.png?width=185&height=50&name=Full%20Passion.io%20logo%20(white).png)
IN THIS ARTICLE
1. Kick-off iOS App set-up process
2. Grant Access to Passion.io
3. Connect your Apple Developer Account
4. Create your App
5. Setup your App Details
6. Preparing Apple App for Submission
7. Review and submit your App for Apple Review
1. Kick-off iOS App set-up process
- Log in and go to My App.
- Publish Your App > Apple App Store.

- You'll see if there are issues that might delay your submission process. Example:
-
- Default content is still displayed in your app (use original content only).
- Confirm that you have completed the Product Setup Checklist.
- Click on CREATE MY MOBILE APP.

- Enroll in the Apple Developer Program and select Manually Connect.

If you do not have an Apple Developer Account yet, follow these steps to enroll in the Apple Developer Program. After payment, Apple will send confirmation within 24-48 hours.
Manually Connect can take up to 60 minutes and requires technical familiarity.
- Click Confirm to proceed with connecting your Apple Developer Account.

2. Grant Access to Passion.io
From your App Store Connect, please make sure to grant access to the below email:
- Go to Users and Access.

- Click on the plus sign as shown below:
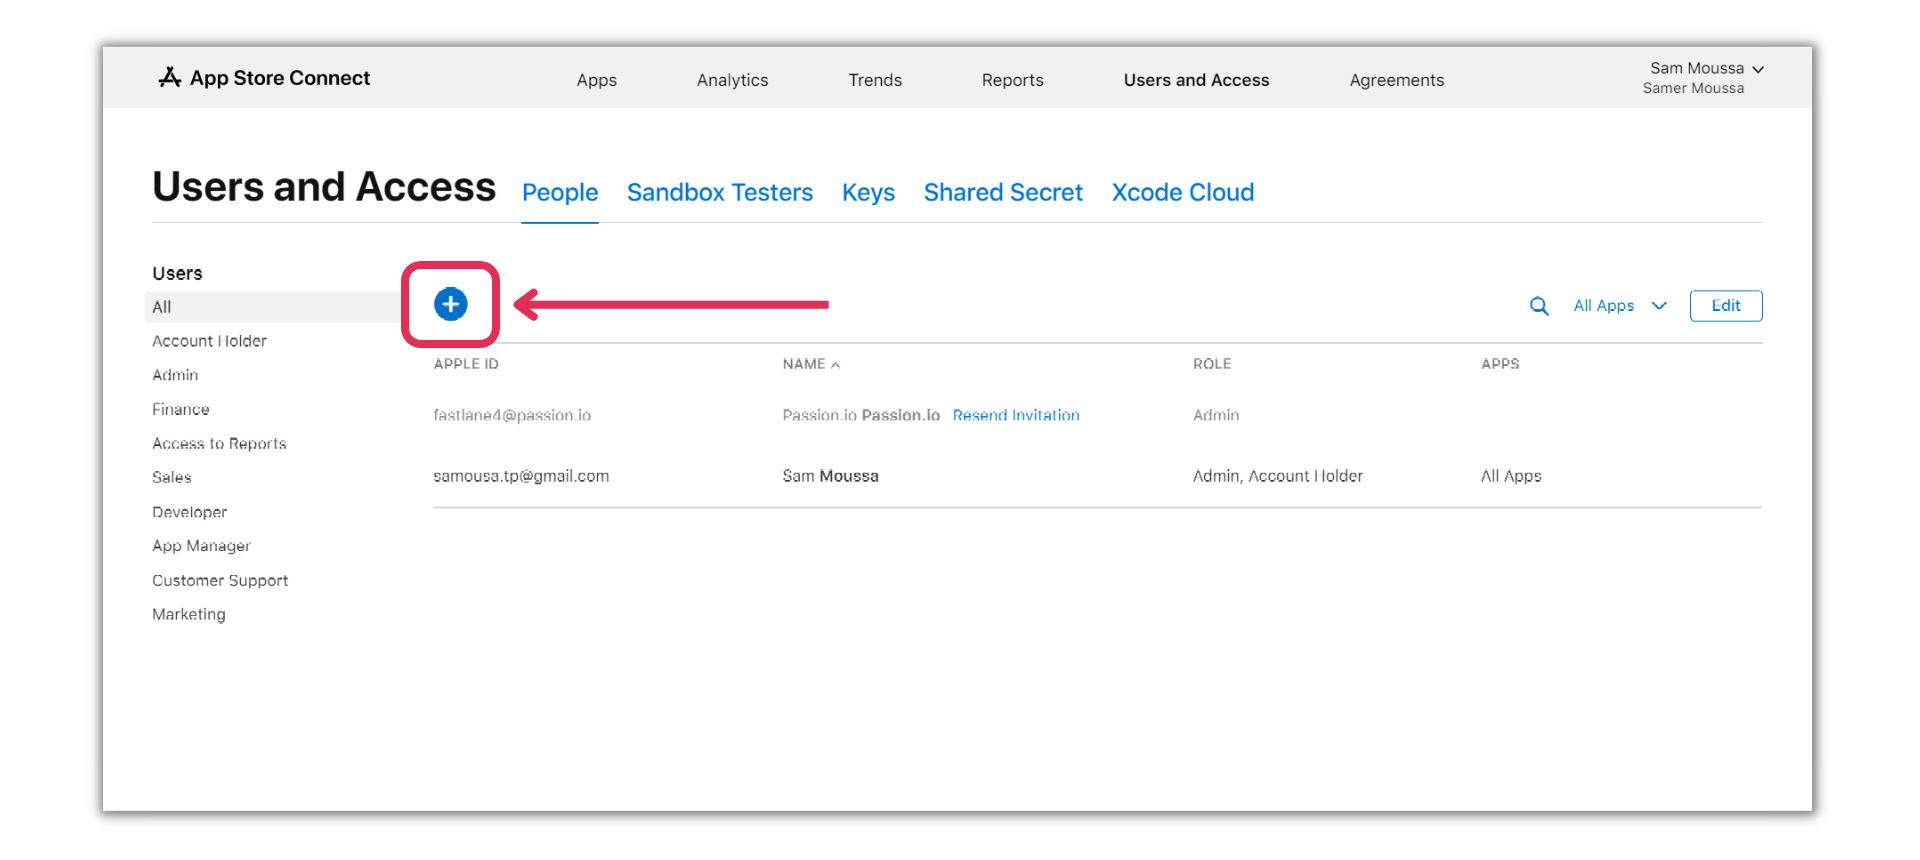
- Once the pop-up appears for the user details, please enter the below:
- First Name: Passion
- Last Name: Passion
- Email: fastlane11@passion.io
- Select the Role to be Admin, automatically all roles and access will be selected.
- Click on Invite after you are done.
-png.png?width=670&height=377&name=integ%20(9)-png.png)
-png.png?width=670&height=377&name=integ%20(10)-png.png)
Please fill out this form right after sending the invite. We can only accept it within 24–48 hours.
Weekend support is limited, we will accept those invites on Monday.
Once you're done, move on to Step 3.
3. Connect your Apple Developer Account to Passion.io
We'll generate vital information for connecting your Apple Developer Account with Passion.io.
We'll get:
-
- iOS Team ID, iOS Team Name
- iOS Key ID, iOS Secret
- iOS IAP API Key, IAP API Key ID
- Issuer ID, API Key ID, and API Key
Make sure that you have already submitted this form.
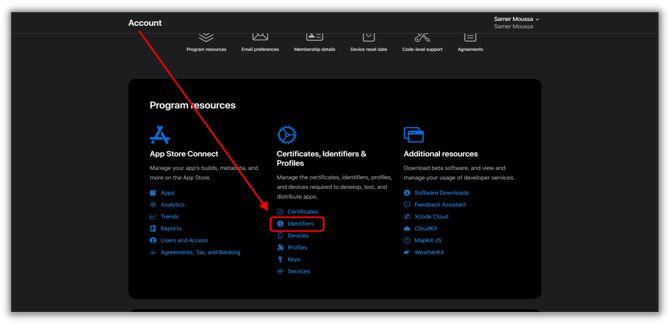
- Log in to your Apple Developer Account.
- Scroll down to Membership details to get the Team ID ⇒ to be pasted in iOS Team ID field in the Passion platform.
- For Individual Accounts, the iOS Team Name can be found under your account name ⇒ to be pasted in the iOS Team Name field in the Passion platform.

-
- For Corporate/Company/Organization Accounts like the below screenshot, the iOS Team Name can be found under Membership details ⇒ Entity name.

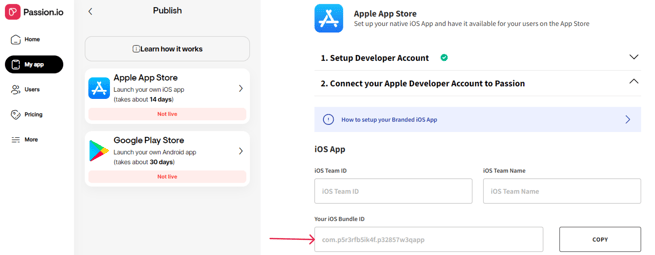
- From the Passion.io platform, go to Publish My App>Apple App Store
- Take note of your iOS Bundle ID as we will need to add it to your Apple Developer Account.
- Log in to your Apple Developer Account.
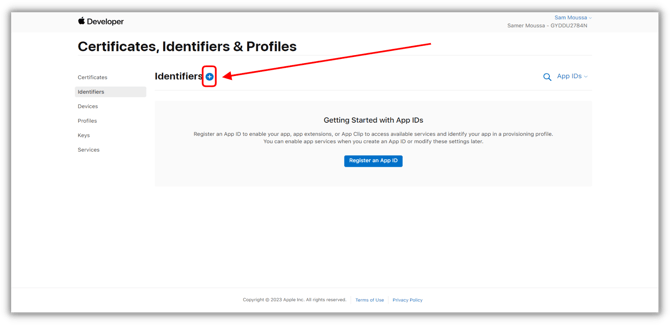
- From Certificates, Identifiers and Profiles click on Identifiers.
- Click on the + sign.
- Select App IDs then click Continue.
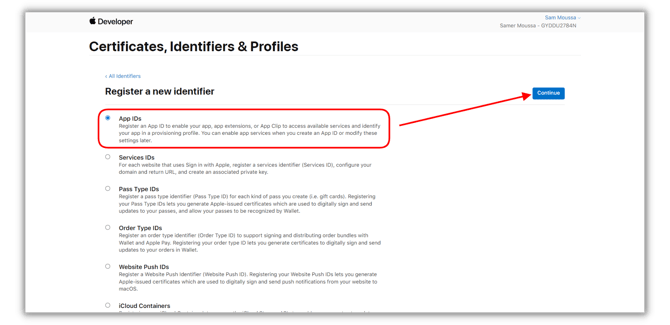
- Select the App icon then click Continue.

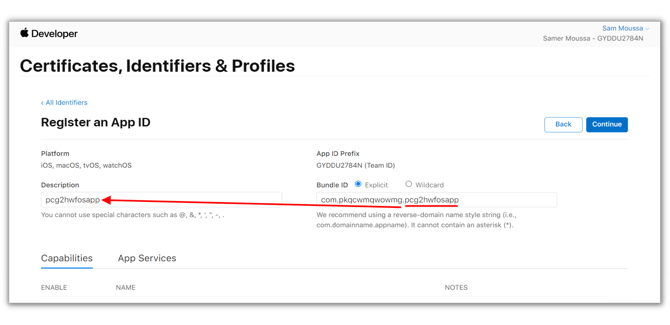
- In the Bundle ID field, paste the iOS Bundle ID.
- In the Description field, paste only the last part of iOS Bundle ID. The part after the dot.
- Example:
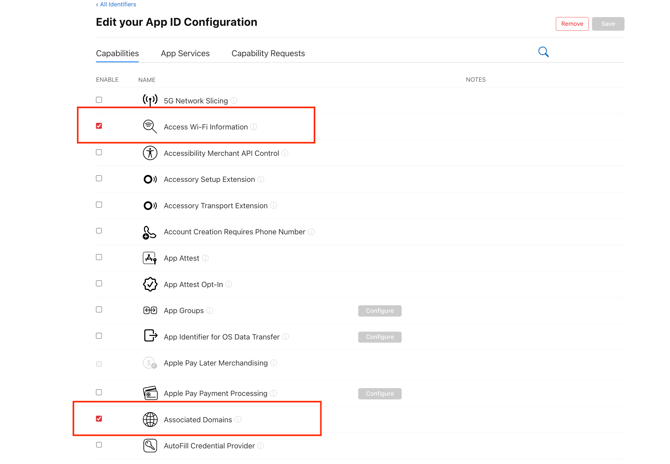
- Scroll down to Capabilities, mark on the below:
- Access Wi-Fi Information
- Associated Domains
- Scroll down further and mark on the below:
- Push Notifications and Broadcast Capability
- Sign In with Apple

- Select Save in the top right and proceed with Register.
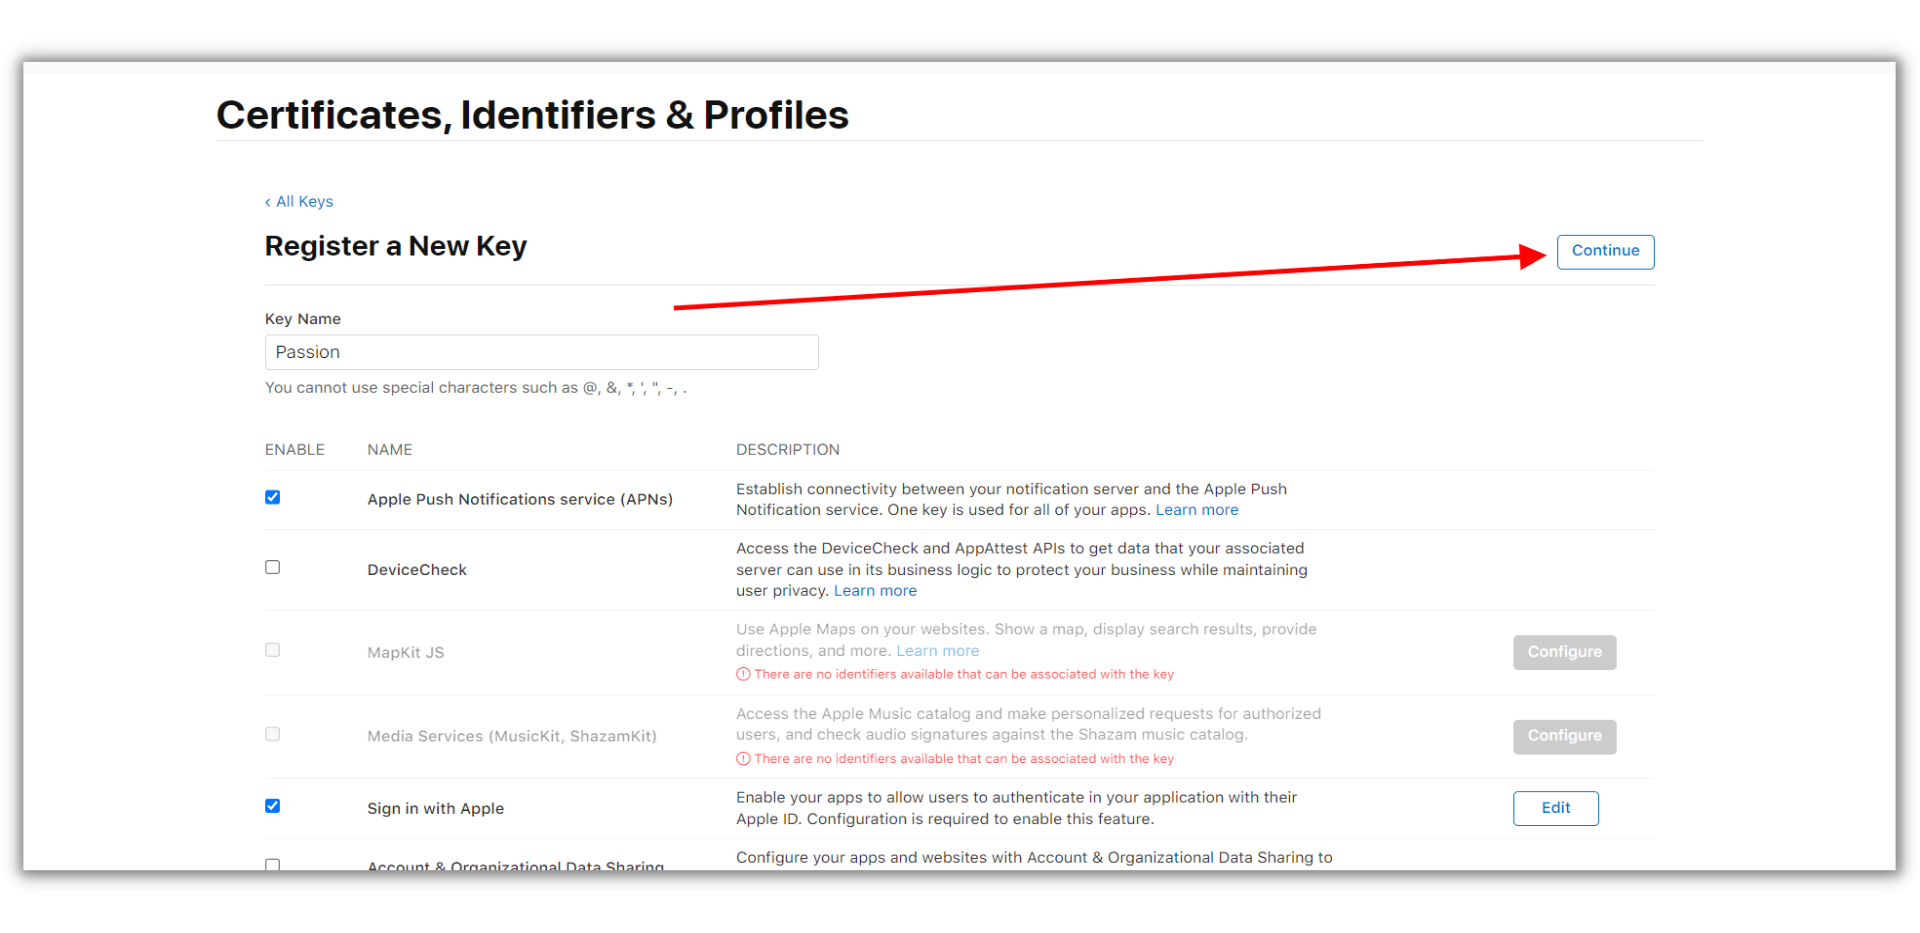
- Click on Keys and click on Create a Key or click on the + sign.
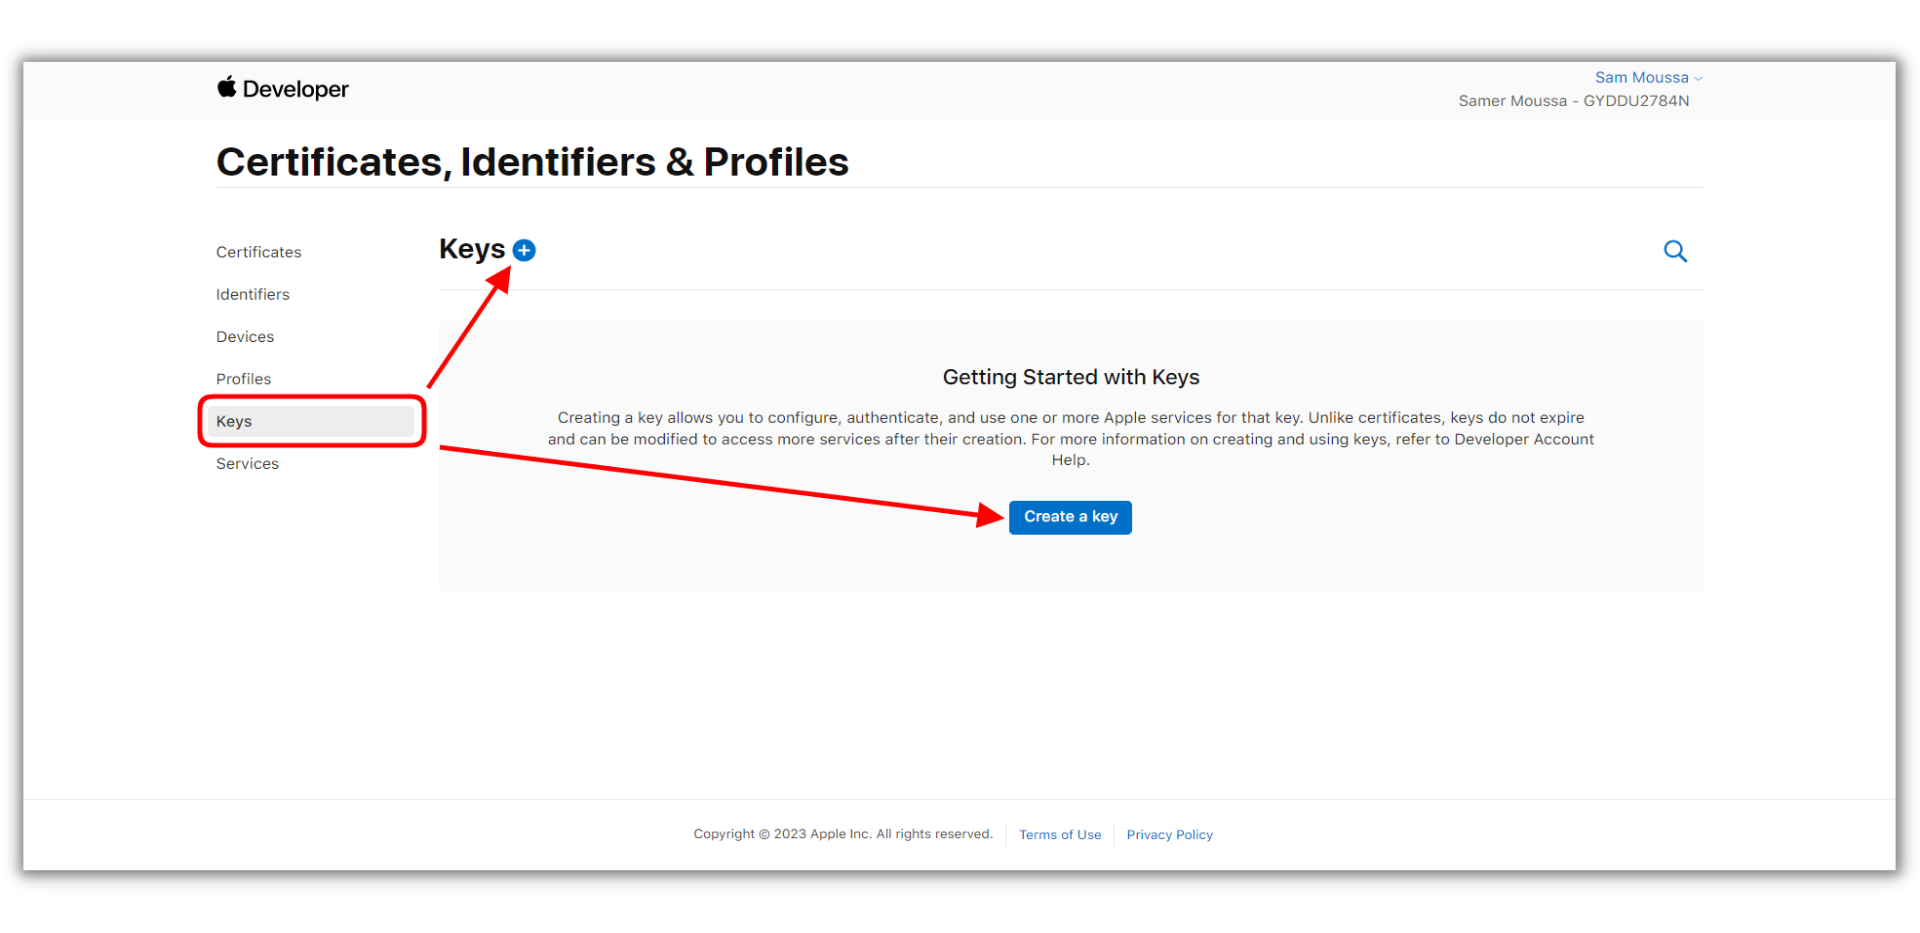
- Create a name for this key, it could be anything you desire.
- Mark on Apple Push Notifications service (APNs)
- Mark on Apple Push Notifications service (APNs)
-
-
- Click Configure beside APN
-
- Update the Environment to Sandbox & Production (important!)
- Click Save

- Click on Continue.
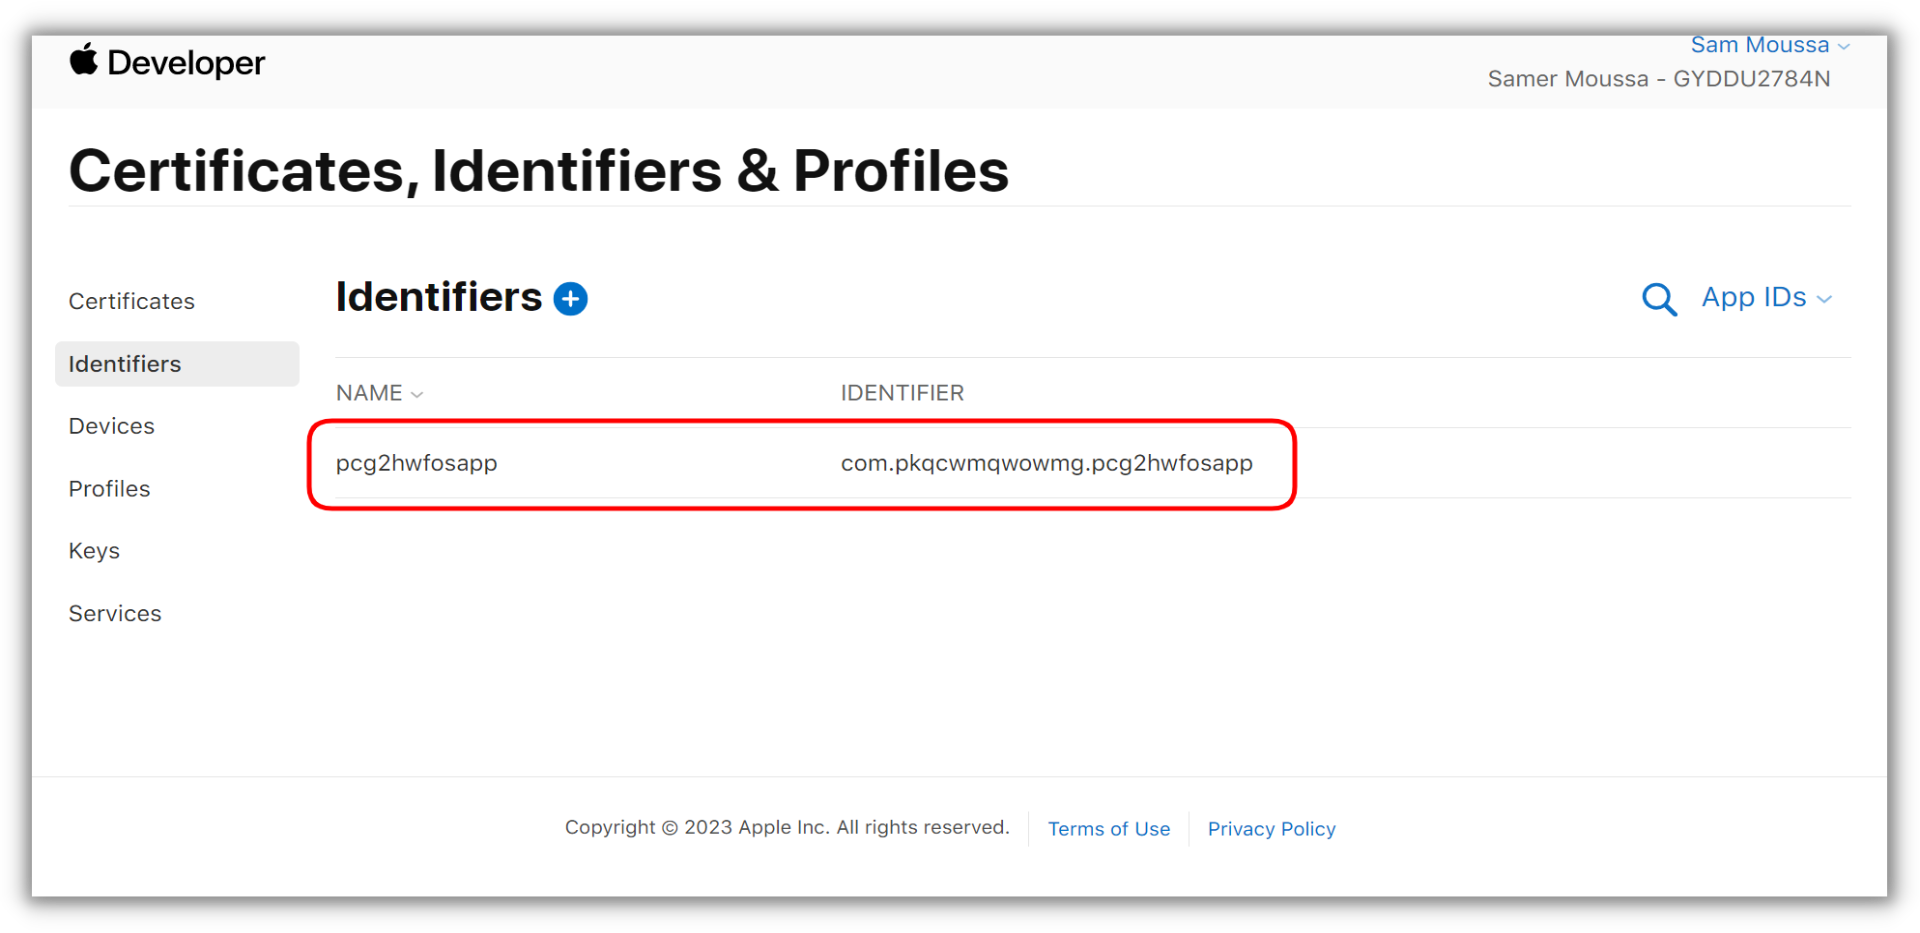
- The button will turn to Register, click on it once it does.
- This is how your iOS Bundle ID should look after a successful registration.
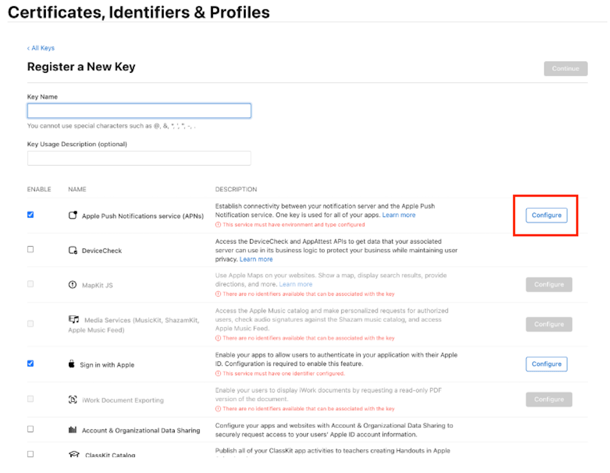
- Mark on Sign in with Apple.
- Click on Configure to select the iOS Bundle ID as an identifier.
- Select the Identifier then click on Save.
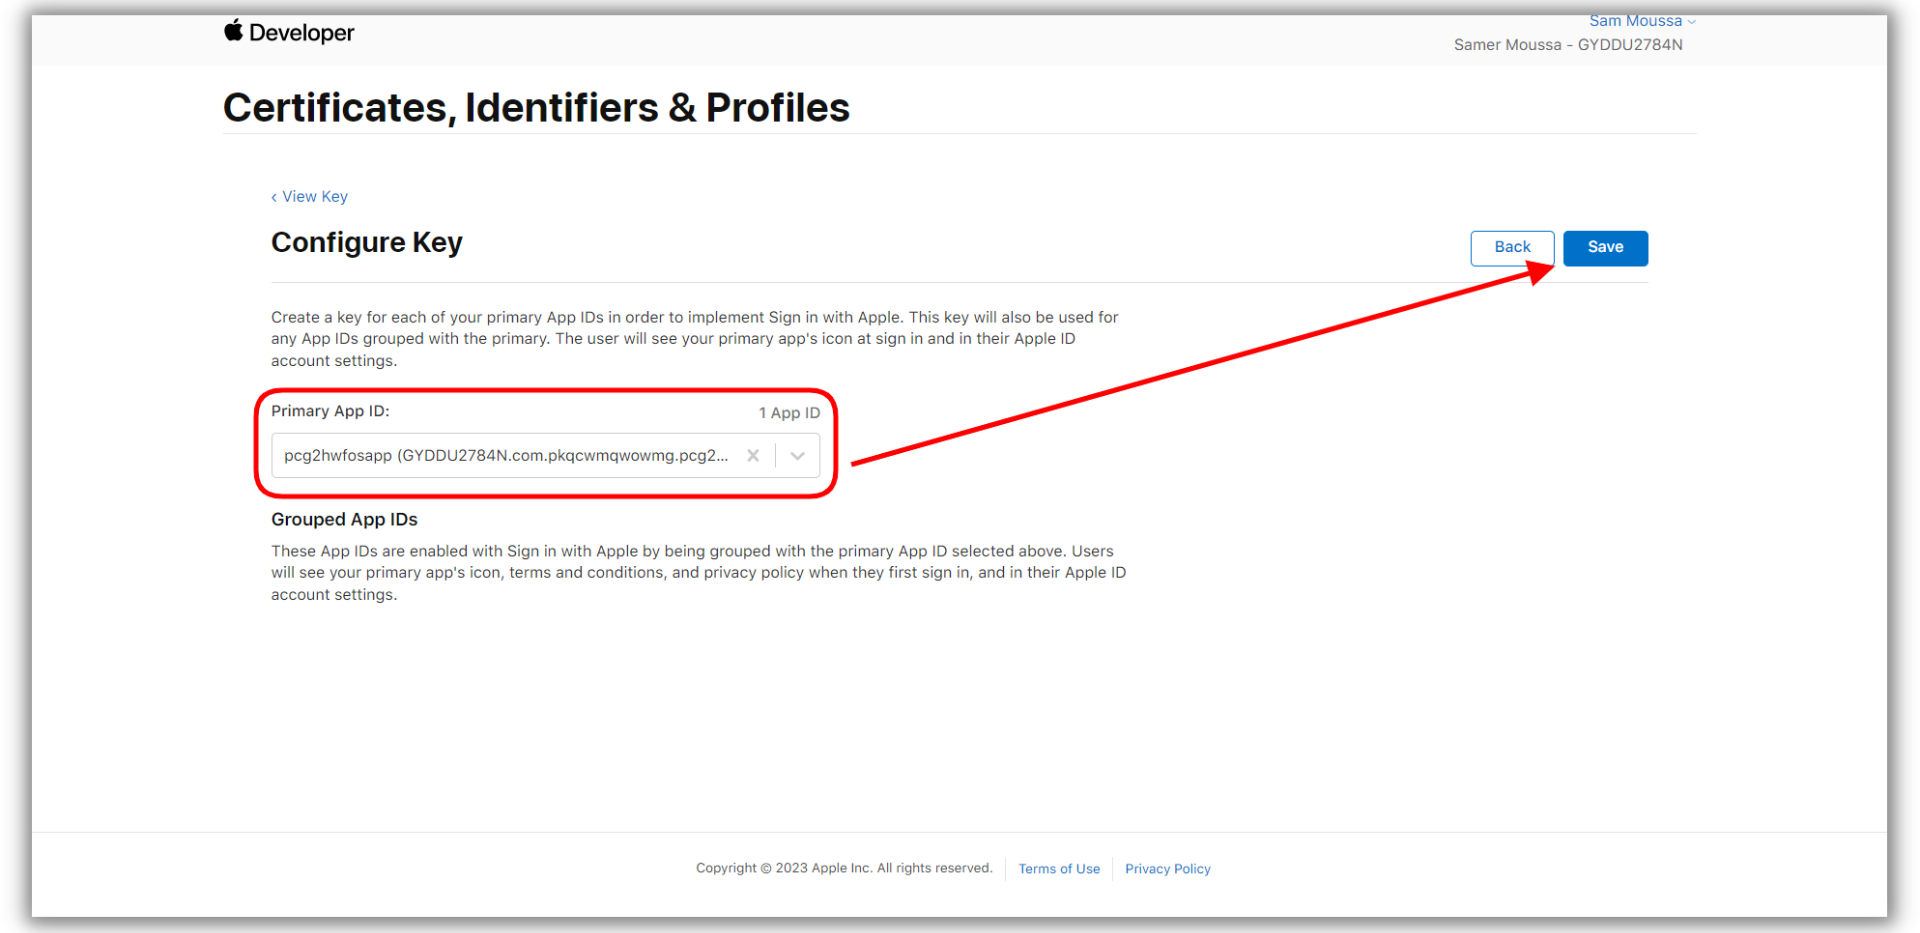
- Once you are redirected to the Key Registration Screen, click on Continue.
- A confirmation screen will appear, click on Register to confirm the key registration.
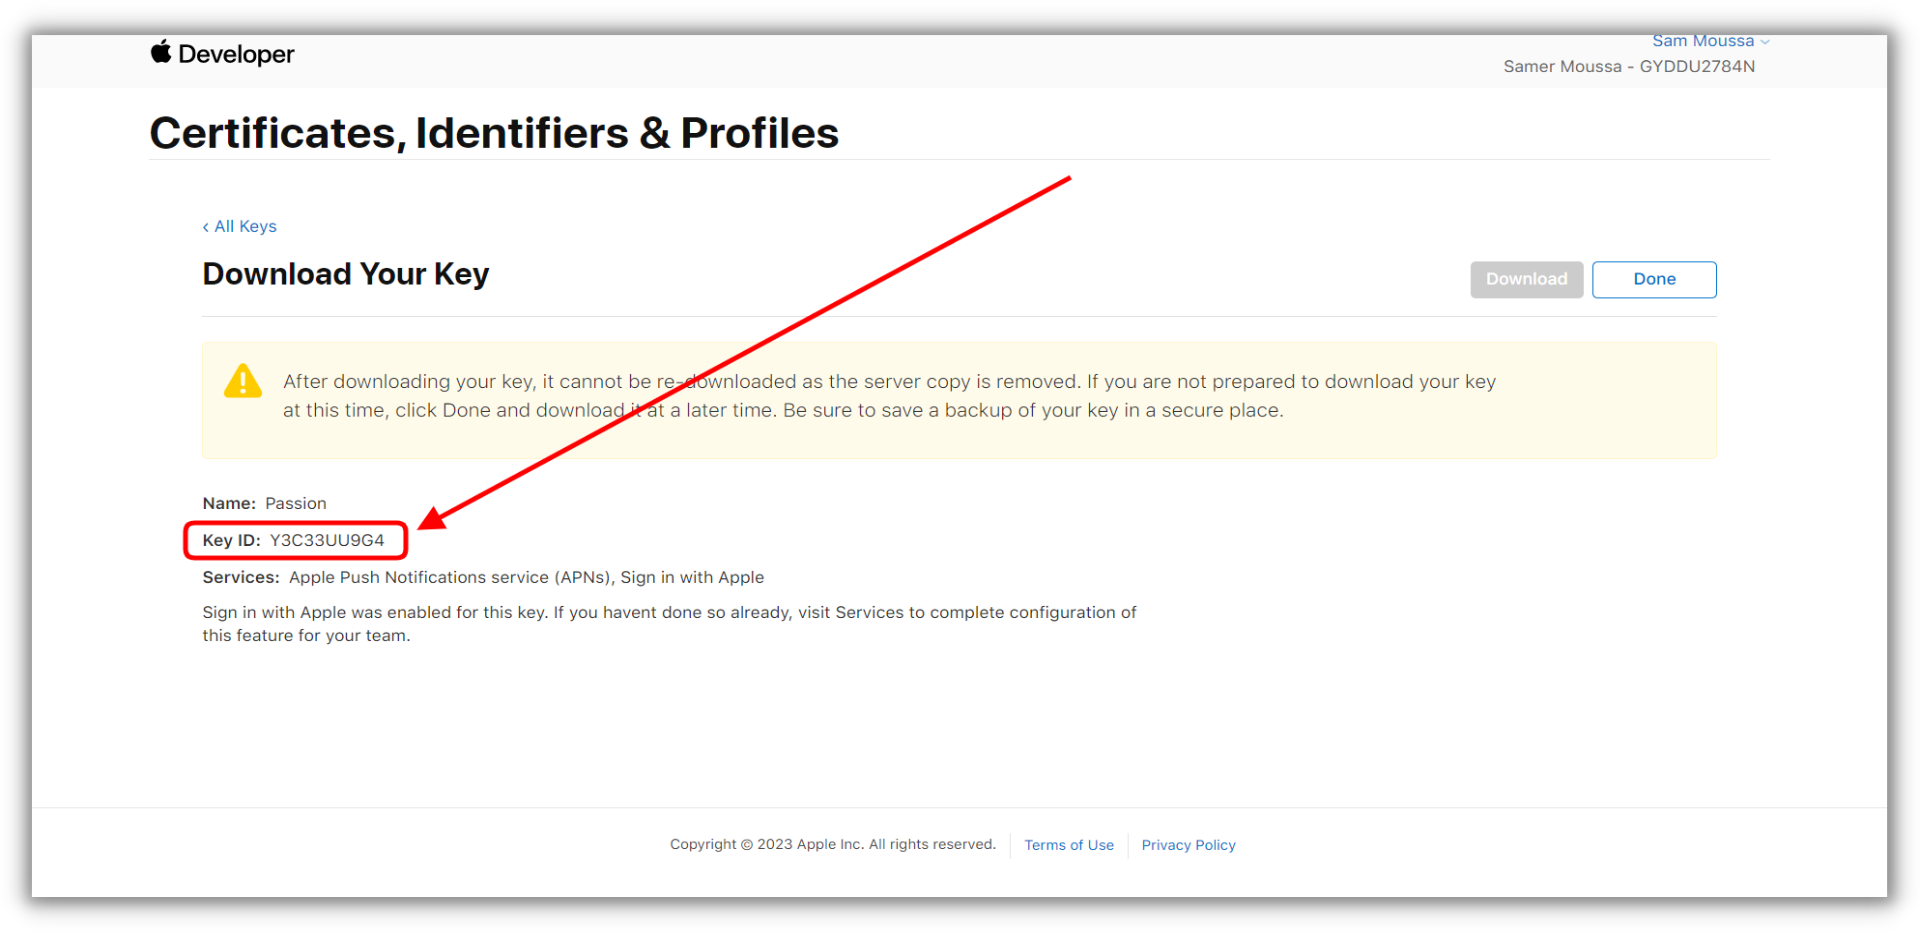
- Download the created key and mind its location on your computer. Don't try to open the file as your system will not be able to read it.
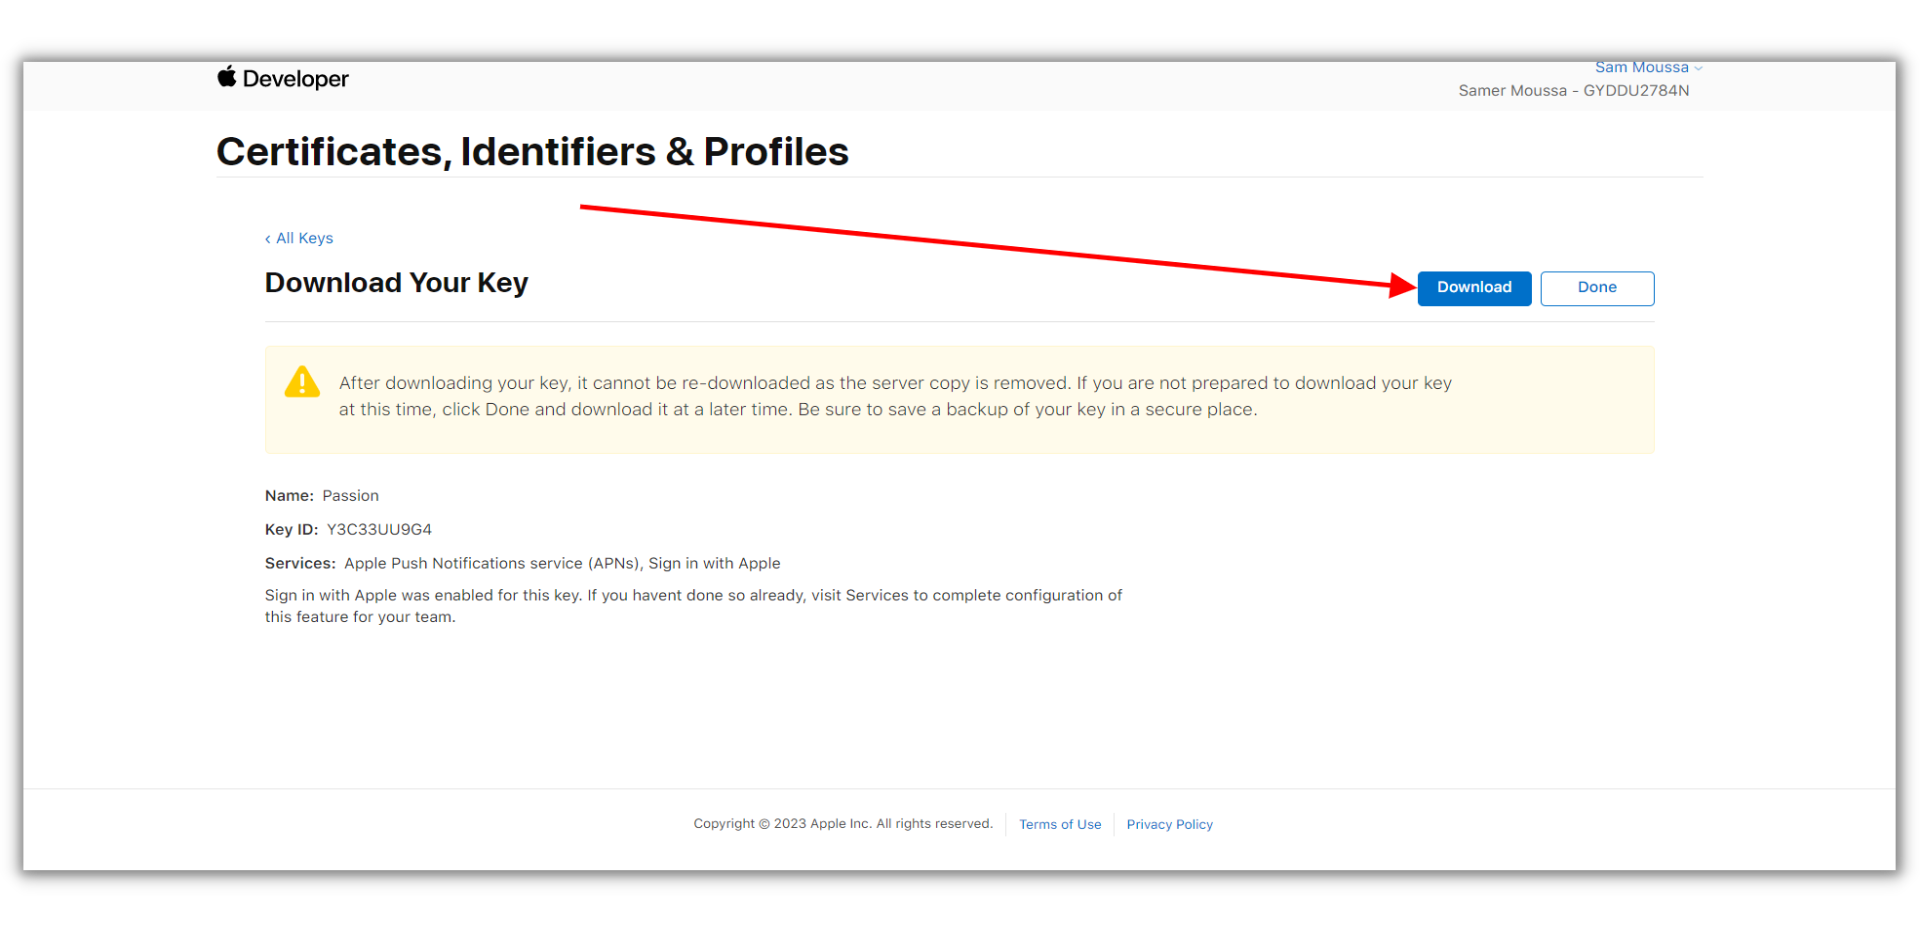
- It is very important to copy the Key ID to your sticky notes or notepad as we will need it later in the Passion.io platform.
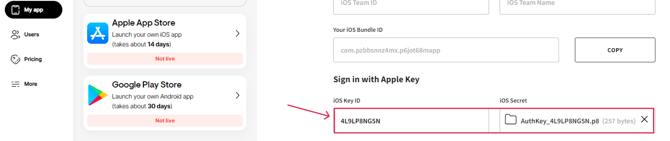
- From your Admin View, upload the downloaded file to the iOS Secret field and paste the Key ID.
- It is important to upload the file and paste the Key ID in this form.
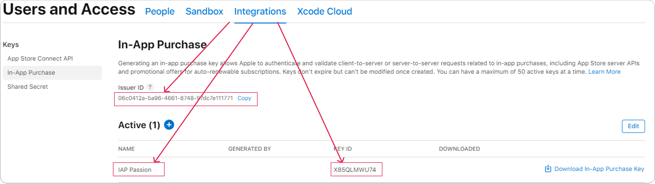
- Now, log in to your App Store Connect account and click on Users and Access.
- Click on Integrations then click on Generate In-App Purchase Key.
.png?width=655&height=248&name=Group%2026%20(1).png)
- Type in IAP Passion in the name field.
- Click Generate.
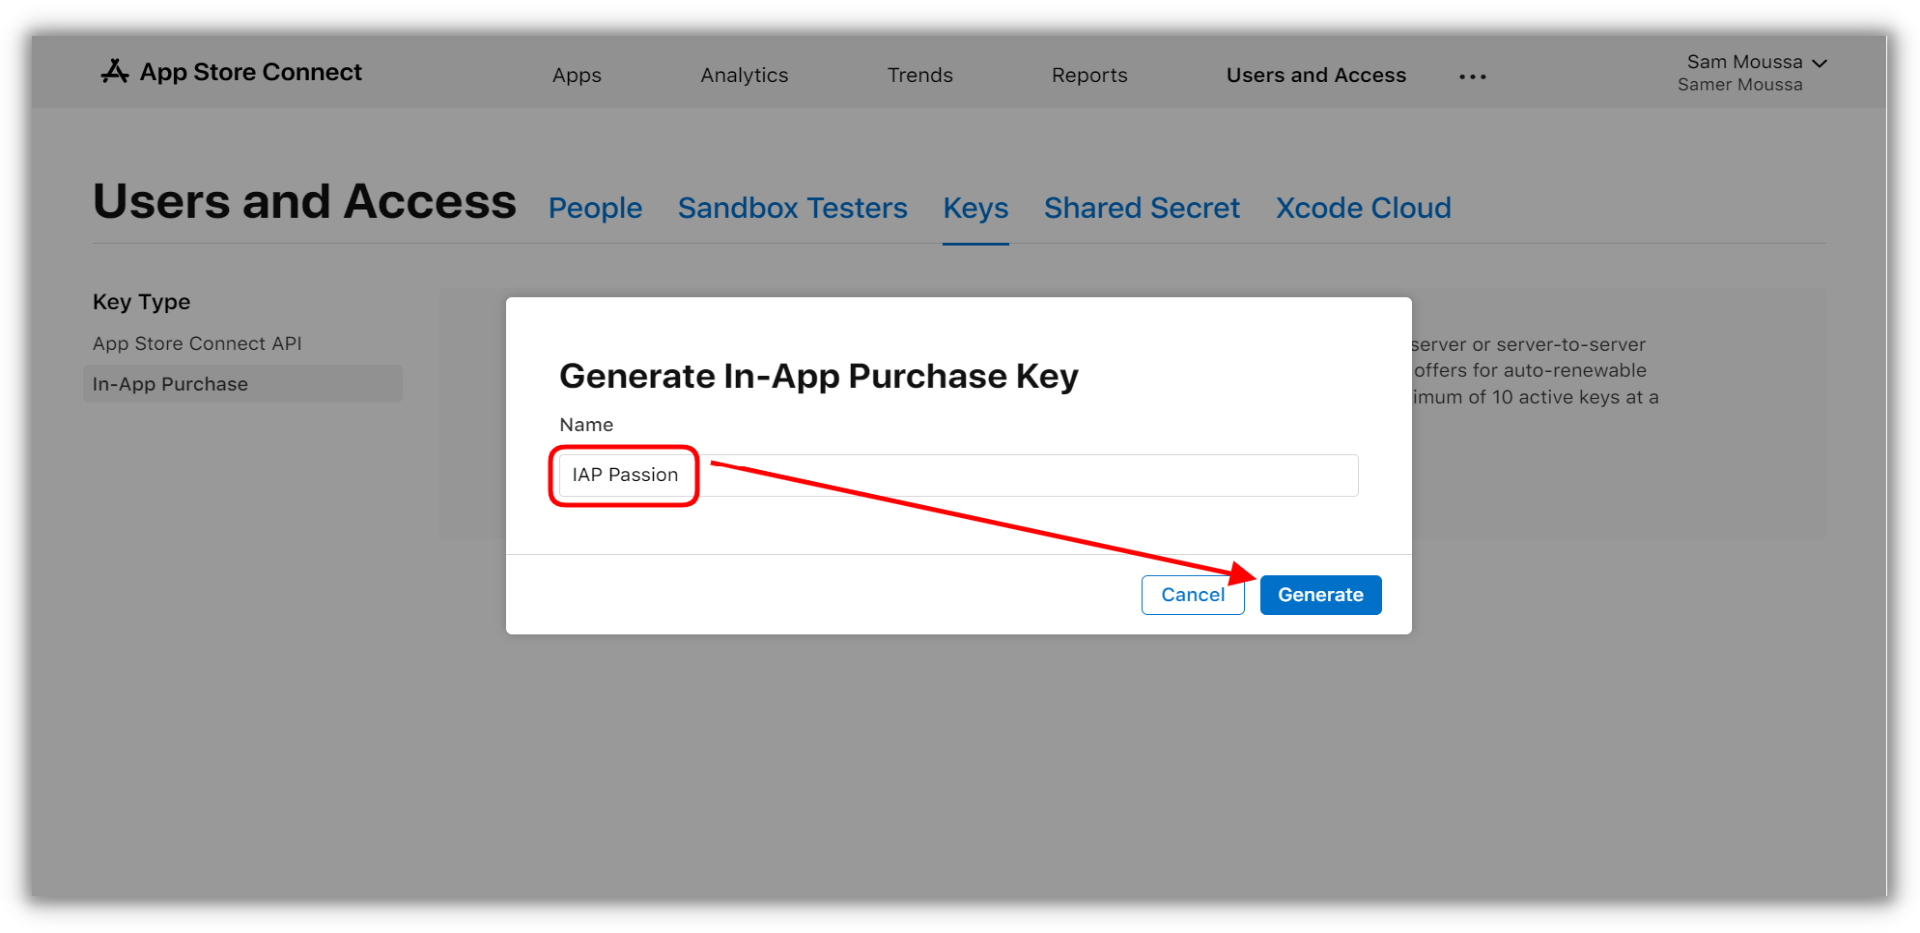
- Once the key is generated successfully, click on Download In-App Purchase Key.
- Copy the Key ID to a notepad as we will need them to be added to your Passion.io platform. This Key ID is dedicated to the IAP In-App Purchase Field.
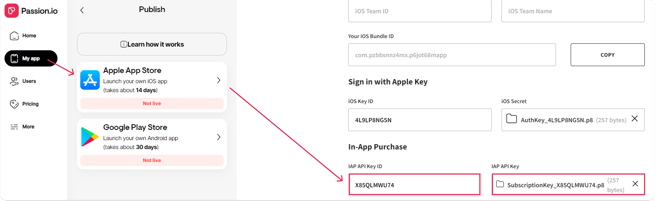
- Go to the Passion.io platform, from My App > Publish > Apple App Store.
- Upload the downloaded key to the IAP API Key field. The format to it starts with SubscriptionKey.
- Paste the copied Key ID related to the IAP In-App Purchase to the IAP API Key ID field.
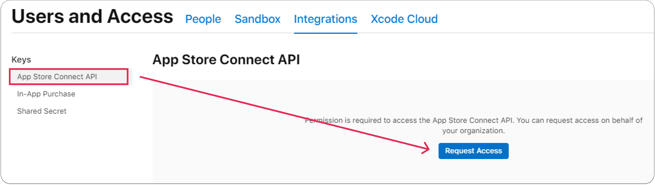
- Navigate back to Users and Access from your App Store Connect account.
- Click on Integrations.
- Click on App Store Connect API.
- Click on Integrations.
-
-
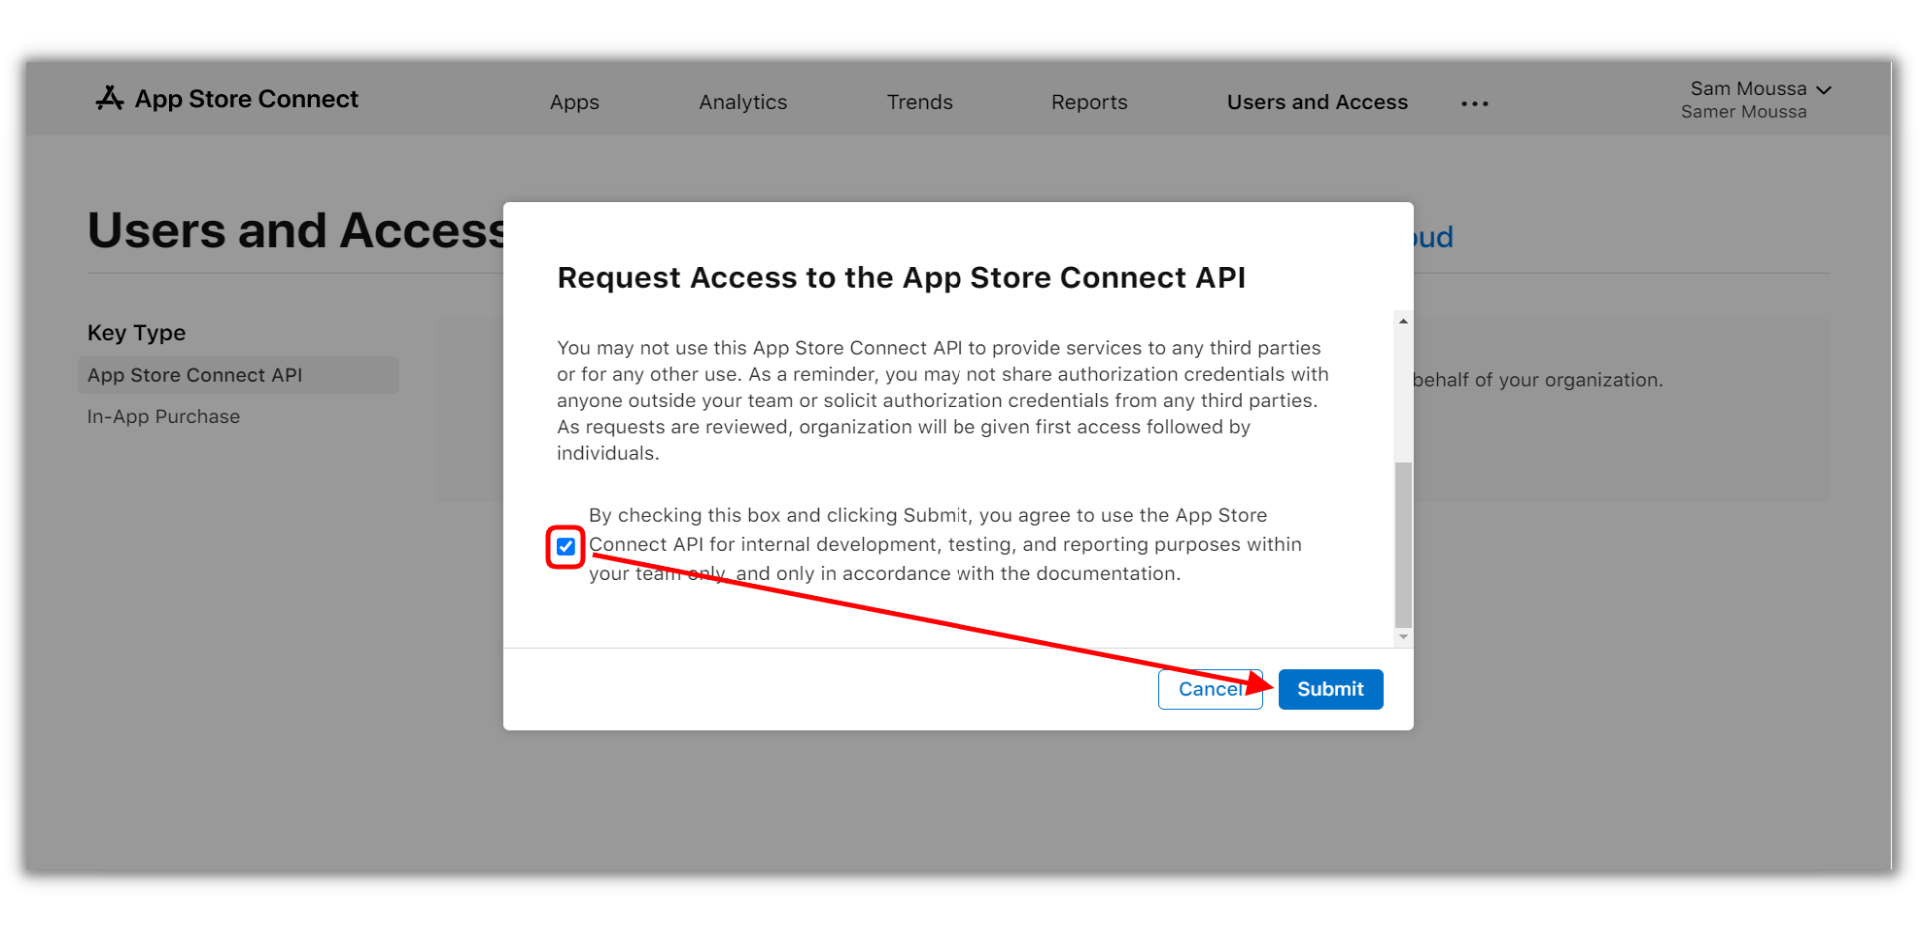
- Click on Request Access.
-
- A pop-up will appear informing you of the usage of this API, scroll down, mark the checkbox and then click on Submit.
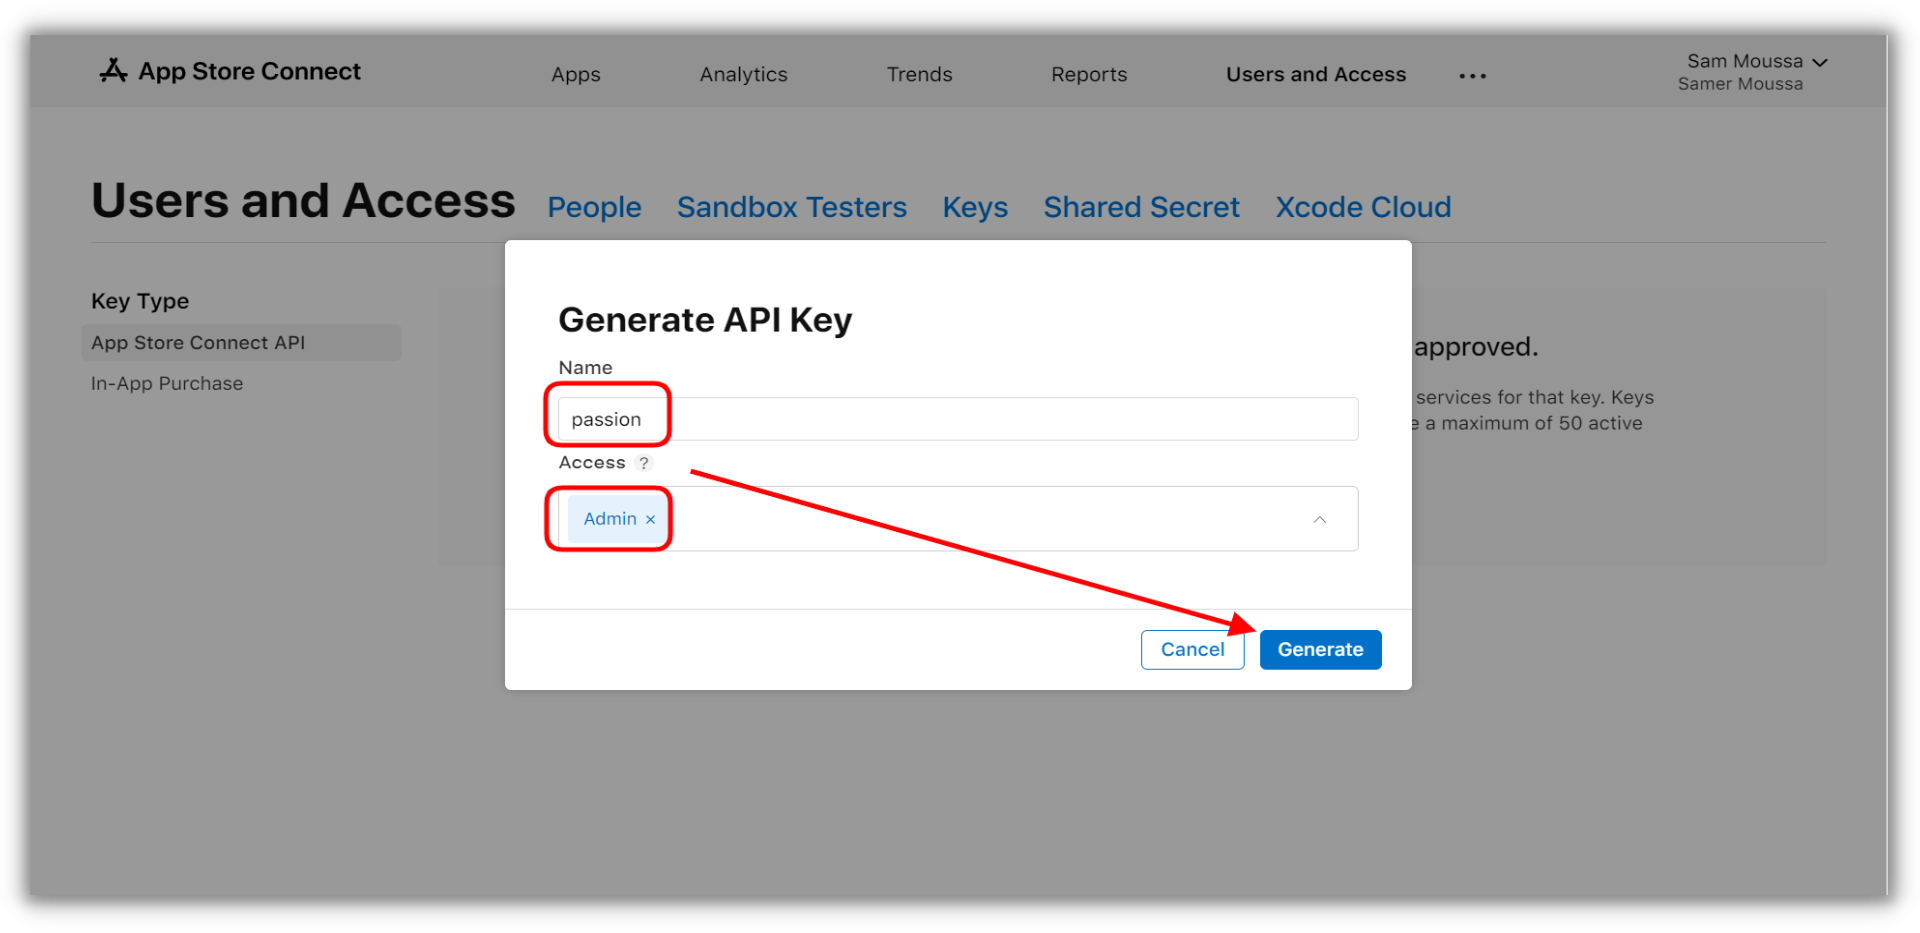
- Enter passion as the name for this API.
- The role should be Admin as shown in the below screenshot.
- Click on Generate.
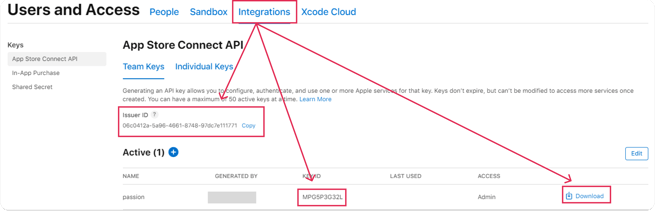
- Download the API Key, then copy and save the Key ID.
- These are important for your Passion.io platform. Remember, the Key ID for the App Store Connect API is different from the earlier IAP API Key.
- Copy the Issuer ID last after generating both keys.
- Go to your Admin Panel, from My App > Publish > Apple App Store.
- Upload the downloaded key to the API Key field. the format for it starts with AuthKey.
- Paste the copied Key ID to the API Key ID field.
- Click on Connect Account to establish the connection between your Apple Accounts and Passion.io.

4. Create your App
- Log in to your Apple Developer Account.
- Below App Store Connect, click on Apps.

- Click on Add Apps or click on the blue + sign.

- Choose iOS for platforms.
- Enter the name of your App.
- English(U.S.) is the primary language.
- Choose whatever you have in the dropdown for Bundle ID.
- Grant Users a Full Access.

- From your Admin View, copy Your iOS Bundle ID and paste into the SKU field on App Store Connect.

- Make sure the Bundle ID and SKU fields match.
- If yes, Click on Create to build your App Shell.
It will take 5-10 minutes for your App Shell to be created.

- Now you can go back to the Passion Platform and click on I have created my App.

5. Set up your App Details
-
Fill out all the details in this section that would reflect on your app in the App Store.
- App Name: The name of your app that will be published on Apple and Google
- App Icon: Upload your app's logo or icon to be shown on your app and will appear as the icon when downloaded to your home screen. (recommended size: 1024x1024px)
- App Description: This text is used in the app stores to advertise your application. It's key to convince users to download your app. We recommend you write a minimum of 50 words. Please make sure to include information about all pricing plans you are offering on your Sales Page (do not include any prices).
- Promotional Text: A summary of your app description
- App Subtitle: A short description of your app
- App Store Category: The category the app will be placed in on the AppStore
- Weapon Content: No weapon content
- App Key Words: Define keywords to help with search optimization
- Support URL: Your support link to your site. You can use https://passion.io/
- Marketing URL: Your marketing link to your site. You can use your Web App URL.
- Privacy Policy URL: Your privacy policy for the app. Use the Passion Privacy Policy.
- Enable Screenshot Builder: enable the use of the screenshot builder to show your app screenshots in the details for users to view before they download.

For more guidance, please check this article: How to Setup your App Details
6. Preparing Apple App for Submission
This step is highly important!
-
You're almost there! Complete the additional steps in this article: Preparing the Apple app for submission.
Proceeding to Submit For Review before finalizing this step will cause review rejections and app-live delays.
7. Review and submit your app for Apple Review
- Please read this first: What do I need to do before I submit my app?
- When done, click on Submit For Review.
- A confirmation screen will pop up to confirm your app submission to Passion.io. Once the review process is started, you will not be able to make changes until the app is Live.

- Once you submit, this sends your App to Passion.io for review.
- We will review your App and update the below timeline for you to know what is the current status.
Important Reminders:
1. You can track the progress of your app by logging in to your Passion.io AppBuilder. Apple app reviews usually will take 7 days or more depending on their review/revision requests.
2. It may sometimes take up to 24-48 hours for your Apple app to be available in the App Store once Apple approves it.

Refer to this article if something went wrong with your latest Apple submission: Apple App Rejections and How to Resolve Them