.png?width=185&height=50&name=Full%20Passion.io%20logo%20(white).png)
How to set up your Google App
Launch your Google App: illustrated steps for easy Setup and Submission.
By following the App Submission steps below, you will be able to set up your Google App and have it available for your users on the Play Store.
To successfully submit your App to be reviewed by Google, we need to make sure that we cover the following points first:
- Set up your own Google Developer Account, click here to learn how.
- Cover each step in the Product Setup Checklist
Important Reminders:
1. Google review process could take up to 7 days or longer depending on their review/revision requests.
2. It may take up to 10 days for Google to list the App once published. This period should be considered in case your App may not show up right away after being published.
IN THIS ARTICLE
- Access your admin panel and go to My App. Click on Publish your App and select Google Play Store from there.

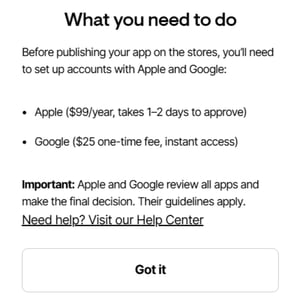
- Ensure you have set up your Google account and click "Got it".
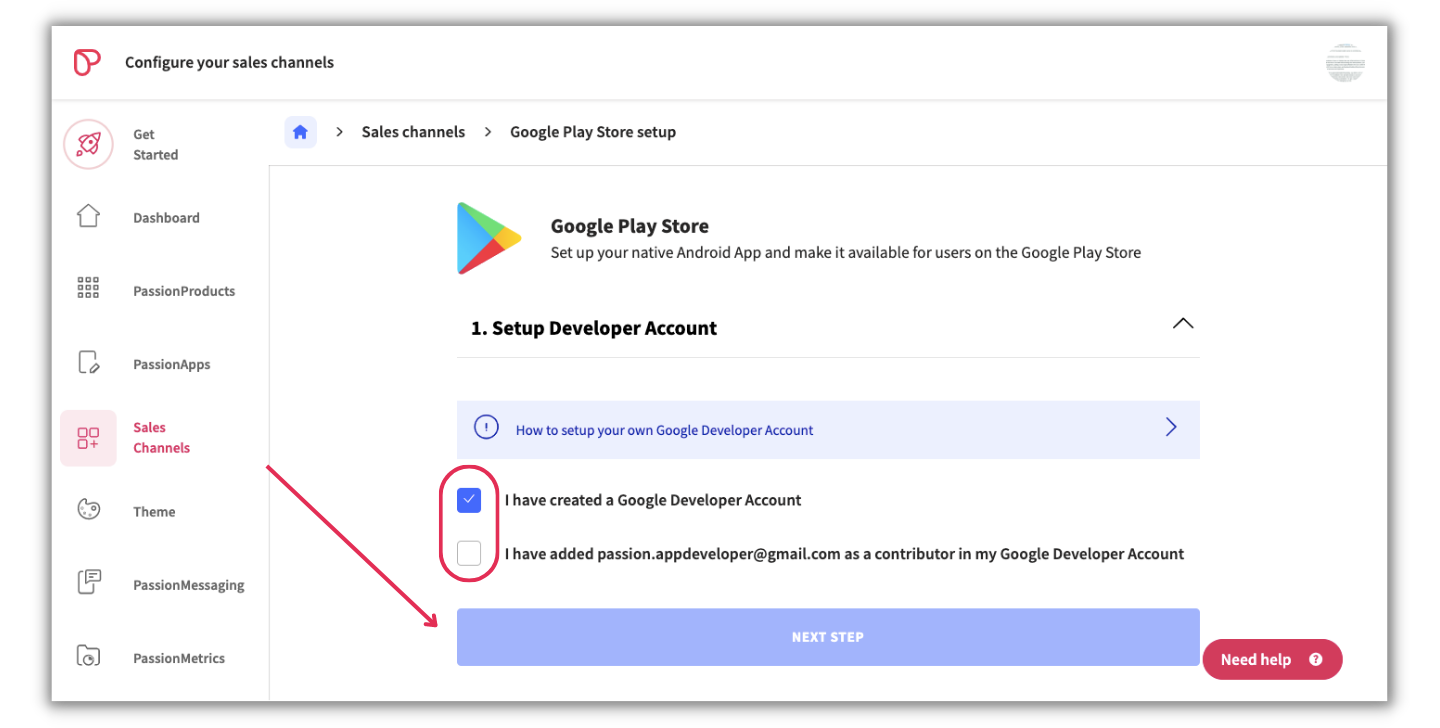
- Once you've set up your Google Developer account, or if you already have one, just check the first box.
Personal Google Developer Accounts: you need to enroll at least 12 testers to test your app for 14 days before you can publish your app and go live.
Organization Google Developer Accounts: you need to apply for DUNS number for your business and add this 9-digit number to your developer account before you can publish your app and go live.
- From your Google Play Console Click on Users and permissions.

- Click on Invite New Users.

- Use this Passion E-mail in the invitation box fastlane9@passion.io

- From Account Permissions, provide Admin Access (all permissions) to this new user.
- Once done click on Invite user from the bottom right corner.

- Your Invitation will take 24 hours to get accepted, yet this won't stop you from proceeding with the upcoming steps.
- Once the invitation is accepted it would look like the below example.

It is very important to fill out the below Typeform once you are done with the user invitation.
In this step, we will create your App details on Passion.io to sync later with the App Shell on Google Play Console.
- Enter your App descriptions.
- Choose the category that your App belongs to i.e. Fitness, Education.

- Scroll down to add your App keywords.
- Marketing URL is your Web App ==> yourappname.passion.io
- Privacy Policy URL can be found under My App ==> Settings ==> Privacy options
-
It is optional to customize your policies.
-
You can update one document, or all of them, or none at all.
-
Default documents will have Passion.io logo, asking you to add your own.
-
Custom documents will have a blue ✔️, asking you to edit if needed.
- Once you customize any of your legal documents, you cannot use Passion.io's default legal information again.
.png?width=635&height=329&name=Settings%20(25).png)
- The first time you opt to edit a custom document, a prompt will appear.
- Read the disclaimer stating that you must indemnify Passion.io and take legal responsibility for any outcomes related to changes in these documents.
- Confirm.

- Make sure to enable the Screenshot Builder.
- Click Next.

Create your Google App Shell:
In this step, we will create the first draft of your App on Google Play Store.
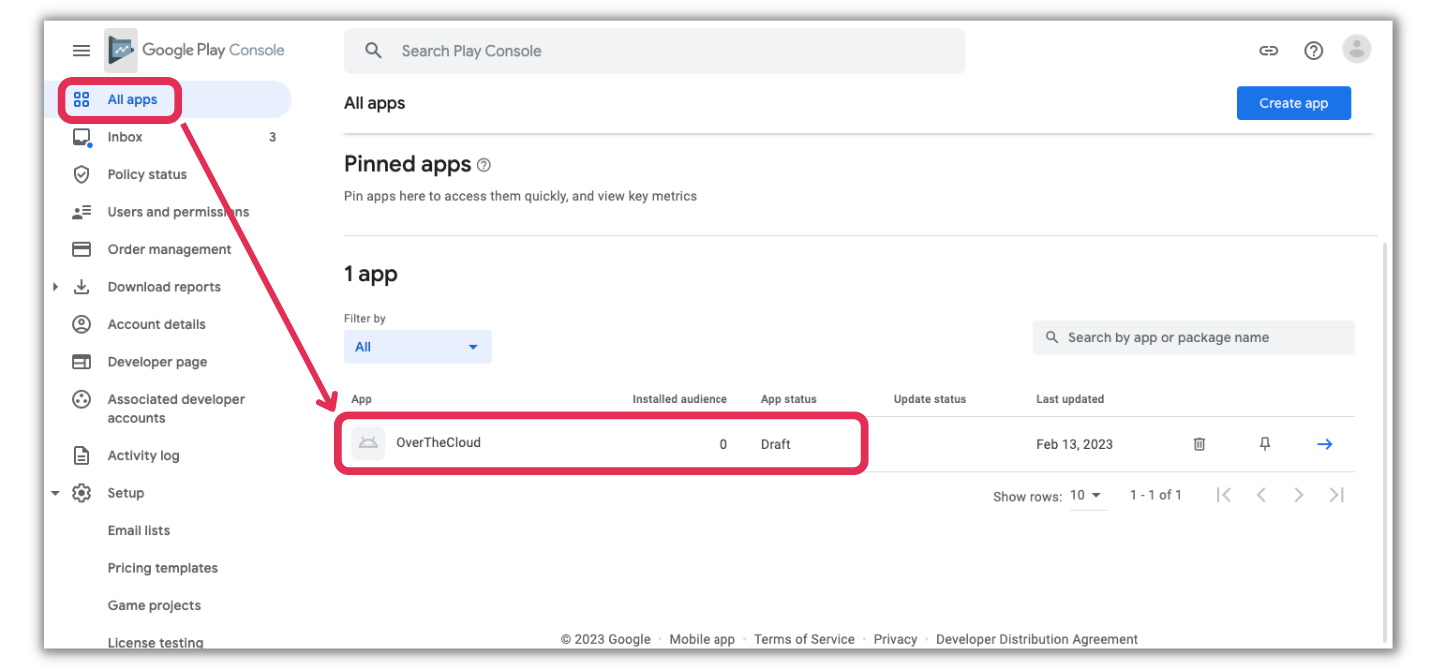
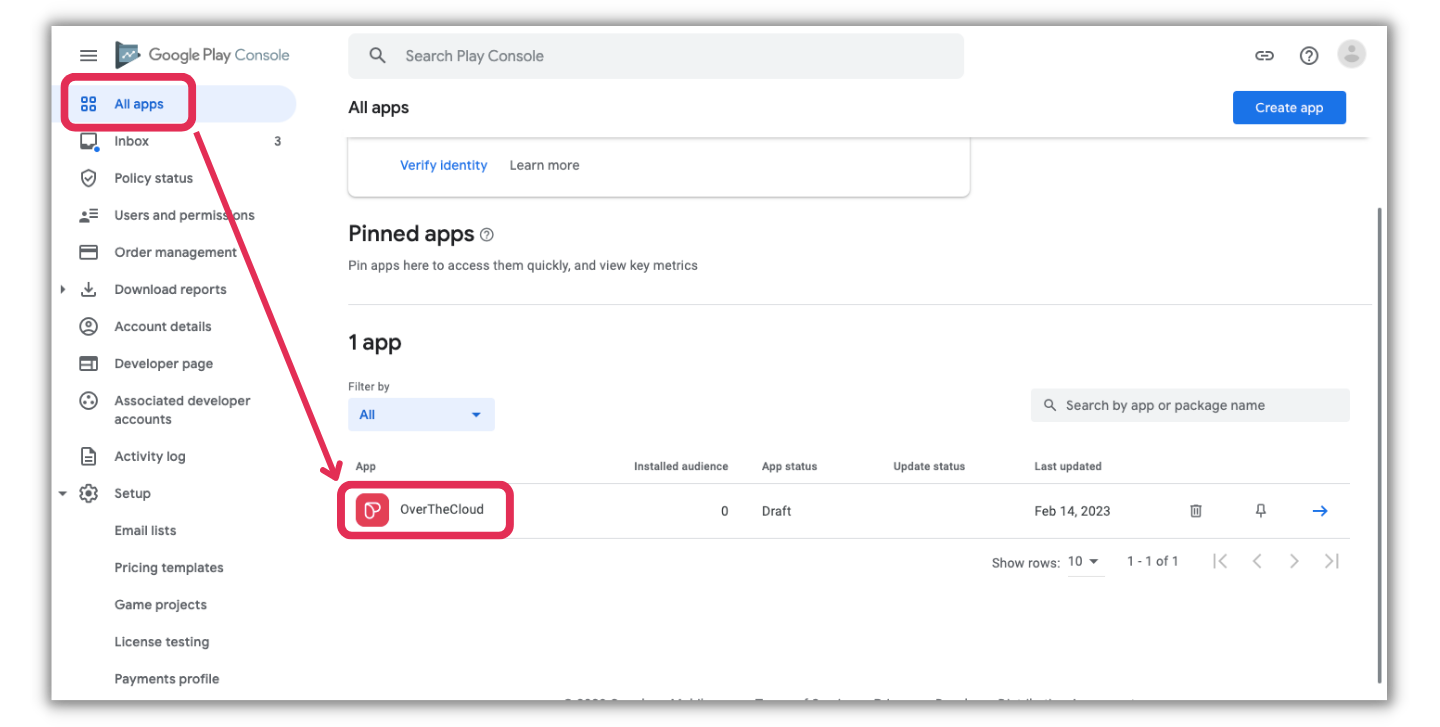
- From your Google Play Console go to All Apps and click on Create app.

- Enter the App Name you desire.
- It is very important to leave the Default Language as English (United States) – en-US. Please do not change it.
- App or Game should be selected as App.
- The App should be created as Free as it is free to download from Play Store.

- Confirm the 3 Declarations as below then click on Create App.

- Once the App Shell is created the page will redirect you automatically to its dashboard.
- From the left side panel, scroll down to Monetize with Play then click on Monetization Setup.
- Scroll down to Licensing to get the Google Play license key.
- Use the copy option on the right of the box and paste it into a document as we will need to use it in your Passion.io App Builder.

- Make sure to paste the GPLK in its field on Passion.io Platform. 
3. Connect your Google Developer account to Passion.io
In this step, we activate your Google Developer Account and create a new Service Account for Passion.io
- Make sure you are logged in incognito to your Google Play Console with the same Gmail for your Google Developer Account.
- Make sure to click on your
- To create a New Service Account User click on your App.
- Click on App integrity ⇒ scroll down and click on Link Cloud project

- Click on Learn more from the new screen that pops up.

- A new page opens, scroll down till you find Go to Manage Resources and click on it.

- From the dashboard find Create a Project from IAM and Admin from the left side panel.

- You will be asked to put in your Project Name, you can enter My New Project or anything you desire.
- Click Create.

- Once created, click on IAM & Admin from the left side panel then choose Service Accounts

- Here is where the Service Account would be, click on Create Service Account.

- In the Service Account Name, type the word passion all lower case then click on CREATE AND CONTINUE.

- Grant the service account access to the project by assigning The Role to be Owner. Click Continue then Done from the end of the page.

- Once the service account is successfully created, you will be directed to the service account listing screen where you will see the new service account as below.

- Under Actions click on the 3-dotted menu, and choose Manage Keys from the drop-down menu.

- Click on ADD KEY then choose Create New Key

- Once the pop-up appears, Leave the key type as JSON then click CREATE. A download will start automatically.
Make sure to remember where the downloaded file is stored as you will need to upload it to your Passion.io Account.

- After creating the key and saving it on your computer, go to Service Account Details.
- Under Details, there's a field that contains an email like the below screenshot.
- Copy the email as you would need it in the next step.

- Go back to the open tab for Google Play Console for App Integrity.
- Select your new project from the drop-down menu. Refresh the page if you can't find your project
- Click on Link project.

- Go back to the Home Page of Google Play Console, and go to Users and permissions ⇒ Invite new users.
- Add the email you copied in the user details.
- From Account permissions grant them Admin Access.
- Click Invite user.

- Once you are done with the invitation, go to Users & permissions to confirm that the account's status is Active.

- Go to Google Cloud Console Home screen.
- Search for Google Play Android Developer API. It should be found under Marketplace.
- Click on it.
- From the New page, click on Enable.
 - Go to Google Cloud Console Home screen.
- Search for Google Play Integrity API.
- Click on the result.
-png.png?width=670&height=377&name=integ%20(7)-png.png)
- Click on Enable.
-png.png?width=670&height=377&name=integ%20(8)-png.png)
Now you have the Google Play License Key from step #2 and the JSON File.
- Go to Sales Channels, and choose Google Play Store ⇒ Continue Setup
- Paste the Google Play license key in the GPLK Field.
- Upload the Key JSON file you just created.
- Click on CONNECT ACCOUNT.

4. Upload your Android App Bundle (AAB) to Google Play
- Once you connect your account and proceed, the Download AAB button will be available.
- Make sure to download the file and secure their location on your computer as it is needed in the next steps.
Note: Wait for the file to finish downloading as it will take a few minutes.

Please do not connect your app now even if you have downloaded and uploaded the AAB file to Google Play, instead, follow the next steps to ensure a smooth app submission process.
Setup your Google Application:
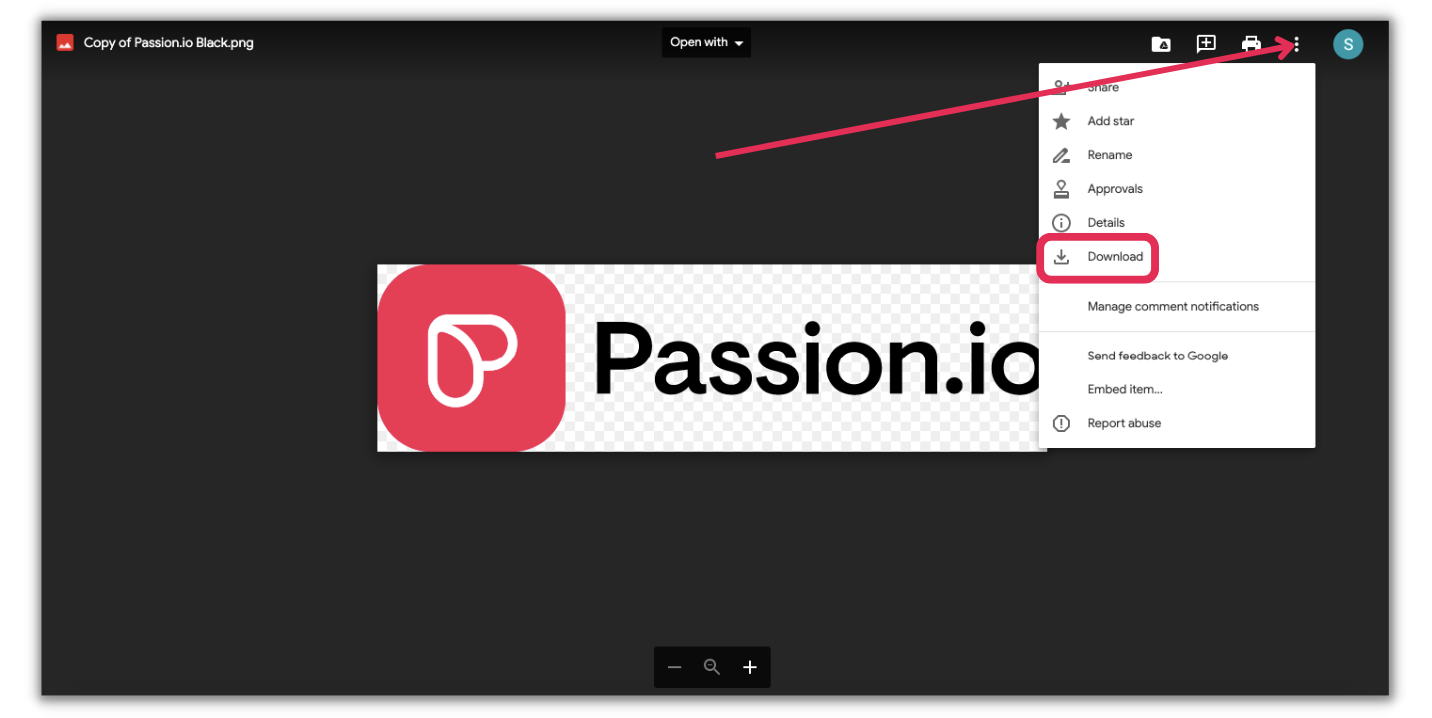
- You will need to download some Passion Resources from here. You will need our logo, Dummy Screenshot 1, Dummy Screenshot 2, and our Feature Graphic.
- Based on what your App is about download only one of the below files:
- Once you open any of the resources above, click on the 3-dotted menu and choose Download.
- Secure the files on your computer as you will need to upload them later on Google Play.
- From your Google Play Console go to All Apps then choose your app.
- From the Dashboard, scroll down to Set up your app and expand View tasks to get the list we will work on.
- This is a set of 12 Mandatory Tasks required by Google to be able to publish your app.
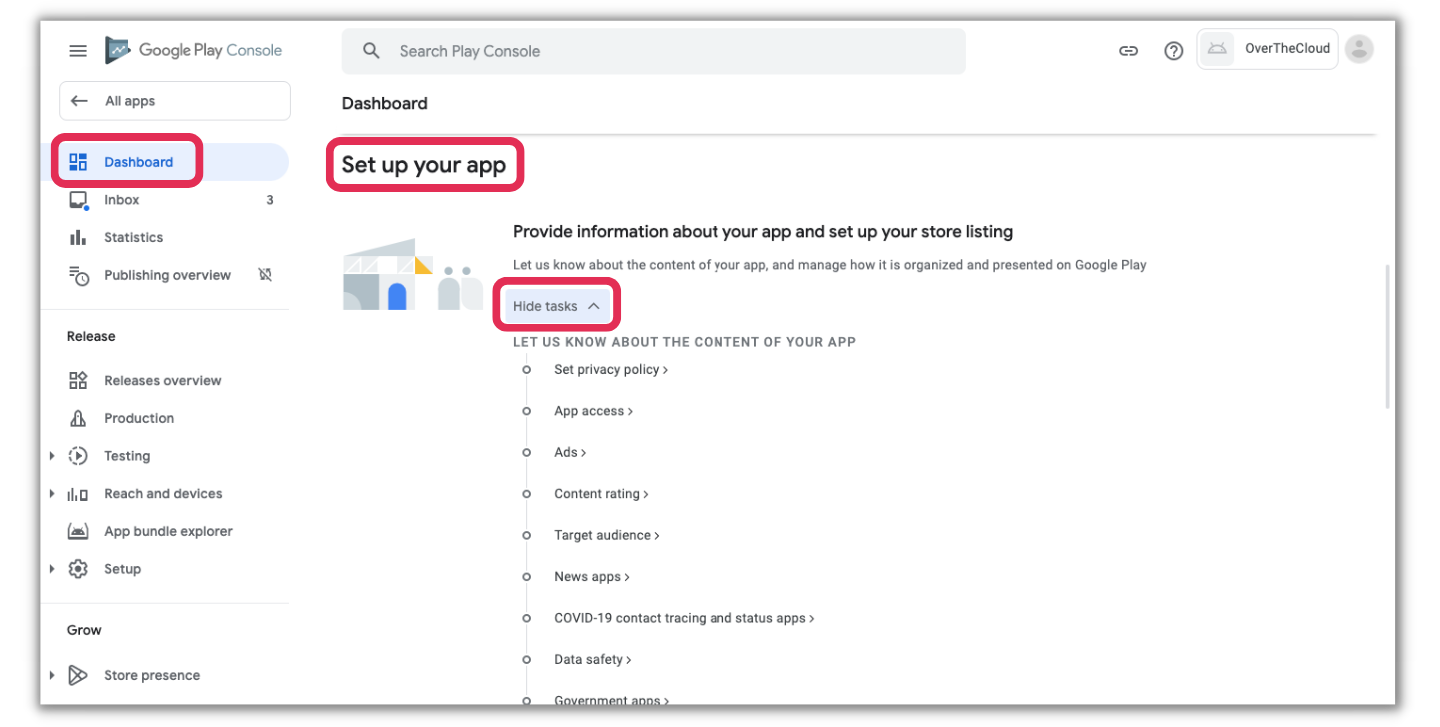
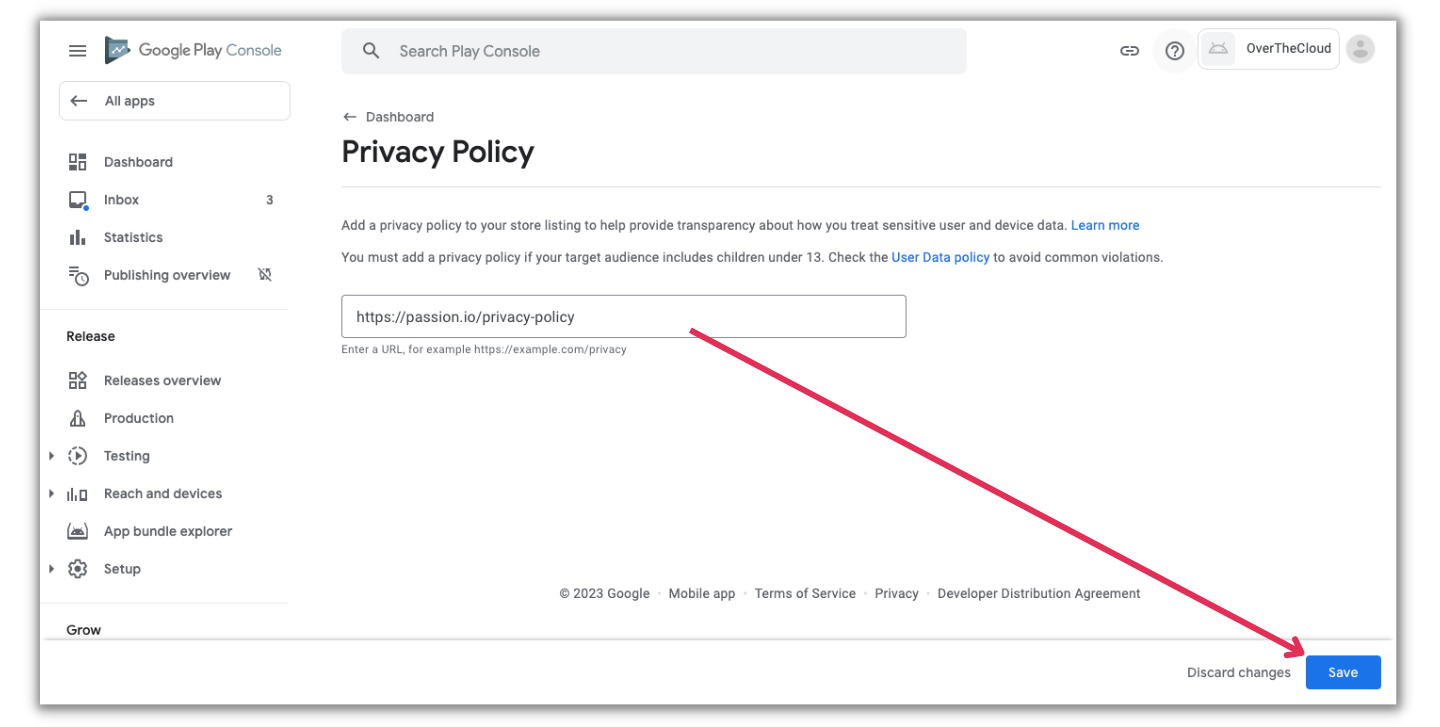
- Starting with Set privacy policy, your link should follow this format: https://yourappname.passion.io/privacy-policy
Example: https://mynewapp.passion.io/privacy-policy
Please do not copy any of the above examples and use them in the privacy policy field; instead, use your Web App URL followed by a / then privacy-policy
- Click Save after you are done. Then, go back to the Dashboard.
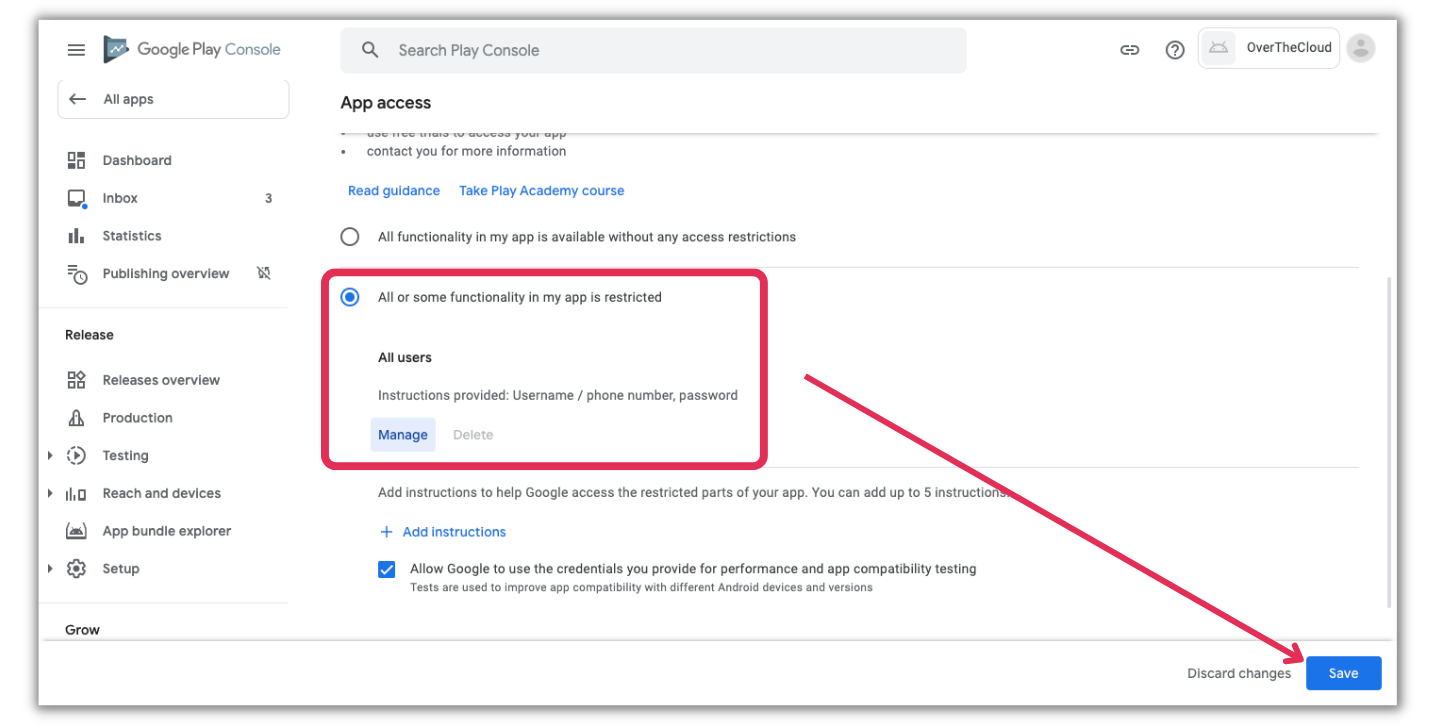
- For App Access, choose All or some functionality in my app is restricted
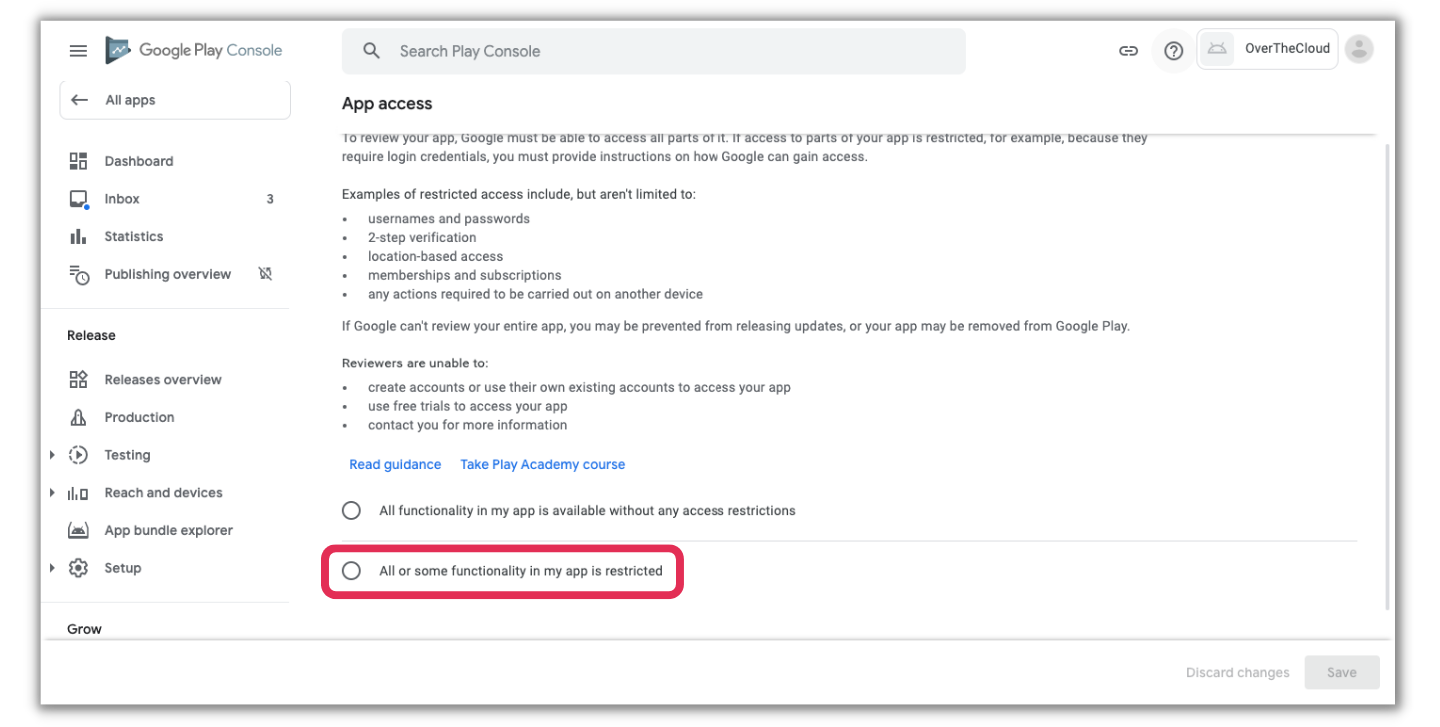
- Once this choice is selected, you will need to Add Instructions.
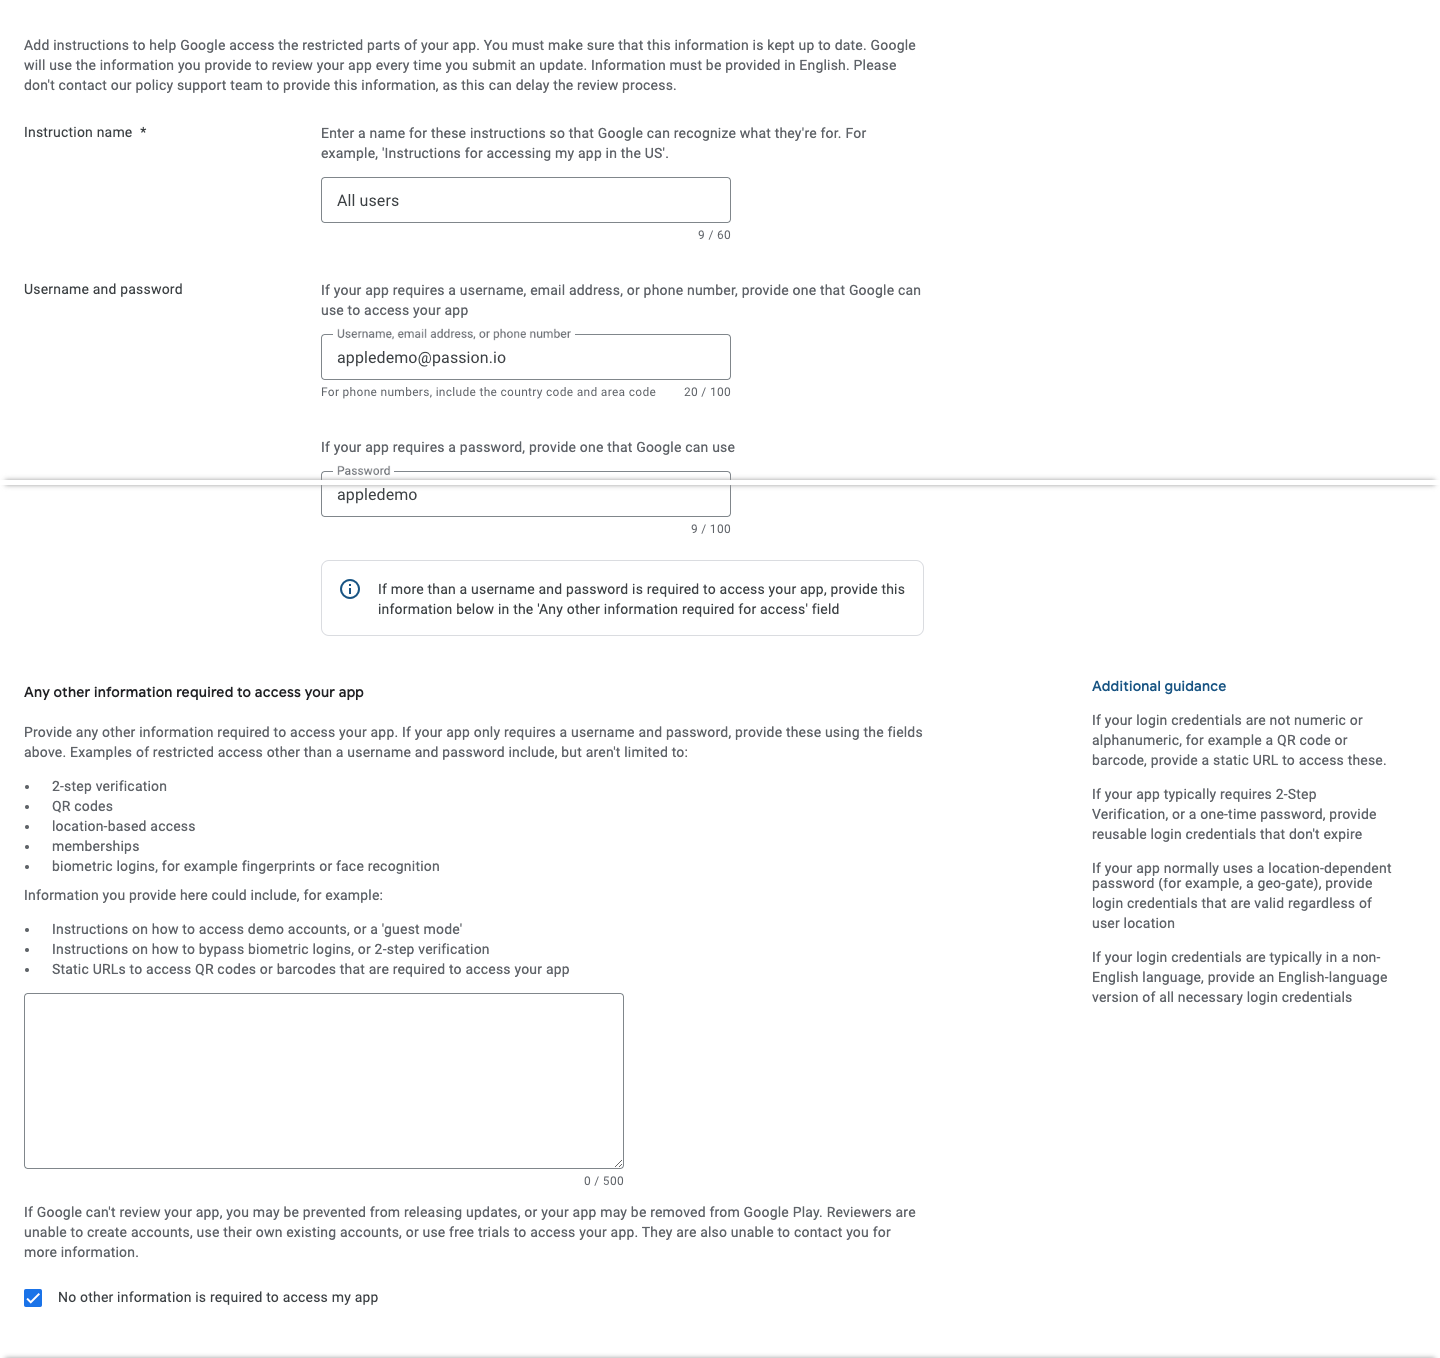
- When you click on Add Instructions, a pop-up will appear that you will be required to fill the below data in.
Instruction name: All users
Username: googledemo@passion.io
Password: googledemo
- Any other information required to access your app section is to be left blank, make sure to check the box for No other information is required to access my app
- Click on Add to save the instructions.
- Below is what the instructions would look like, you can Manage your answers if you make any mistake in this step.
- Click on Save then click on Dashboard to continue with the tasks.
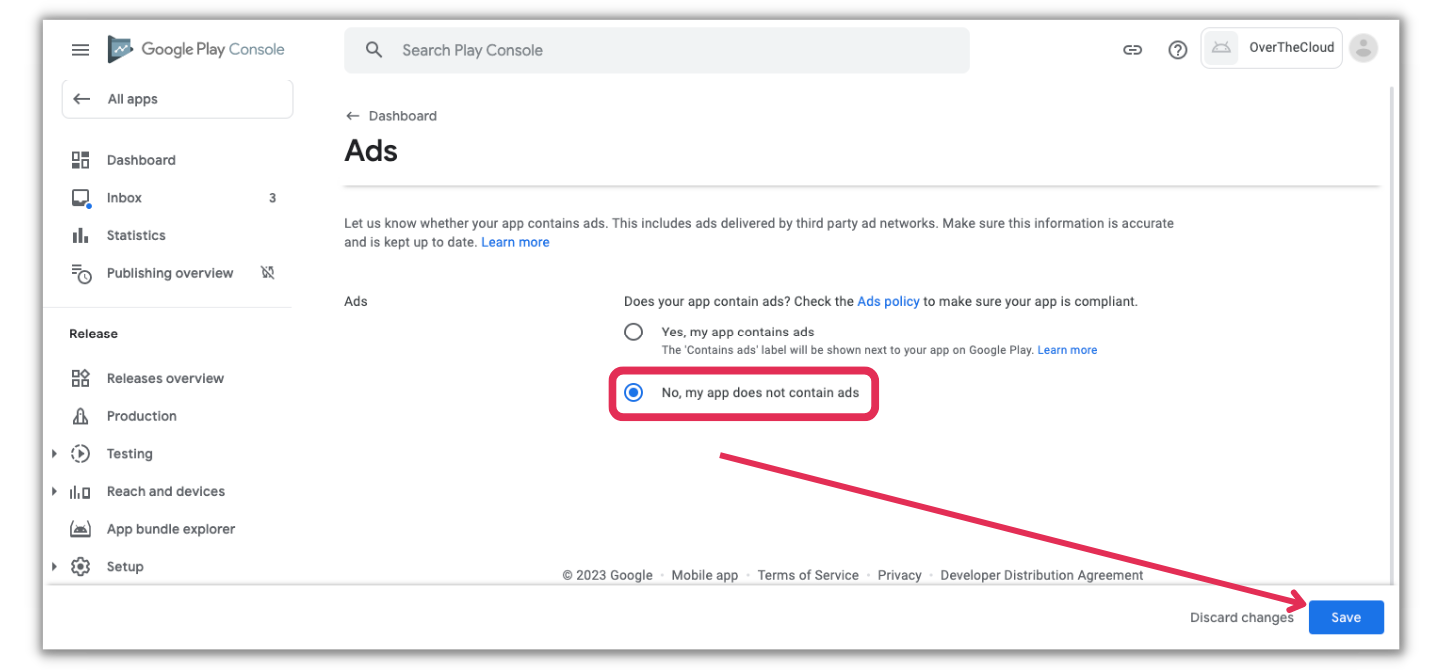
- For Ads, select No, my app does not contain ads then click Save and go back to the Dashboard.
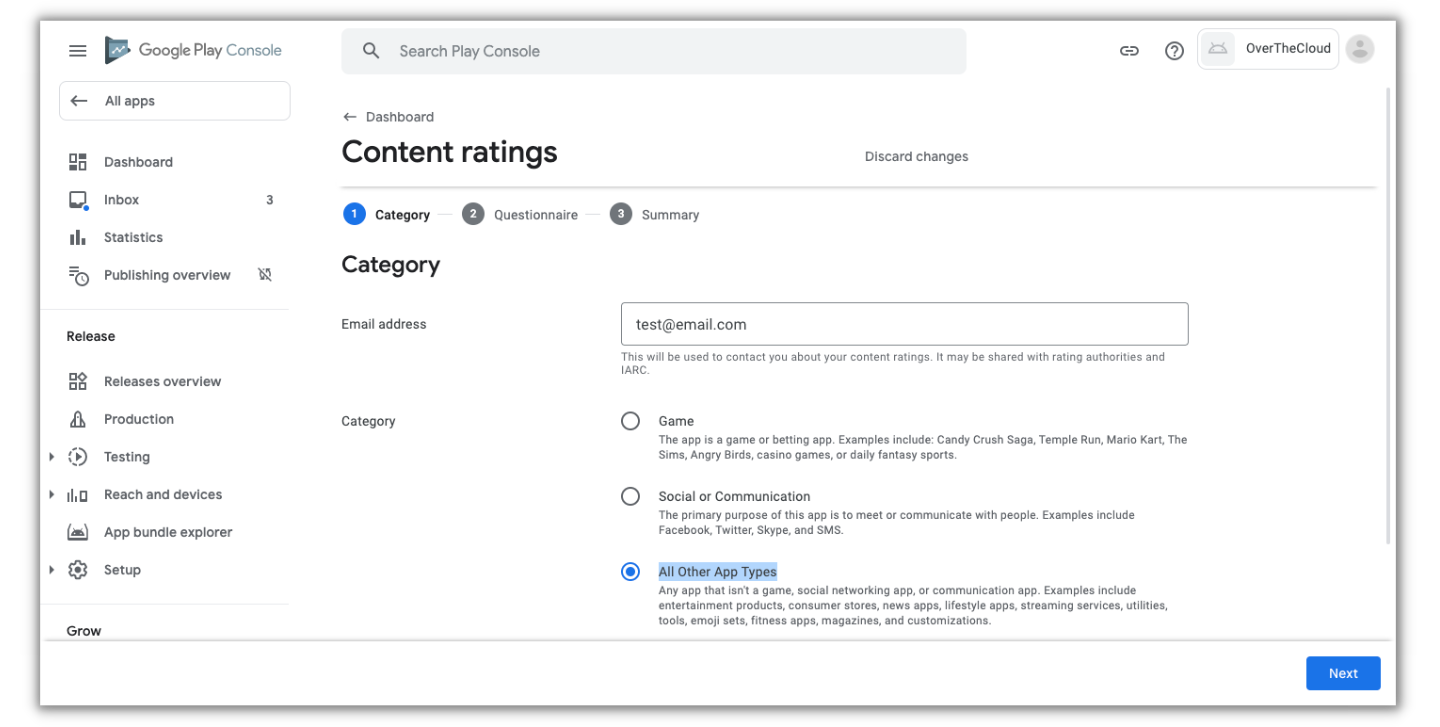
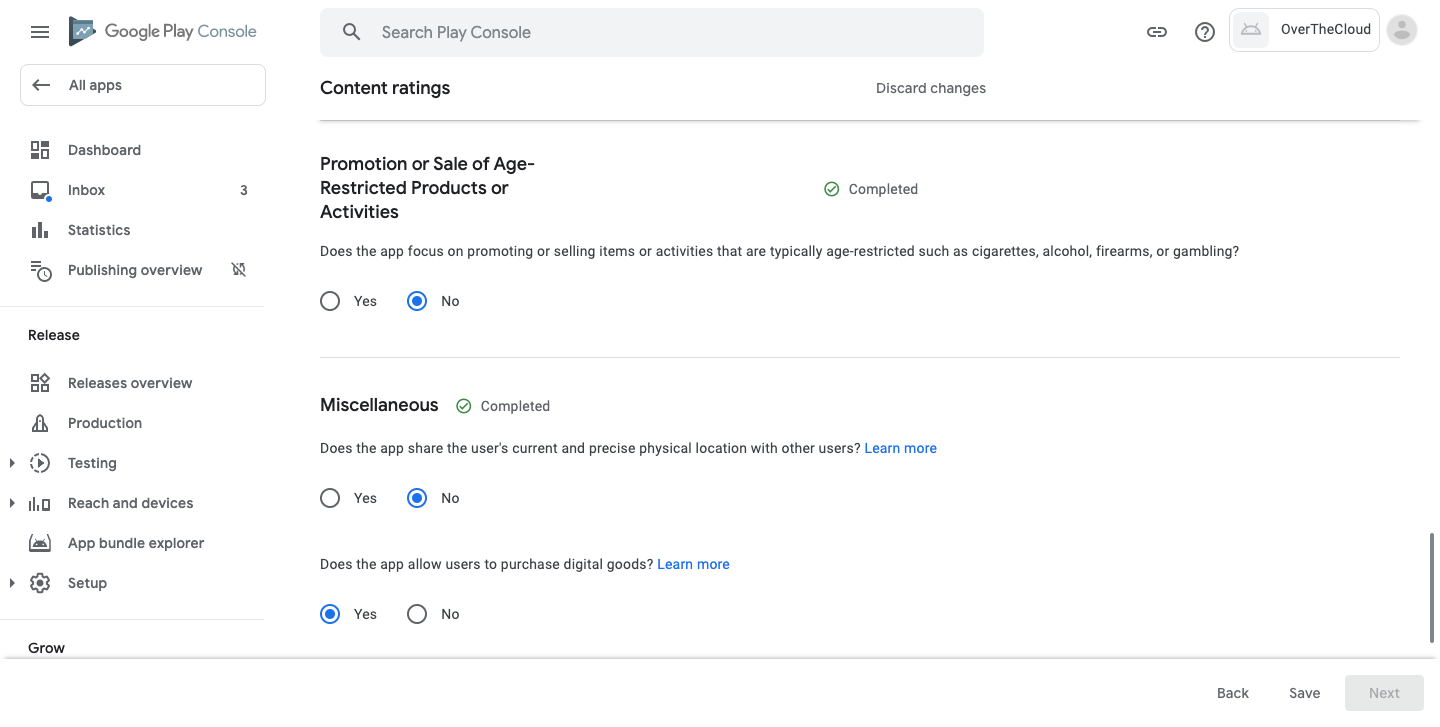
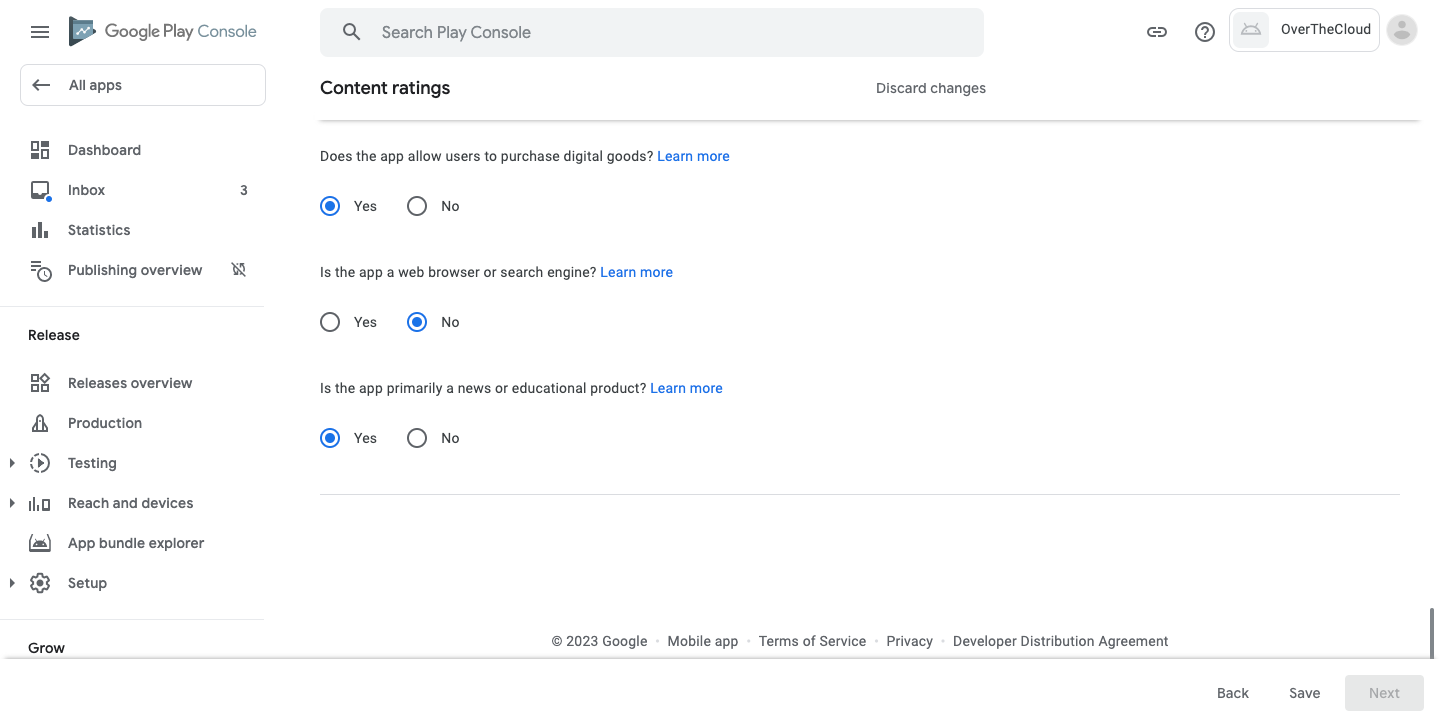
- From Content Rating, click on Start questionnaire.
- In the Email Address, use the email you would like to receive notifications on regarding ratings of your content.
- In the Category, Select the option for All Other App Types.
- Click Next from the bottom right corner of the screen.
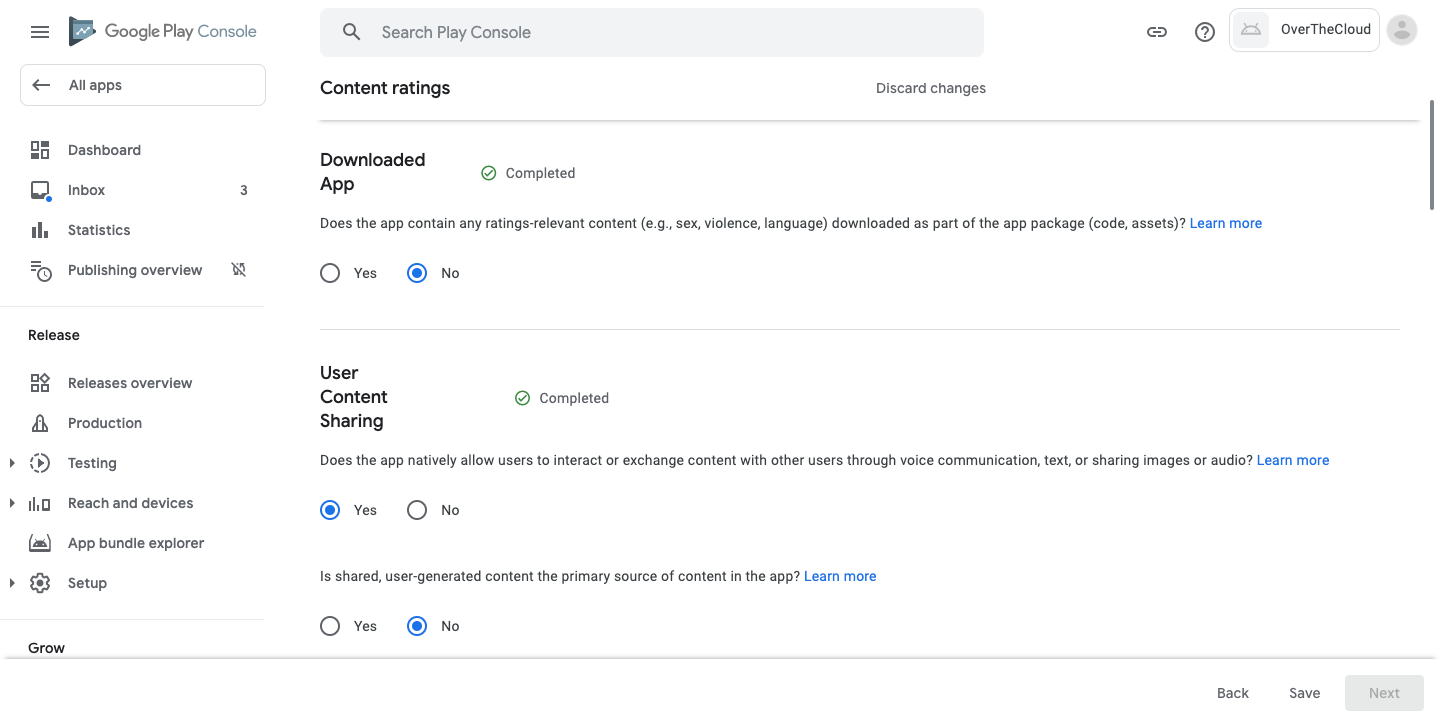
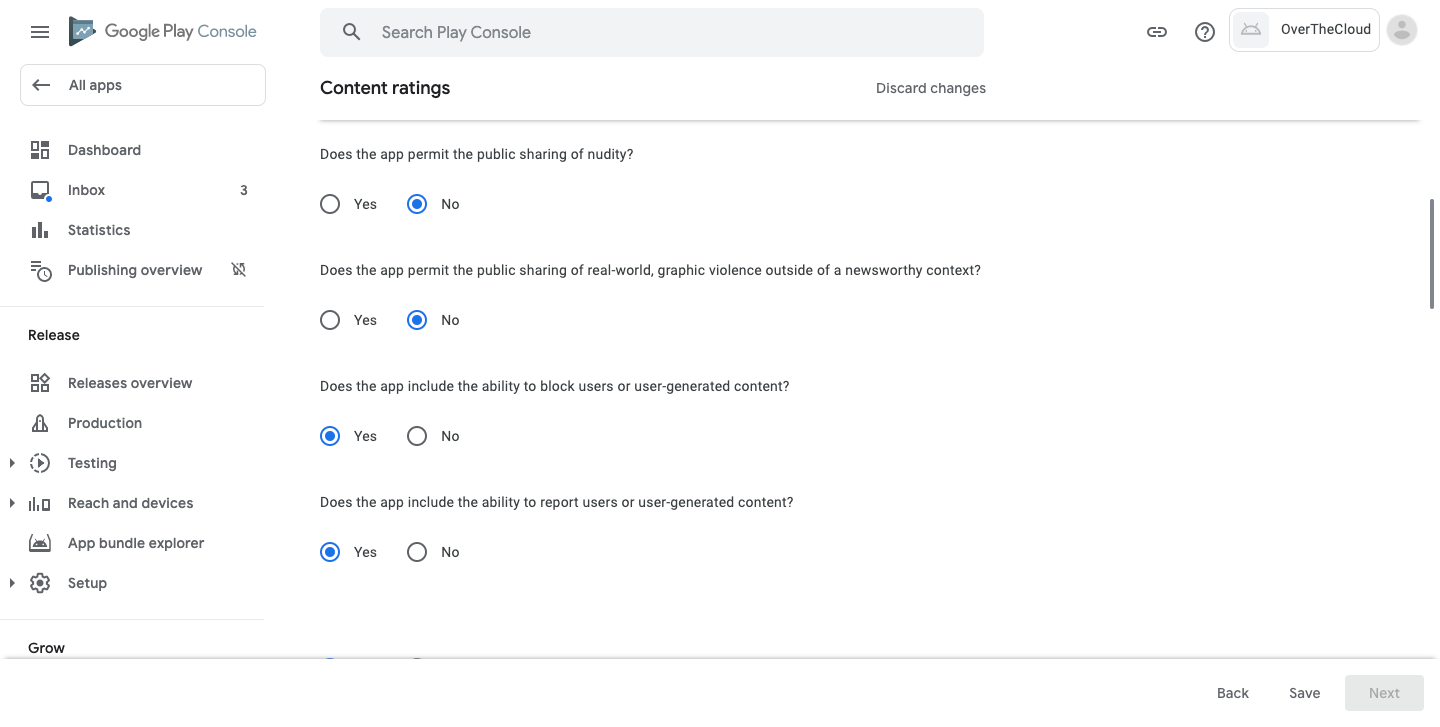
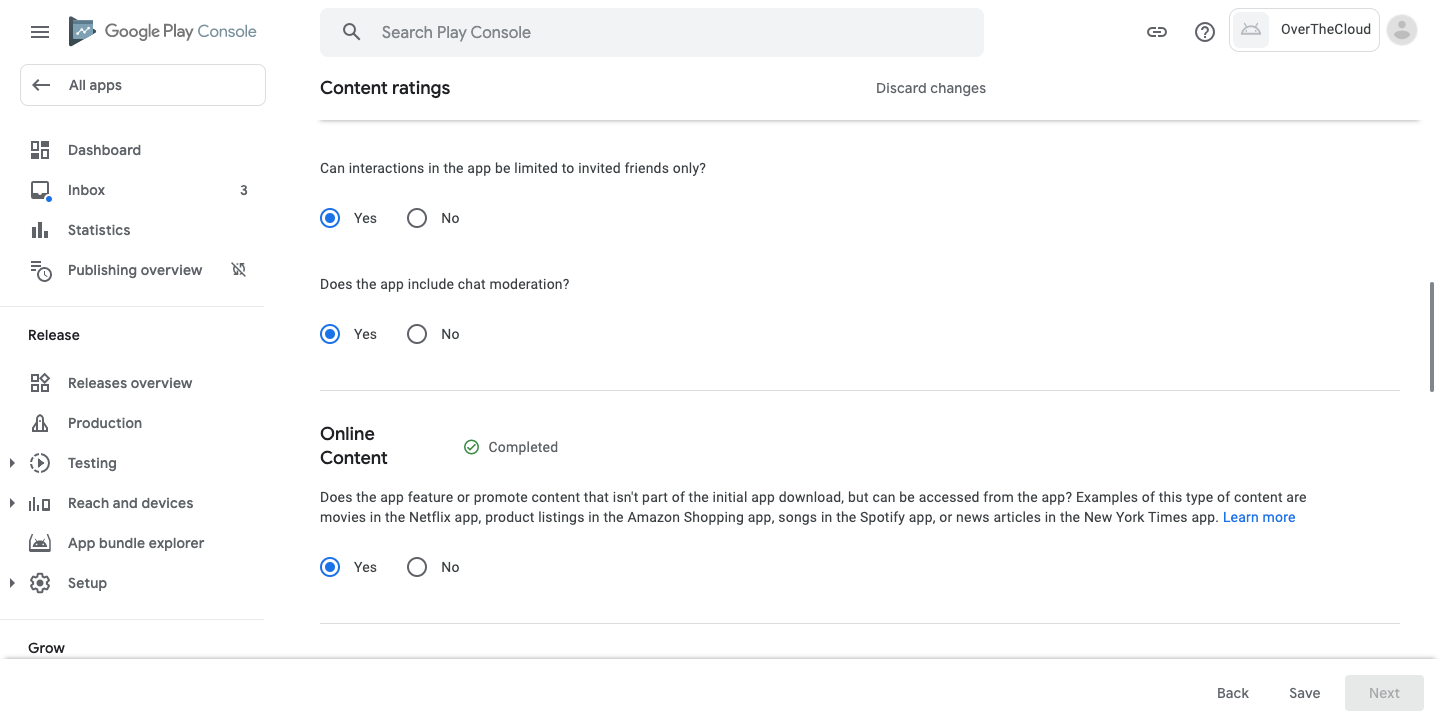
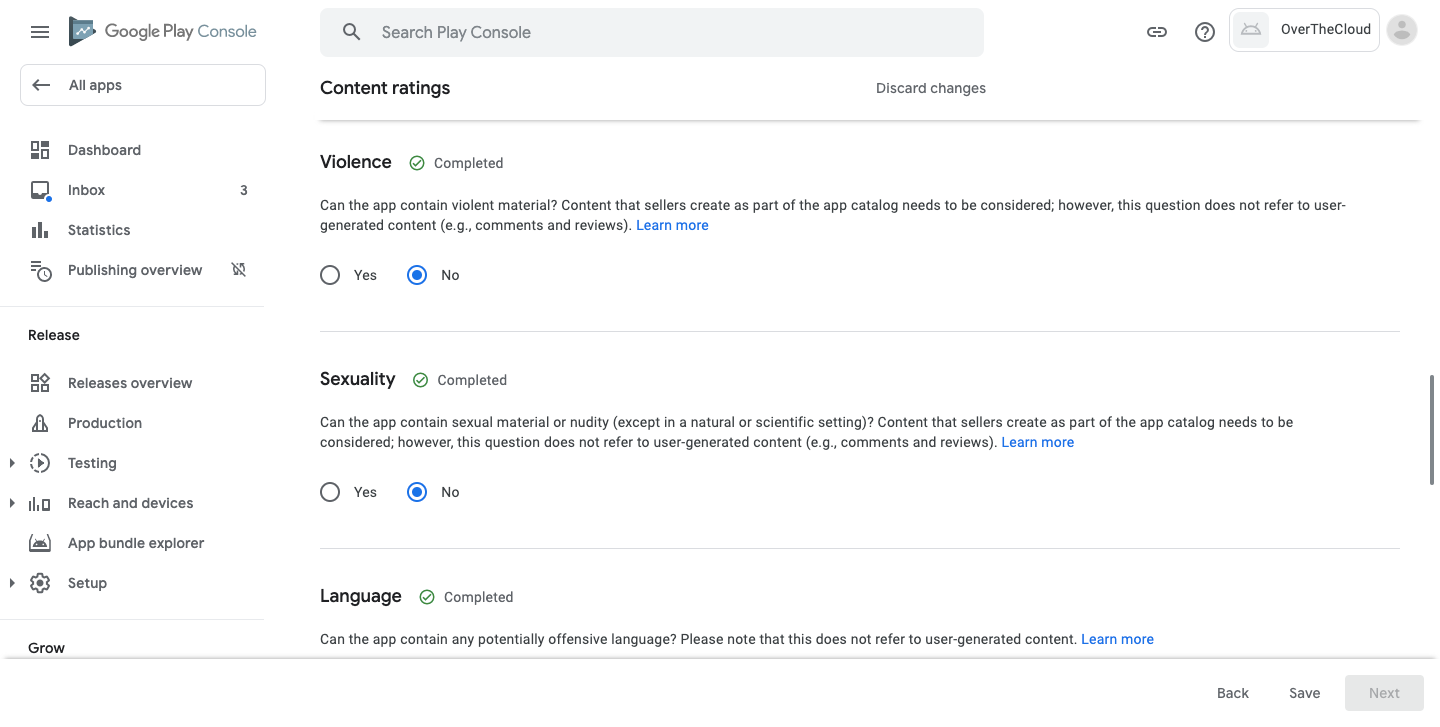
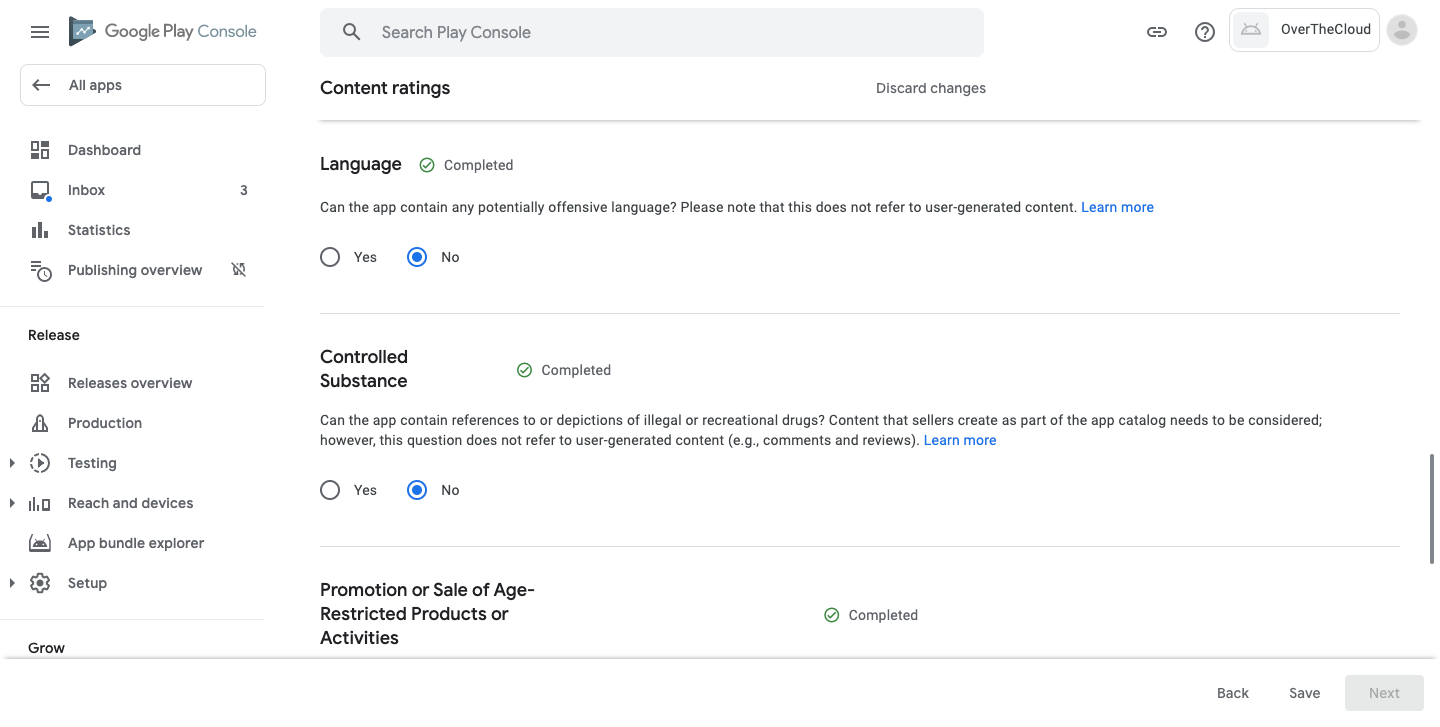
- Answer the questionnaire according to the below screenshots exactly.
- Once done, it is important to click on Save first then click Next.
- Once you reach the Summary click on Submit.
- Click on Dashboard after you are done to continue with the remaining tasks.
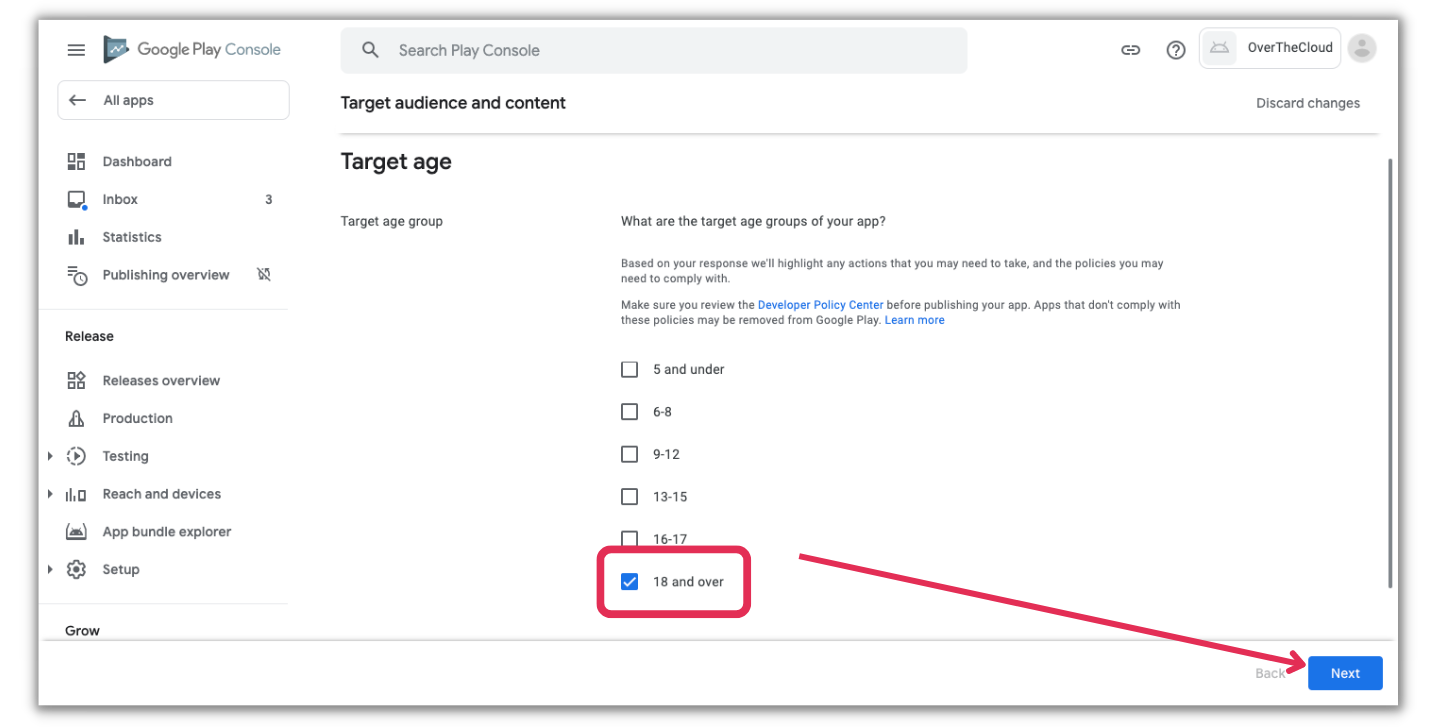
- from Target Audience, select 18 and over then click on Next.
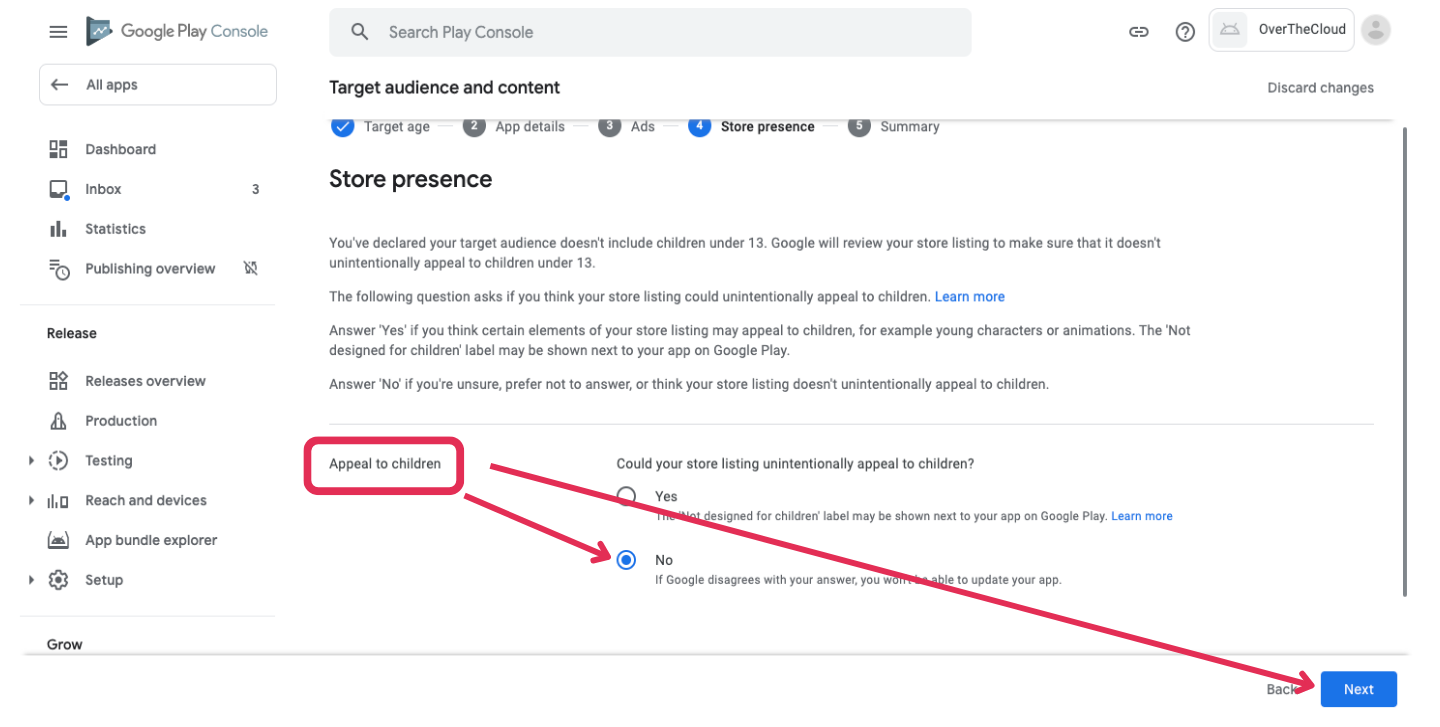
- Under the question for Appeal to children click No. Click Next after your selection.
- Click Save when you get to the summary page titled Here's what you've told us.
- Go back to the Dashboard to continue with the remaining tasks.
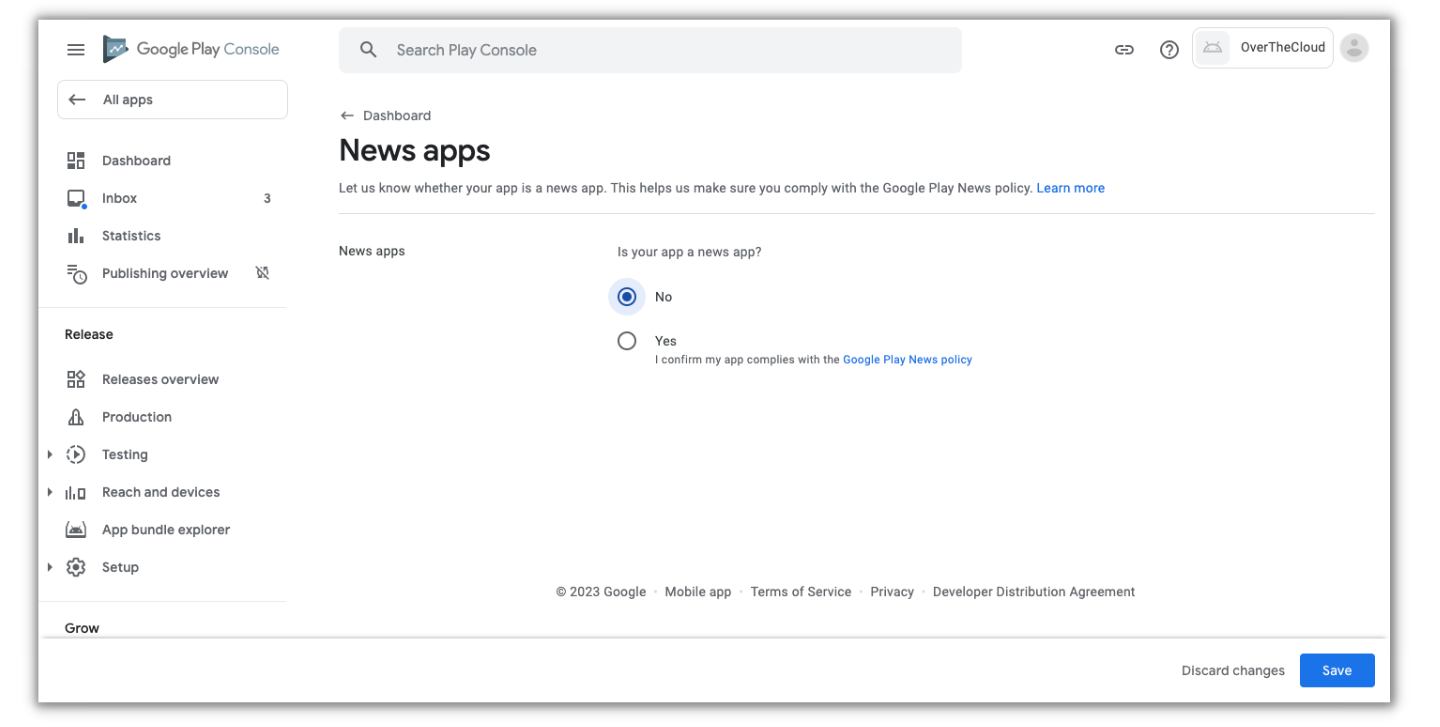
- From the News Apps, select No then click Save.
- Click on Dashboard to continue with the remaining tasks.
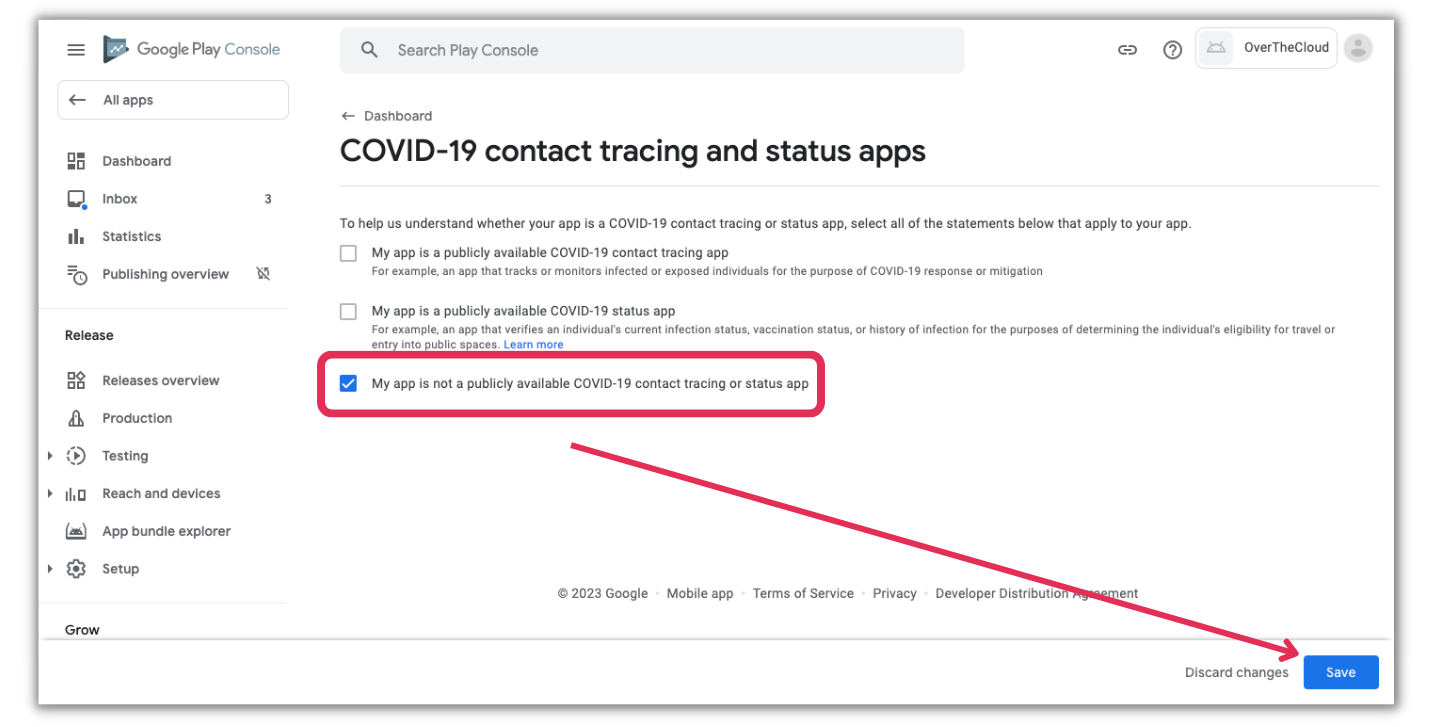
- For COVID-19 contact tracing, choose My app is not a publicly available COVID-19 contact tracing or status app then click Save.
- Click on Dashboard to continue with the remaining tasks.
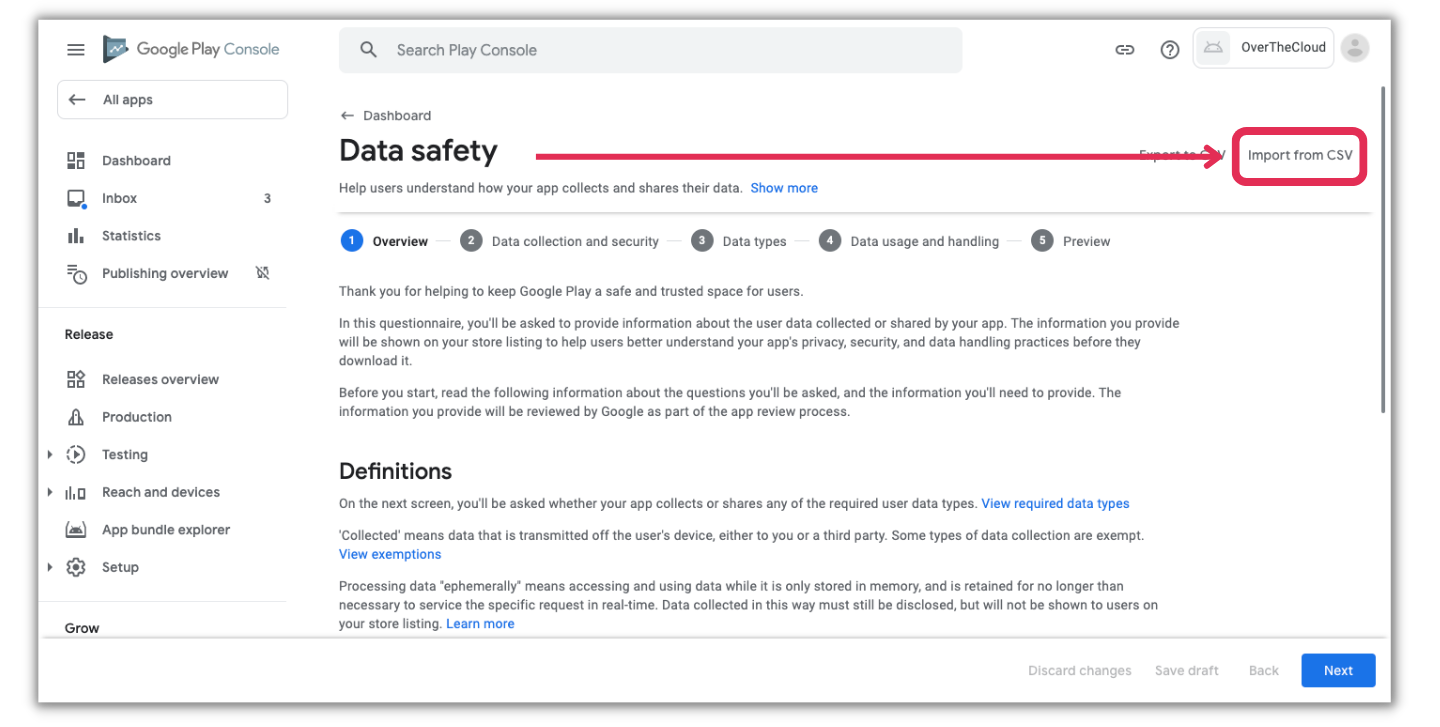
- Once you get to Data Safety and click on it, a pop-up will appear explaining how your app collects and stores data. Keep clicking next until you are done with the tutorial.
- Use the Import from CSV option to upload the Data Safety File you downloaded from Passion Drive.
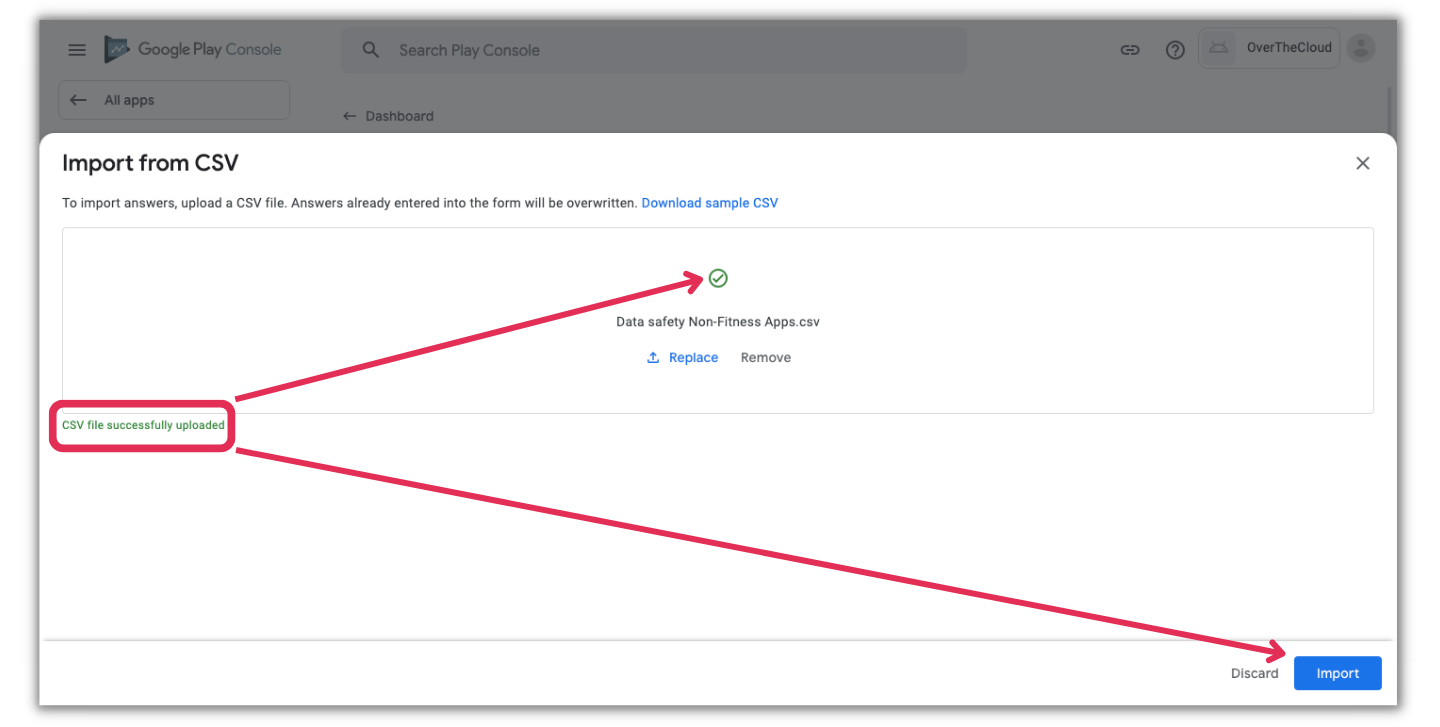
- Click on Upload or drag the file and drop it in the box.
- Once the file is uploaded successfully, click on Import.
- A pop-up will appear with a disclaimer that previously answered questions will be overridden, continue by clicking Import.
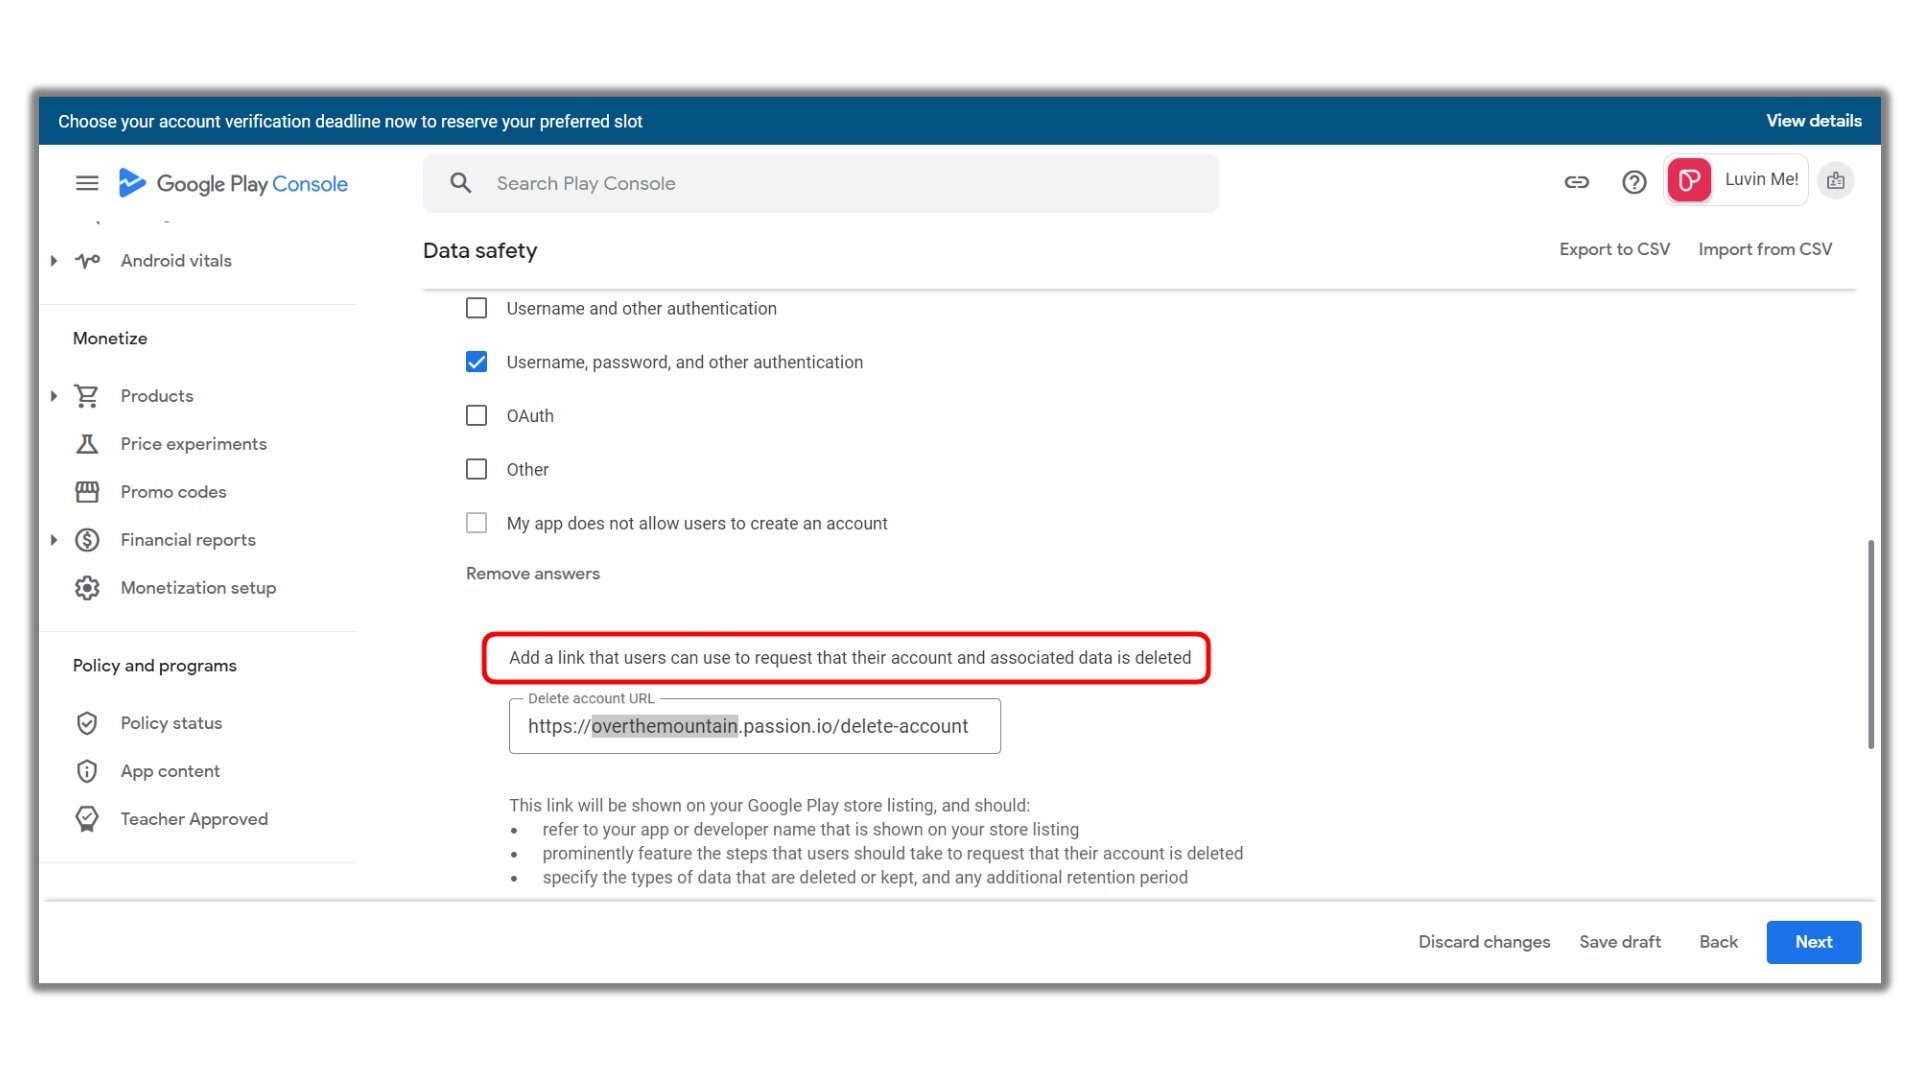
- It is very important to add your Passion.io Web App URL to serve whenever one of your clients wants to delete their account.
Your Passion.io Web App URL is yourappname.passion.io just like the below screenshot.
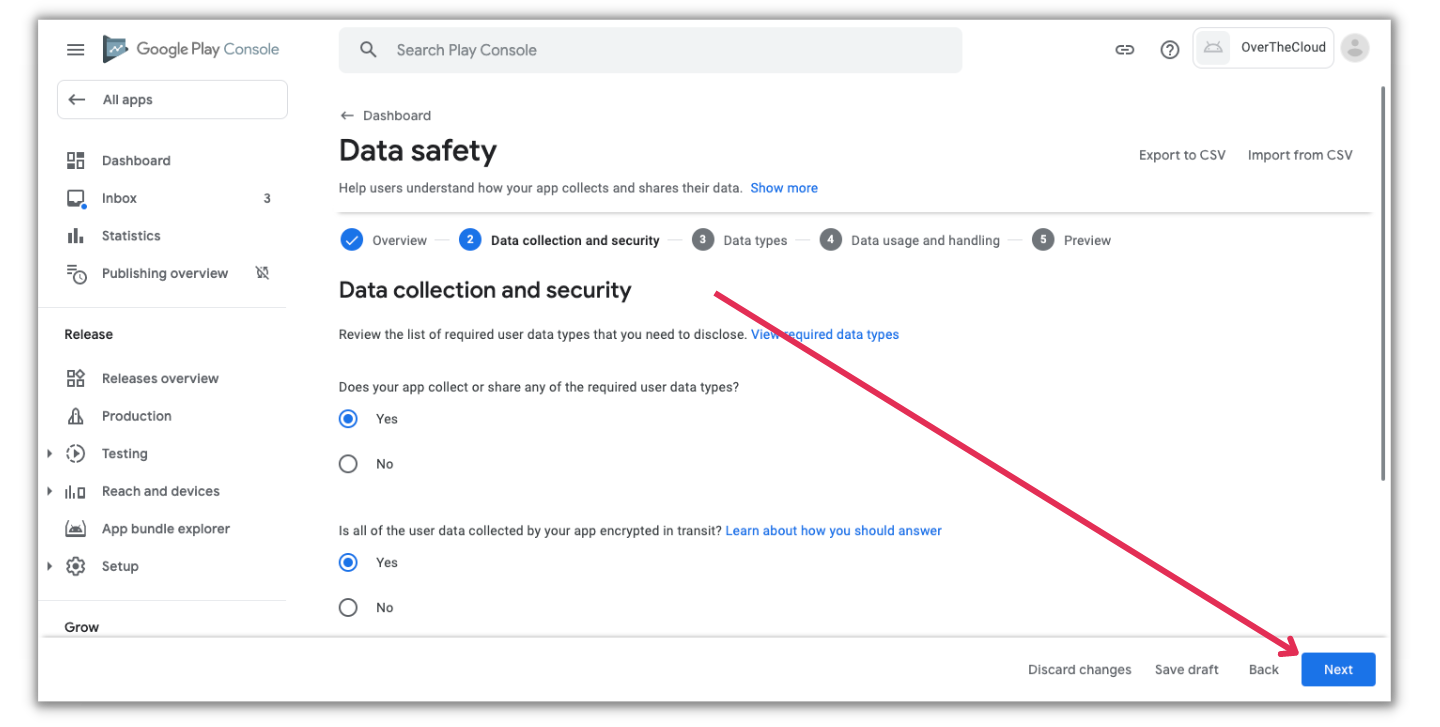
- Once you are redirected to Data Safety click on Next.
- Click Next when you reach Data Types without selecting anything.
- Click Next when you reach Data Usage and Handling.
- Click Submit when you reach the Preview Page.
- Click on Dashboard to continue with the remaining tasks.
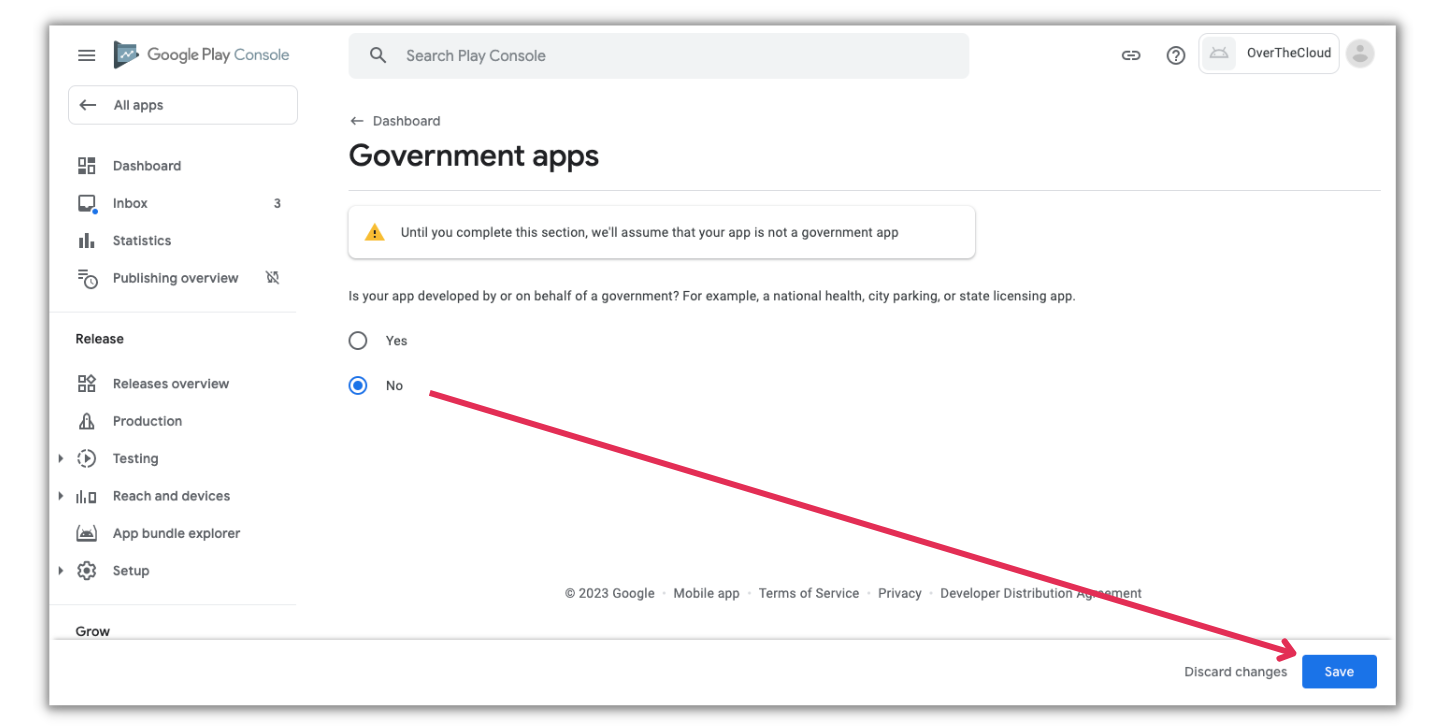
- From Government Apps, Select No then click on Save.
- Click on Dashboard to continue with the remaining tasks.
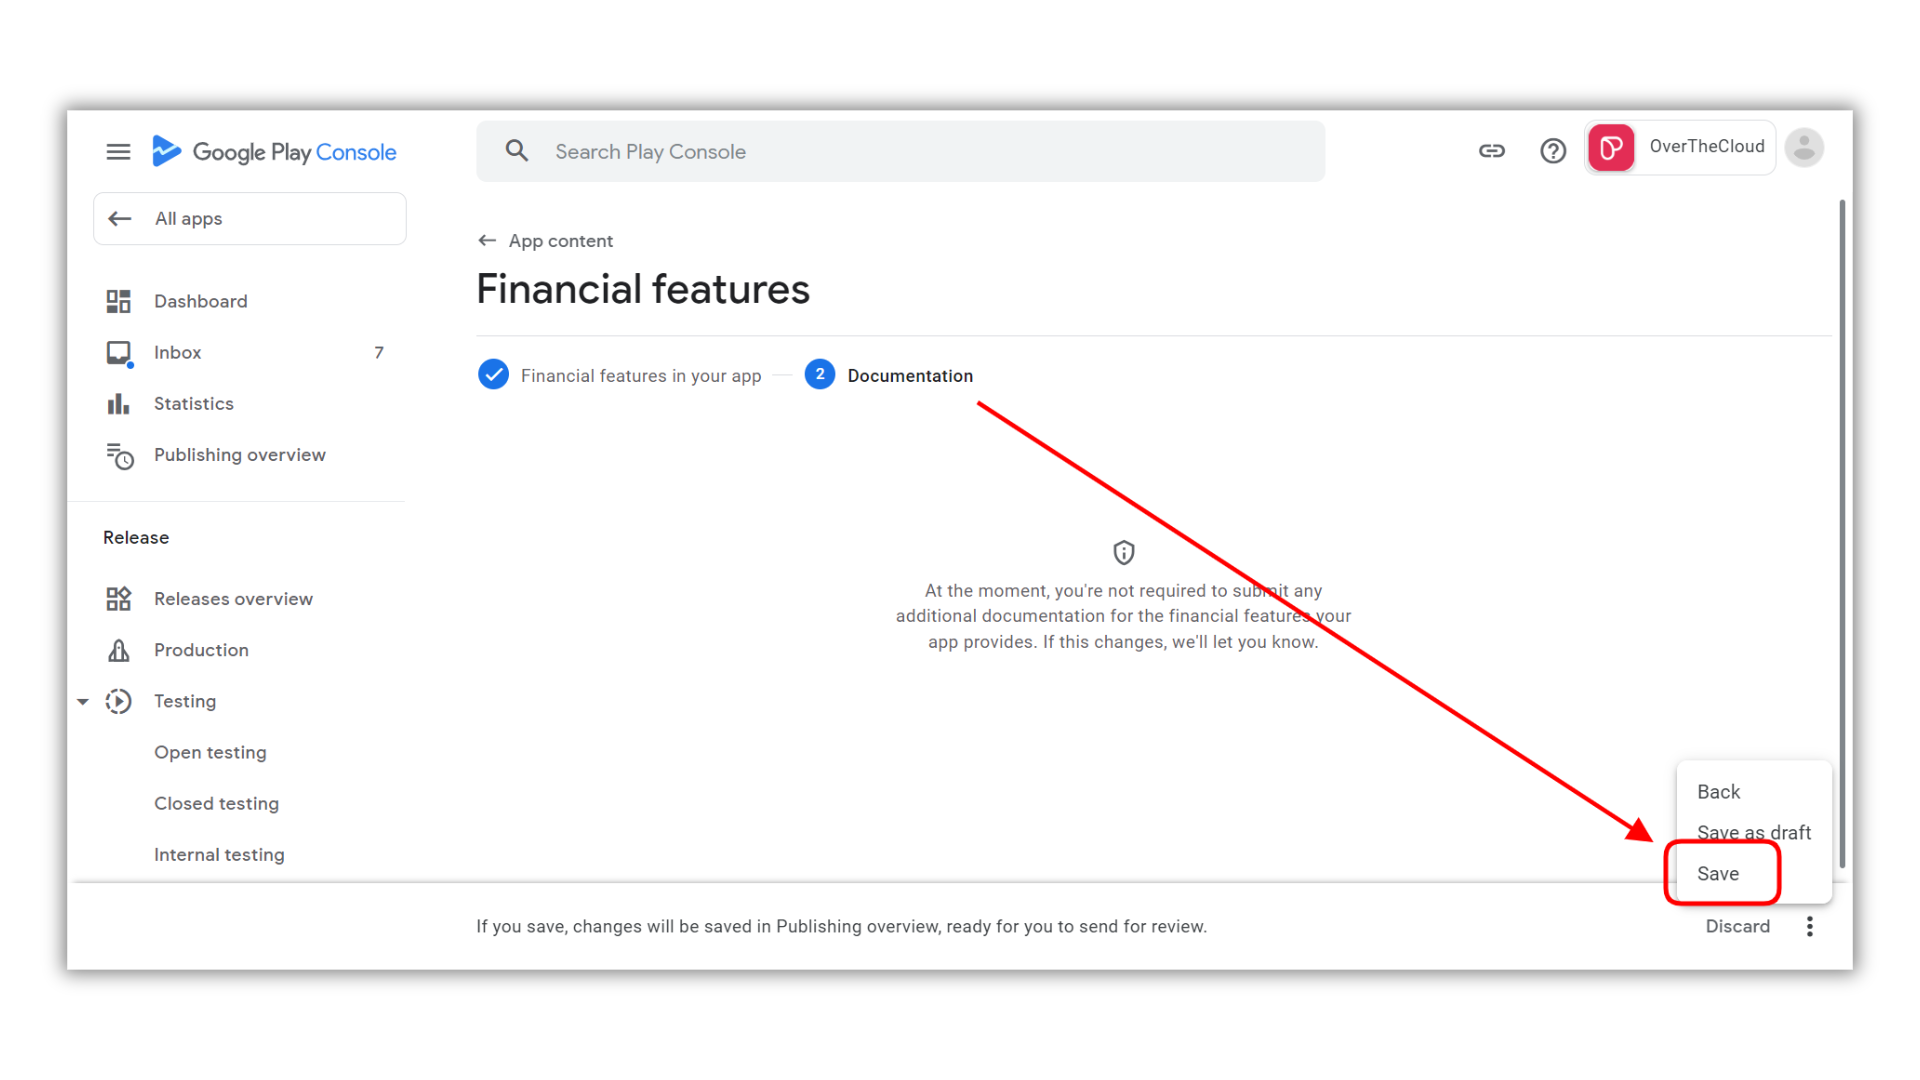
- From Financial Features, scroll down till the end and mark My app doesn't provide any financial features. Click Next after you mark it.

Google would advise you that there are no documents required at the moment, click Save from the 3 dotted menu.
Organize your application:
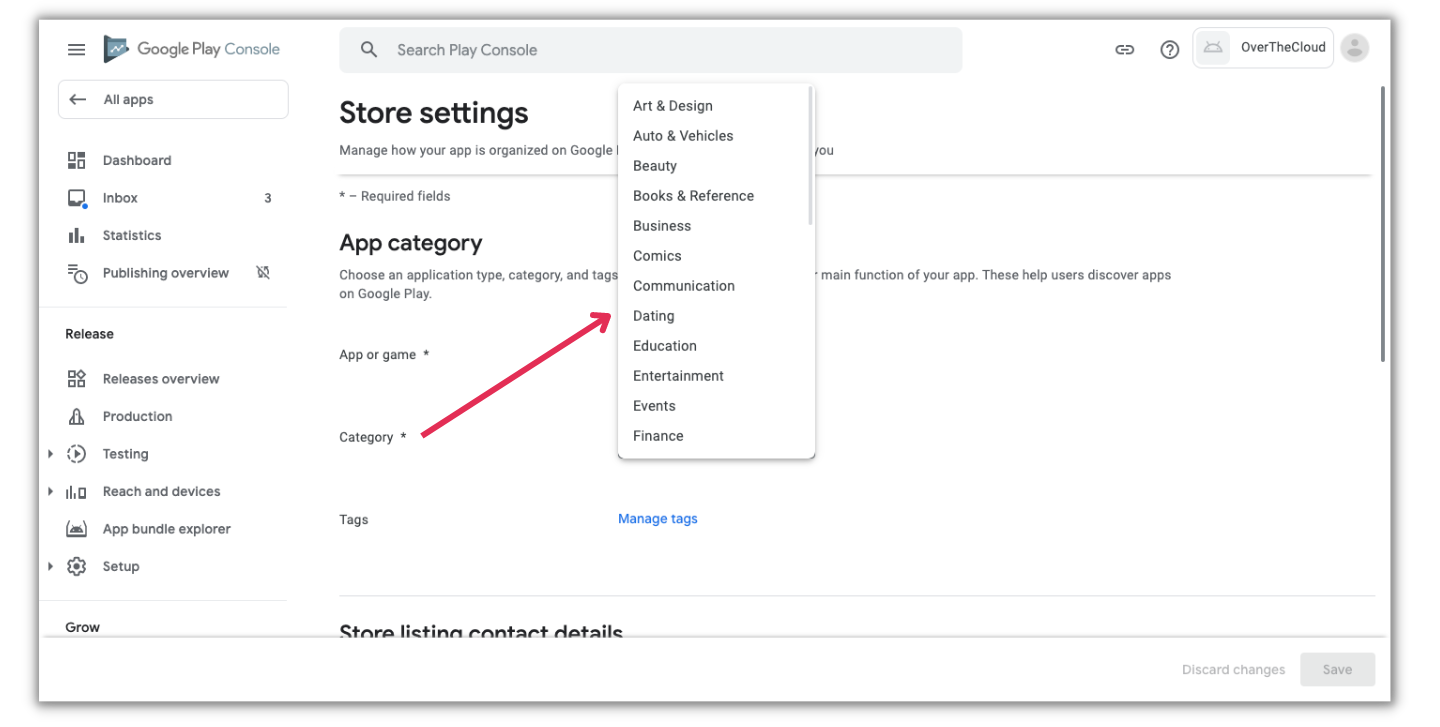
- Now it's time to select an App Category and provide contact details, once selected from the Dashboard choose App from the dropdown menu.
- Select a Category based on what your app offers.
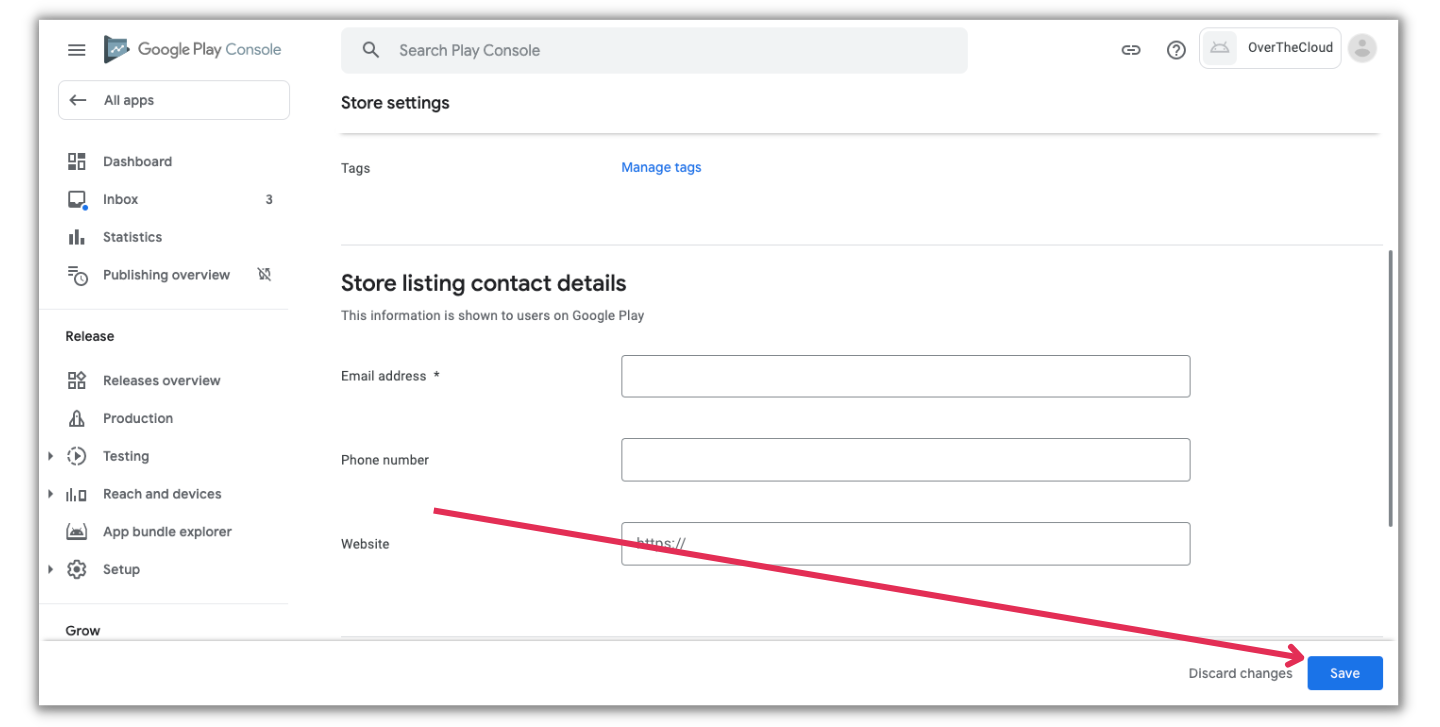
- Enter your Google account email address, the phone number and website are optional.
- Click Save after you are done then go back to Dashboard.
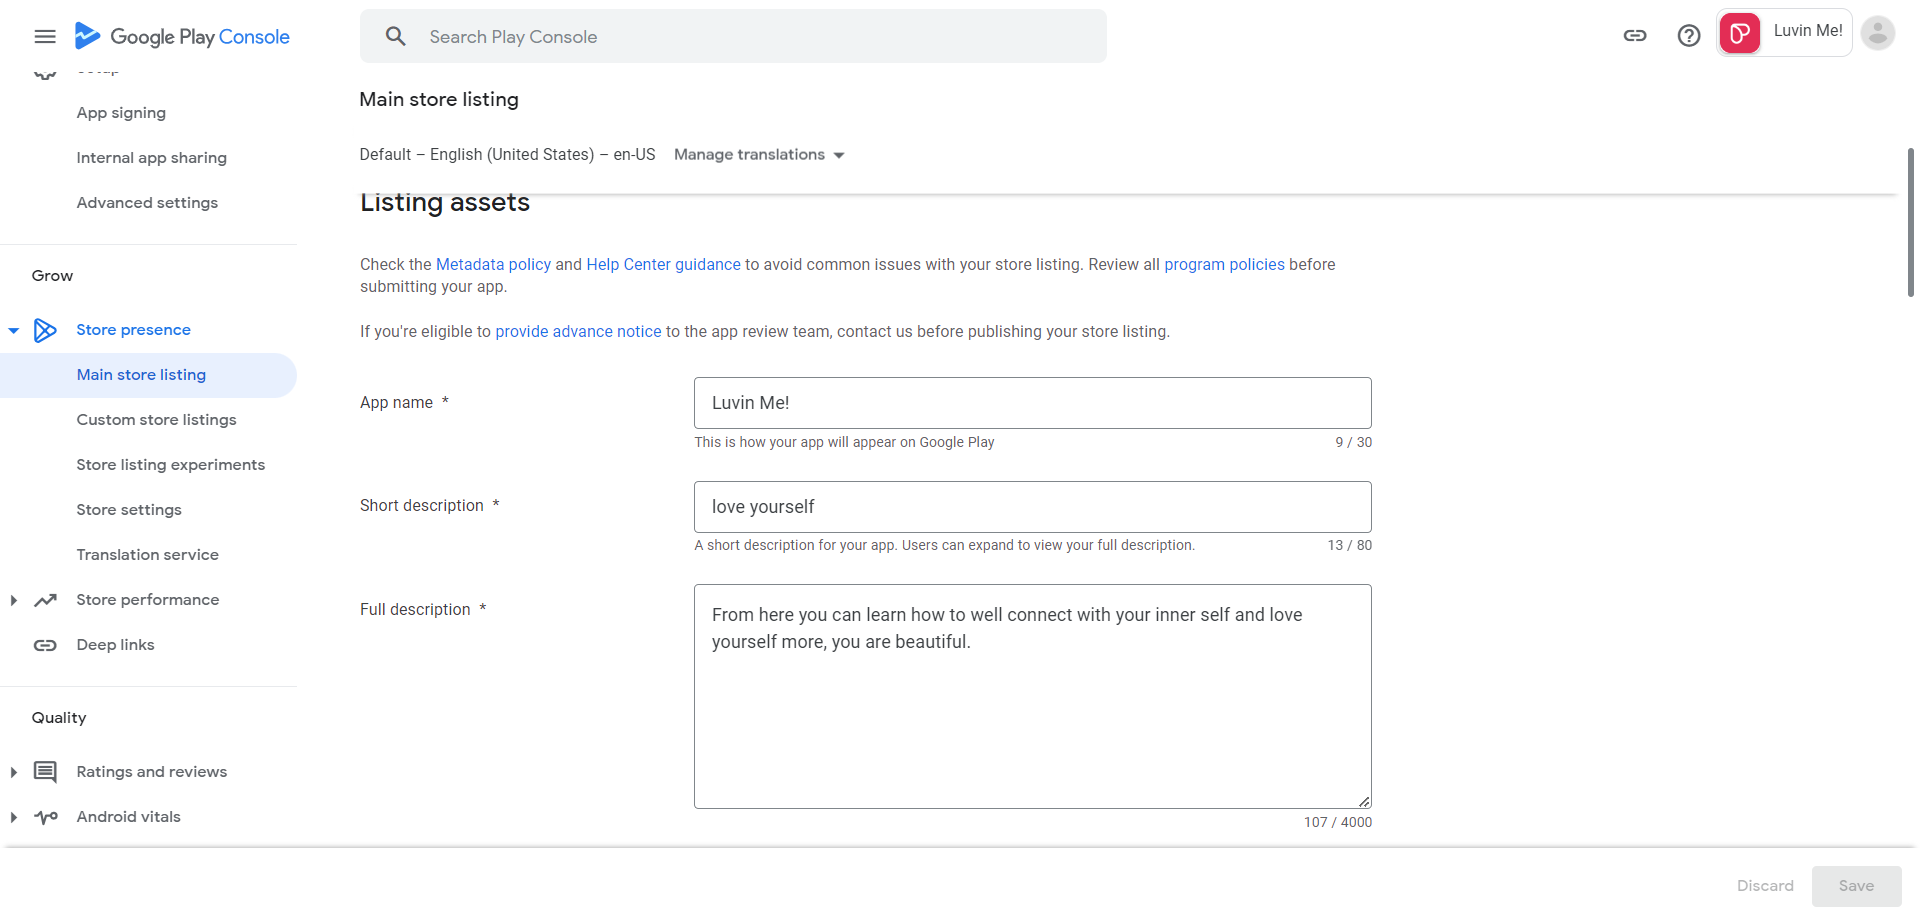
- To Set up your store listing, scroll down to App details and type in the below text.
App name: enter the name you want for your app.
Short description: you can copy this from your app builder.
Full description: you can copy this from your app builder.
Note: This will automatically update with the information added from your end on your passion.io App Builder.
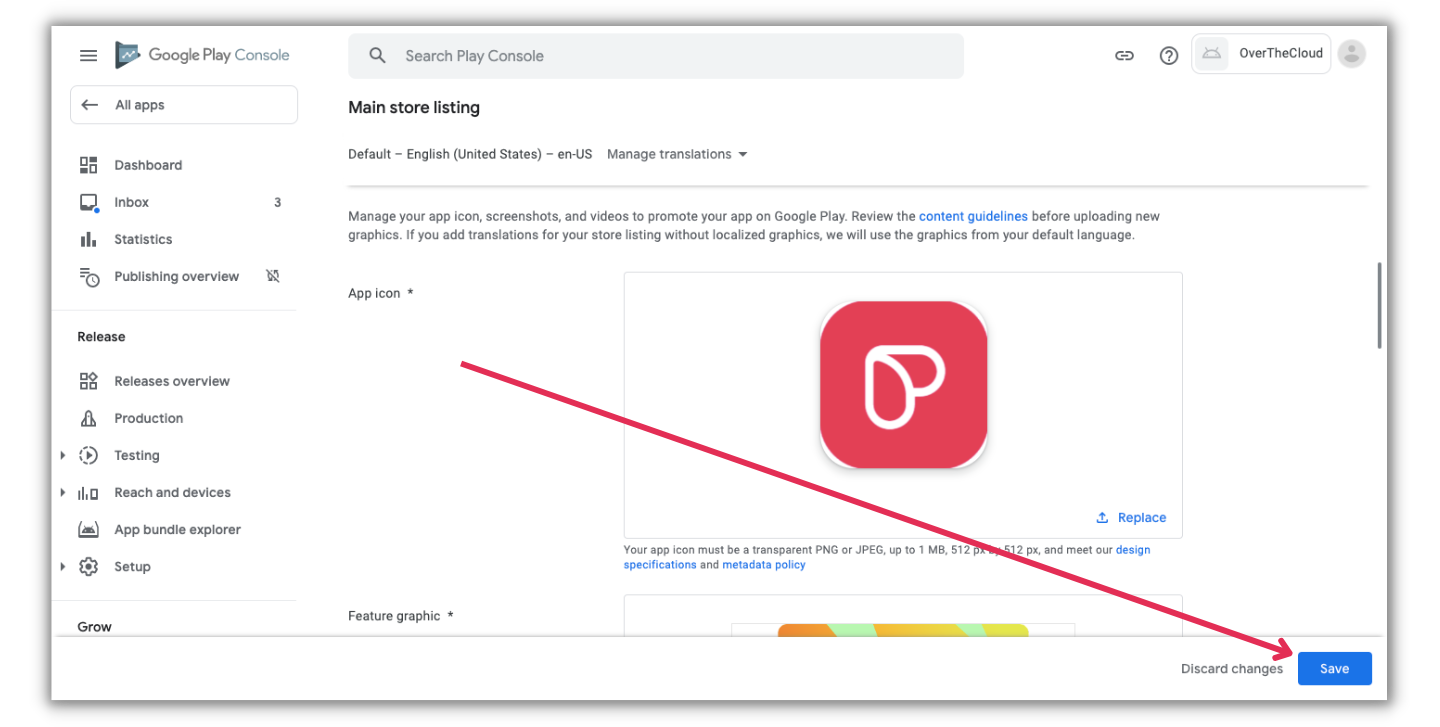
- For Graphics, we will use the images we downloaded from Passion Drive
App Icon goes to App Icon.
Feature Graphic goes to Feature Graphic.
Dummy Screenshot 1 & 2 goes to phone screenshots, 7-inch tablet screenshots, and 10-inch tablet screenshots.
Note: Don't worry, all your content and photos will automatically sync from your passion.io account.
- Click on Add Assets, then upload the image you downloaded earlier
- Hit Upload then Add to upload the image
- Click on Save once you're done uploading the images
- From the main screen of your app, scroll down through the left side panel.
- Under Monetize, click on Monetization Setup.
- From Google Play Billing Section, update the Topic name with the below text.
projects/api-7764412731368975117-91059/topics/in_app_purchases
*** Please make sure that there are no spaces before or after this link when you paste it ***
- Click on Send test notification.
- Click on Save Changes.

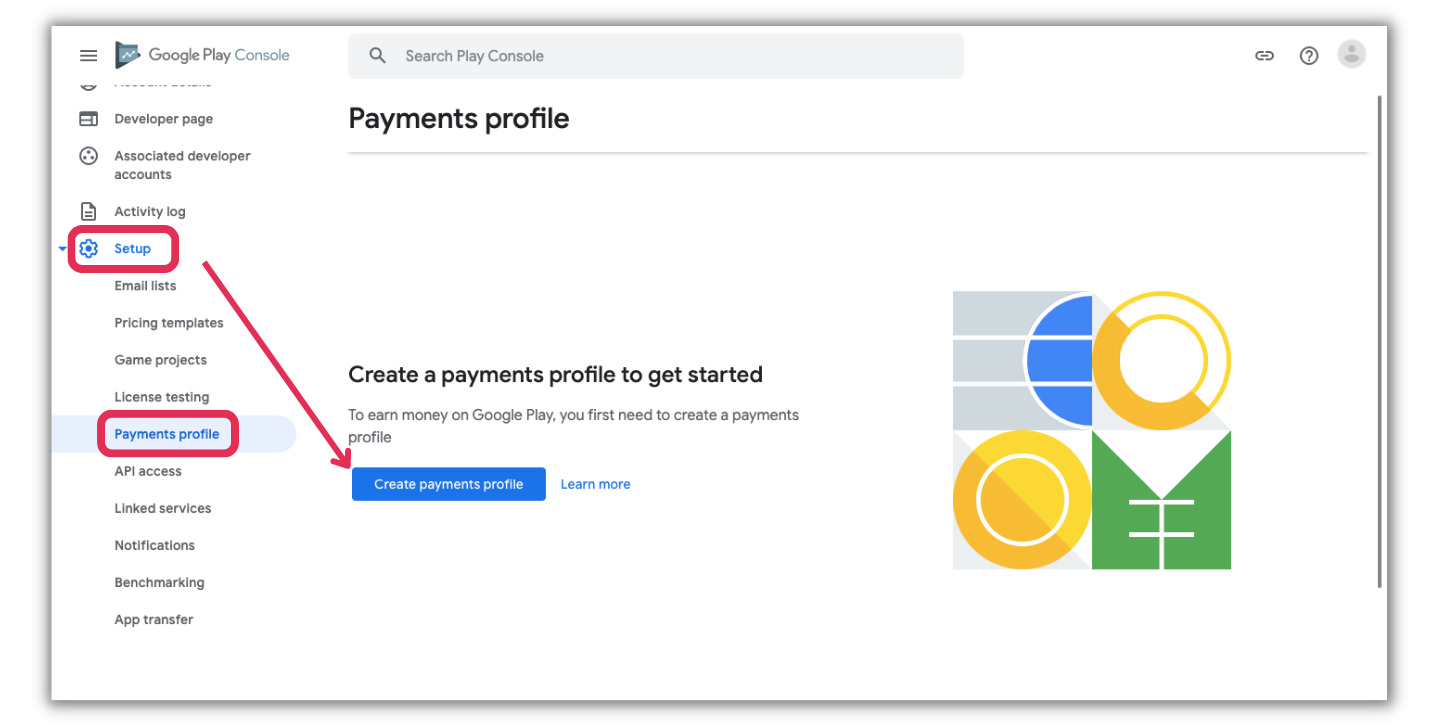
Setup your Payments Profile or Google Merchant account:
- To set up your payment profile or your Google merchant account, click on All Apps from the top of the left side panel.
- Under Setup, click on Payments profile.
- Click on Create payments profile.
- This info will differ from one creator to the other and has no standard, follow the instructions to set up your profile.
- Make sure to set up a bank account to get paid from Google.
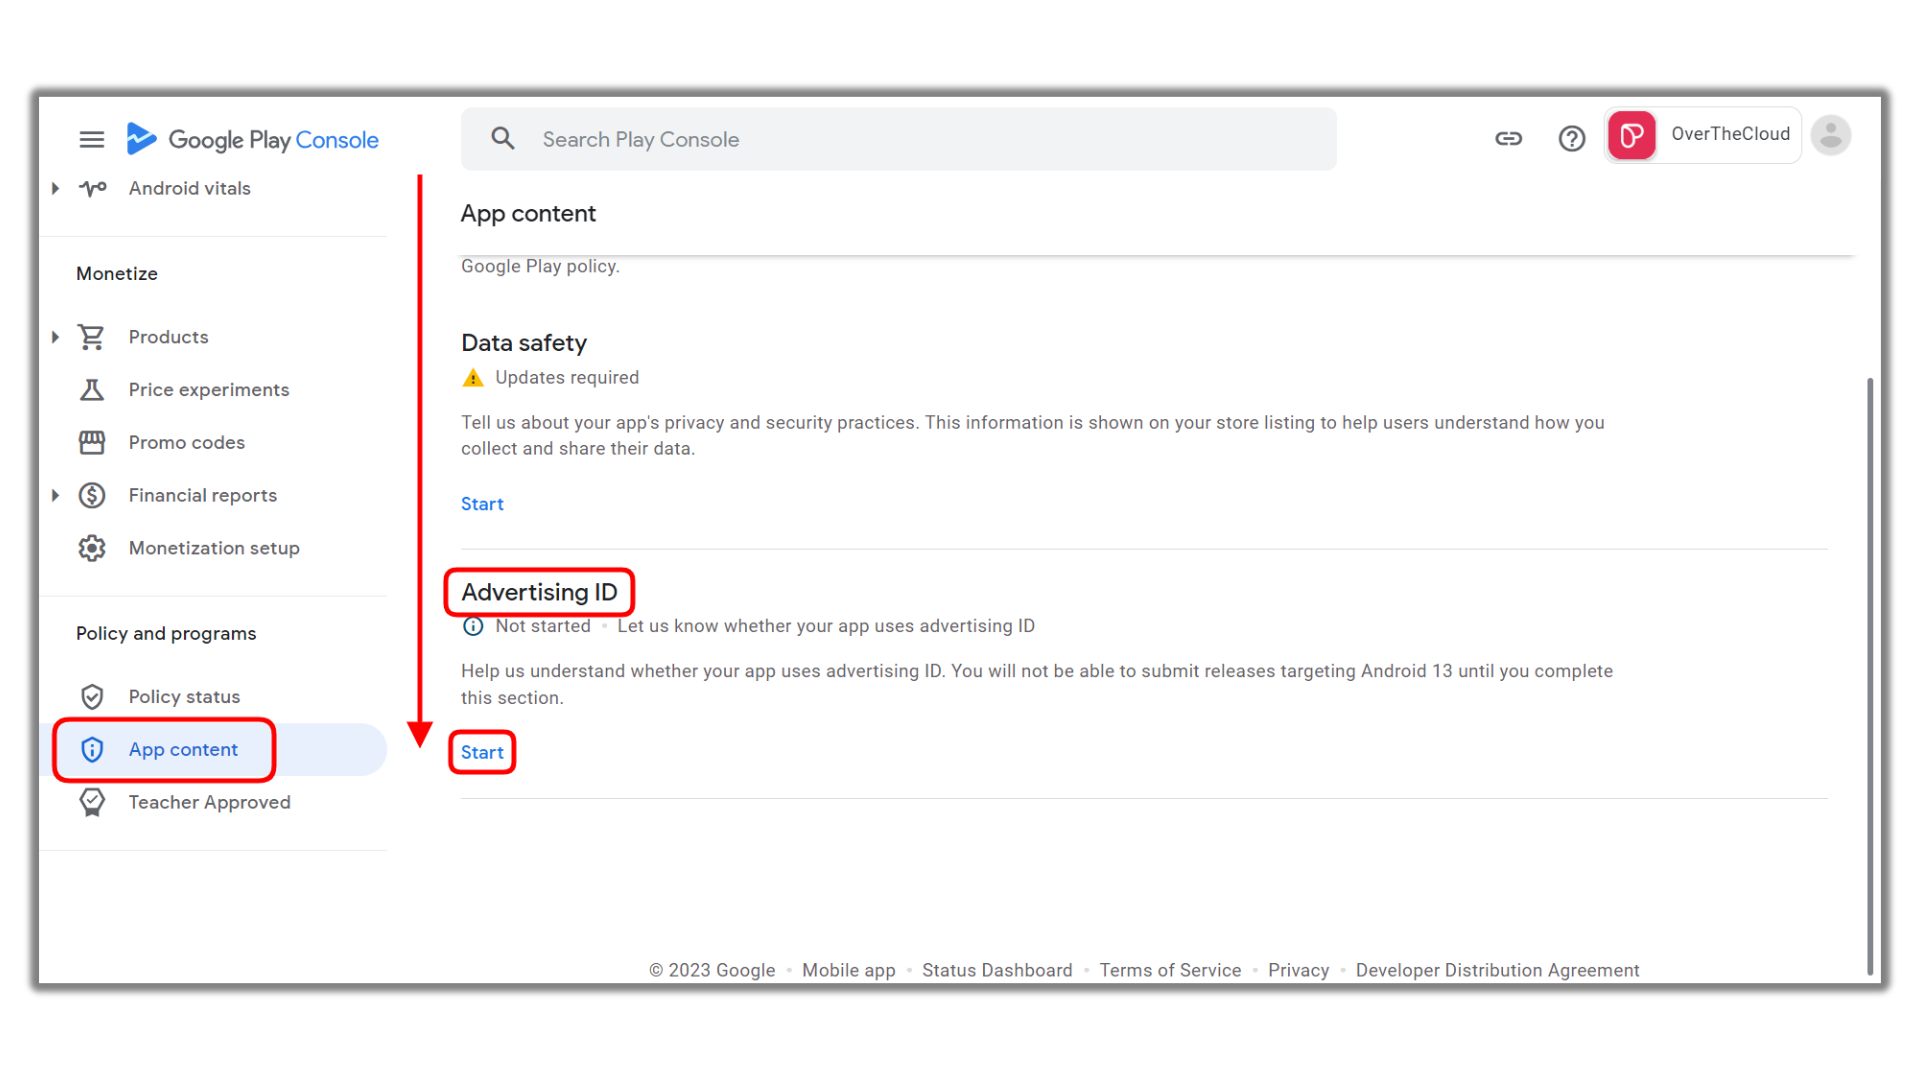
Update your Advertising ID:
From the left side panel, scroll down to Policy and Programs you will find Advertising ID.
Click on Start.
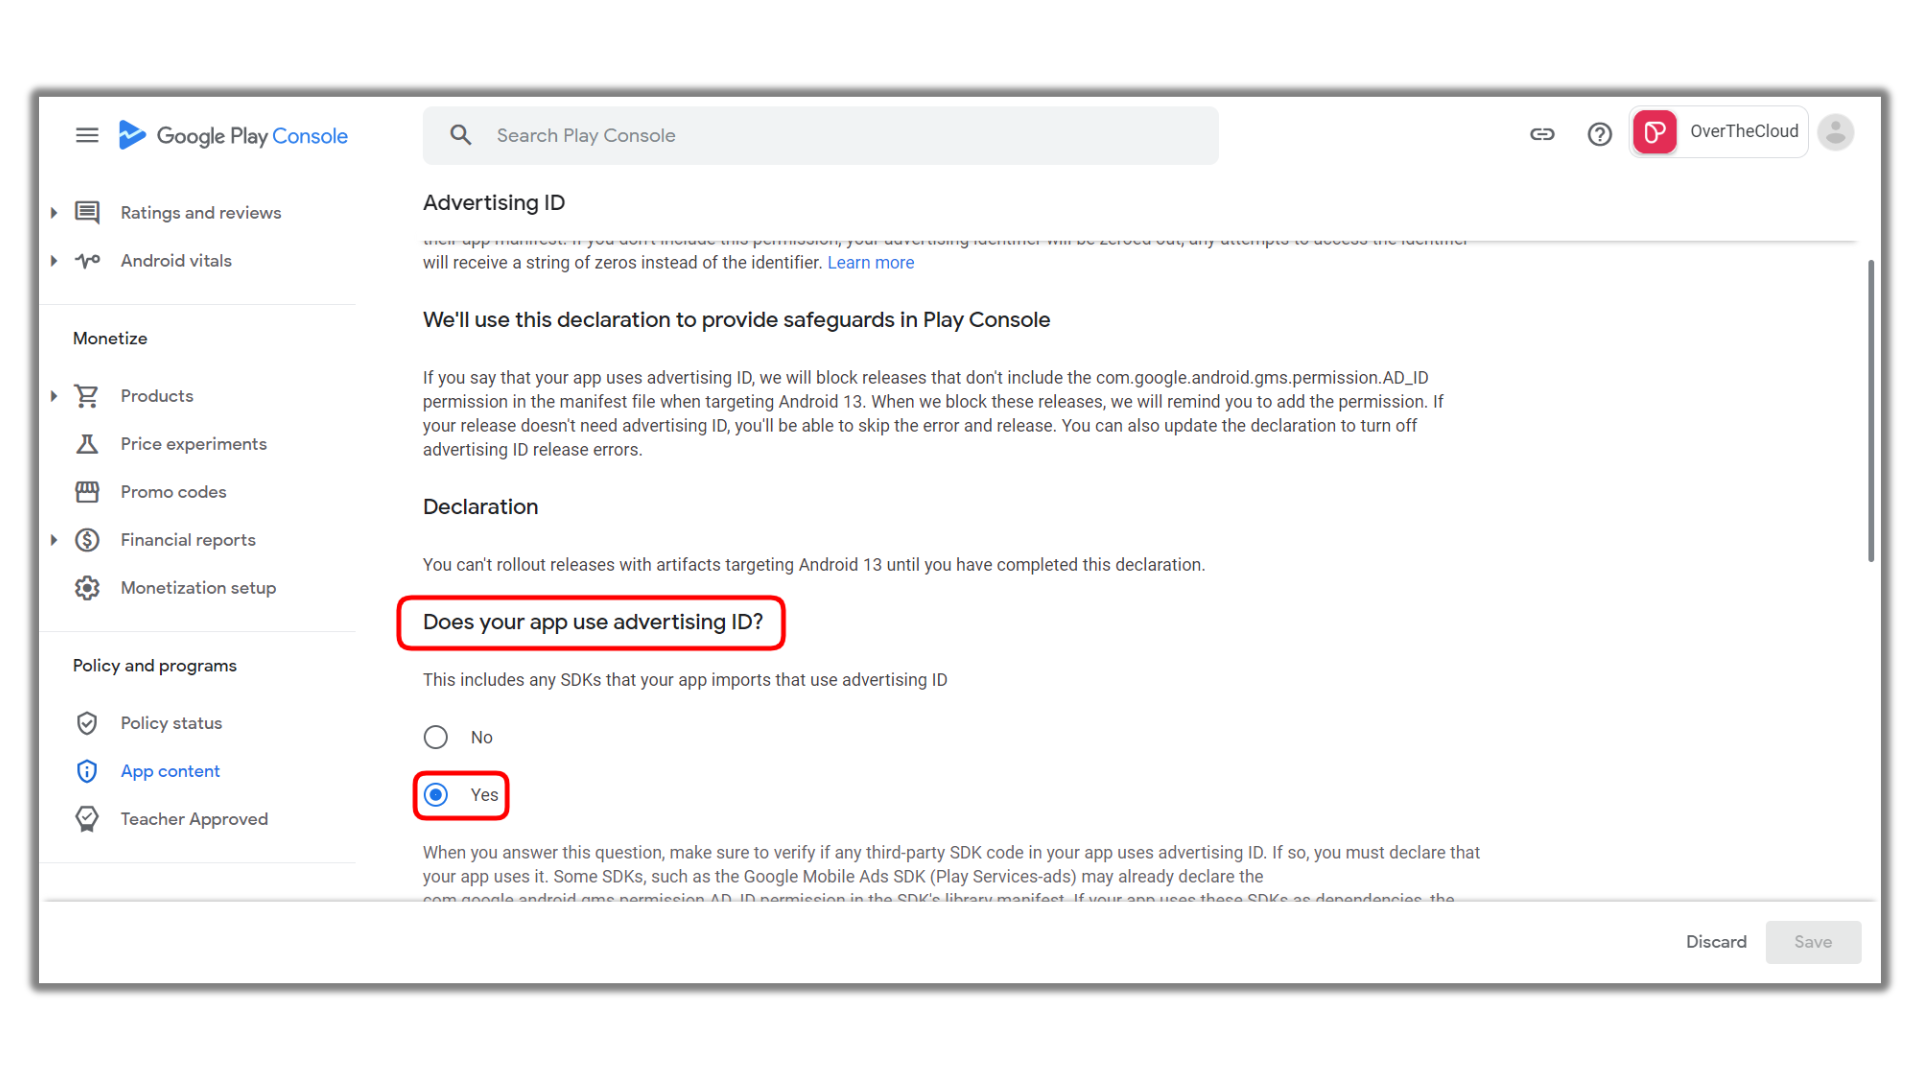
Mark on Yes when asked Does your app uses advertising ID?
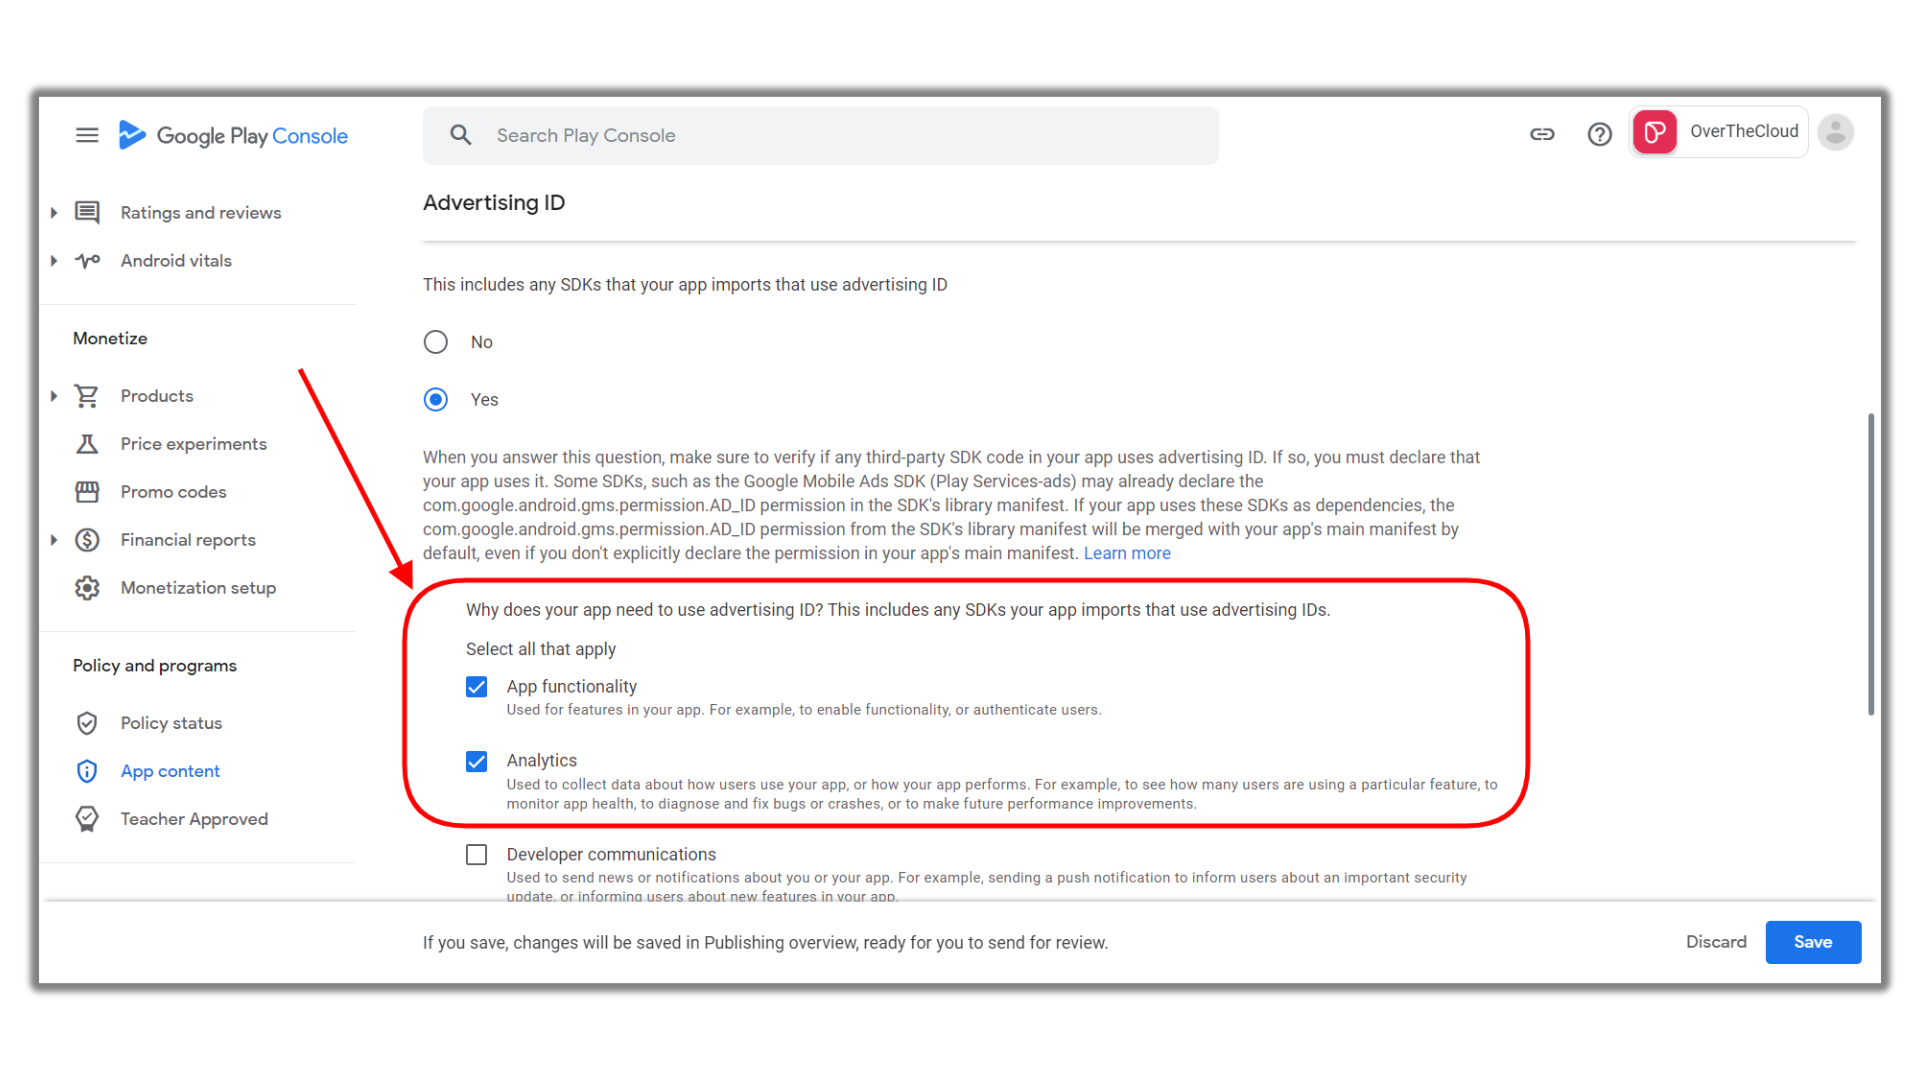
Scroll down to the question “Why does your app need to use an advertising ID? This includes any SDKs that your app imports that use advertising IDs” and select
- App Functionality
- Analytics
Click Save after you are done.
Release your app for Google review:
Important Note:
Personal Google Developer Accounts: you need to enroll at least 12 testers to test your app for 14 days before you can publish your app and go live.
Organization Google Developer Accounts: you need to apply for DUNS number for your business and add this 9-digit number to your developer account before you can publish your app and go live.
We are finally in the last steps to submit your app for Google review.
- Select your app from the main page.
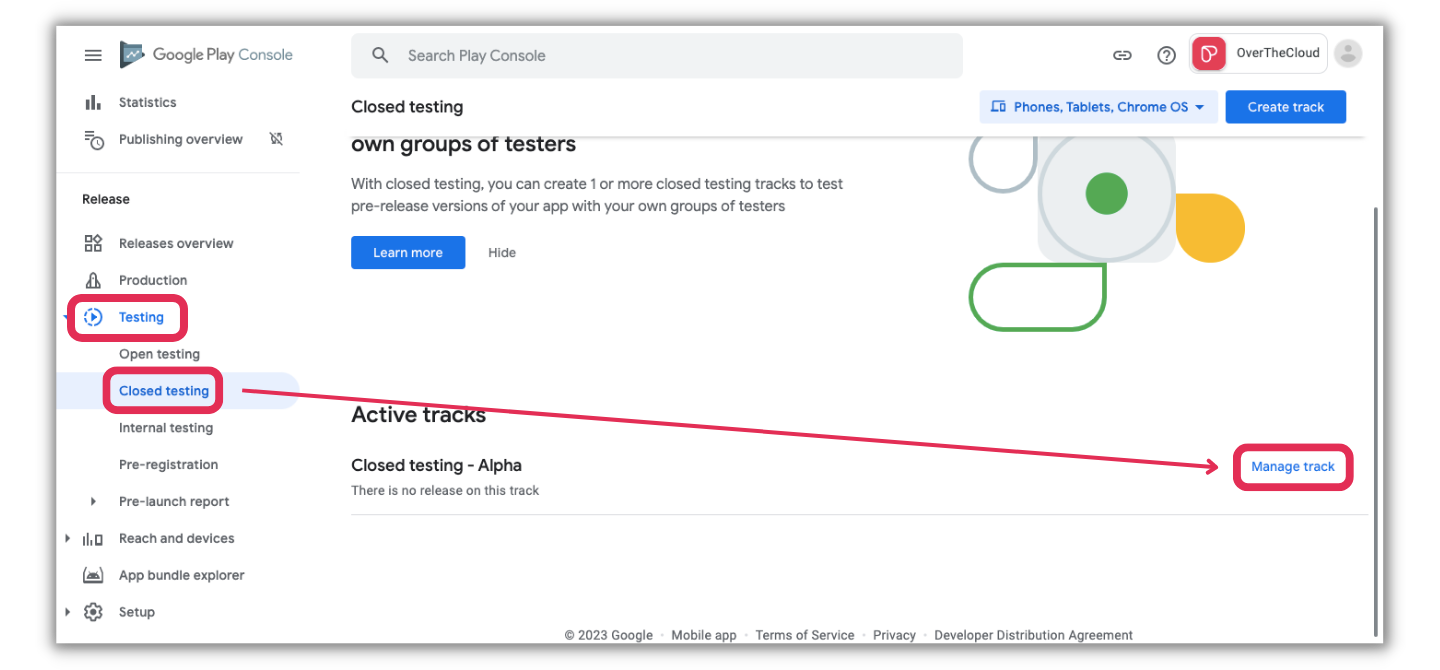
- From the left side panel, scroll to find Testing and click on it to expand.
- Choose Closed testing from the menu that will appear.
- Click on Manage Track from the left side of the screen.
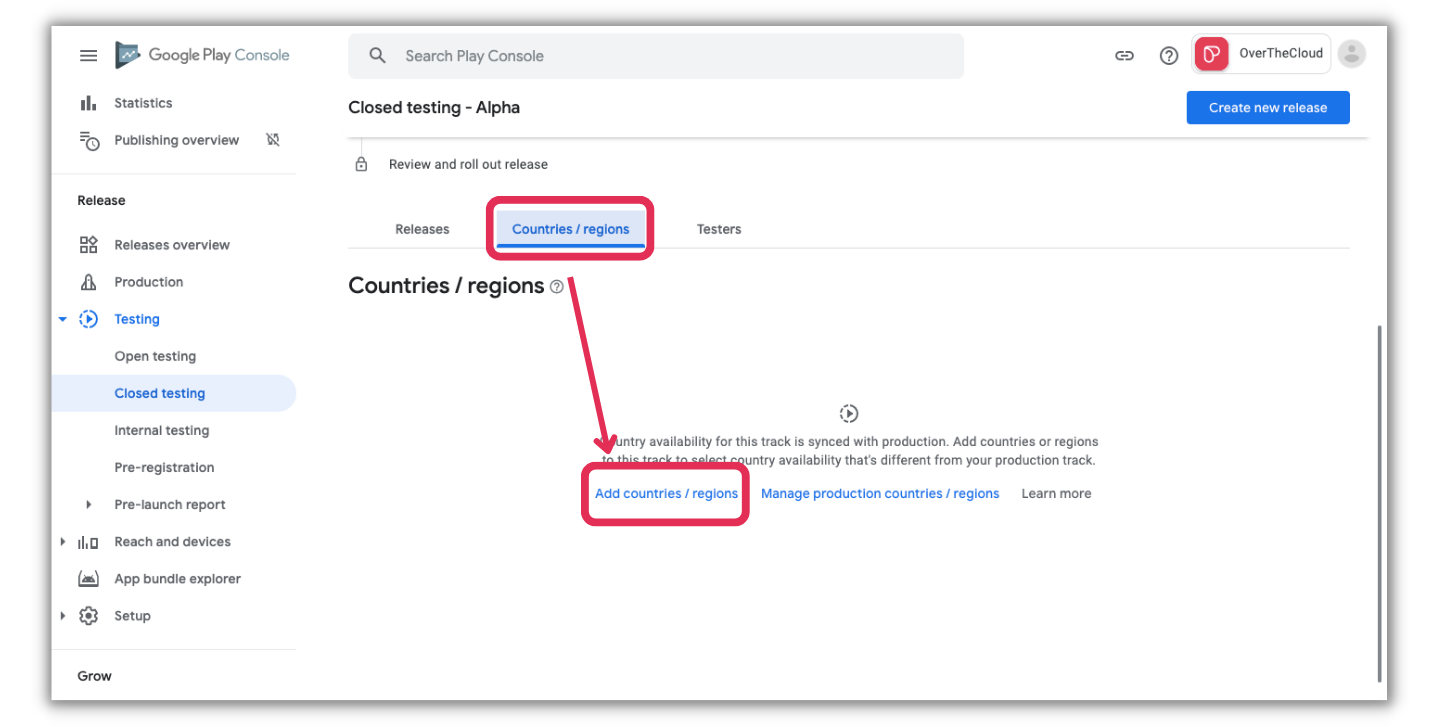
- Under Countries/regions click on Add countries/regions.
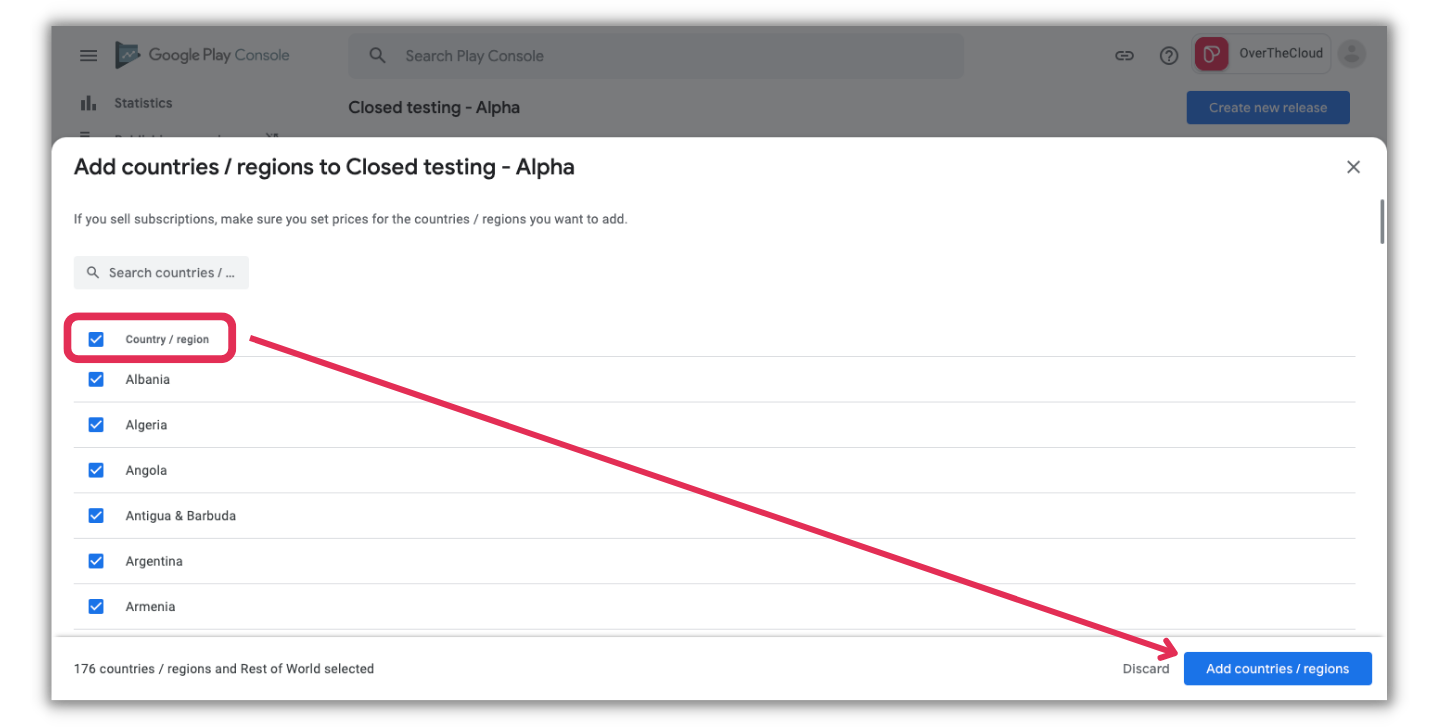
- Using the first checkbox Country/region, select all checkboxes.
- Click on Add countries/regions to save your selection.
- A pop-up will appear notifying you that your app will be available on Google Play to eligible testers from 176 new countries/regions and the Rest of the World, click Add when you get this message.
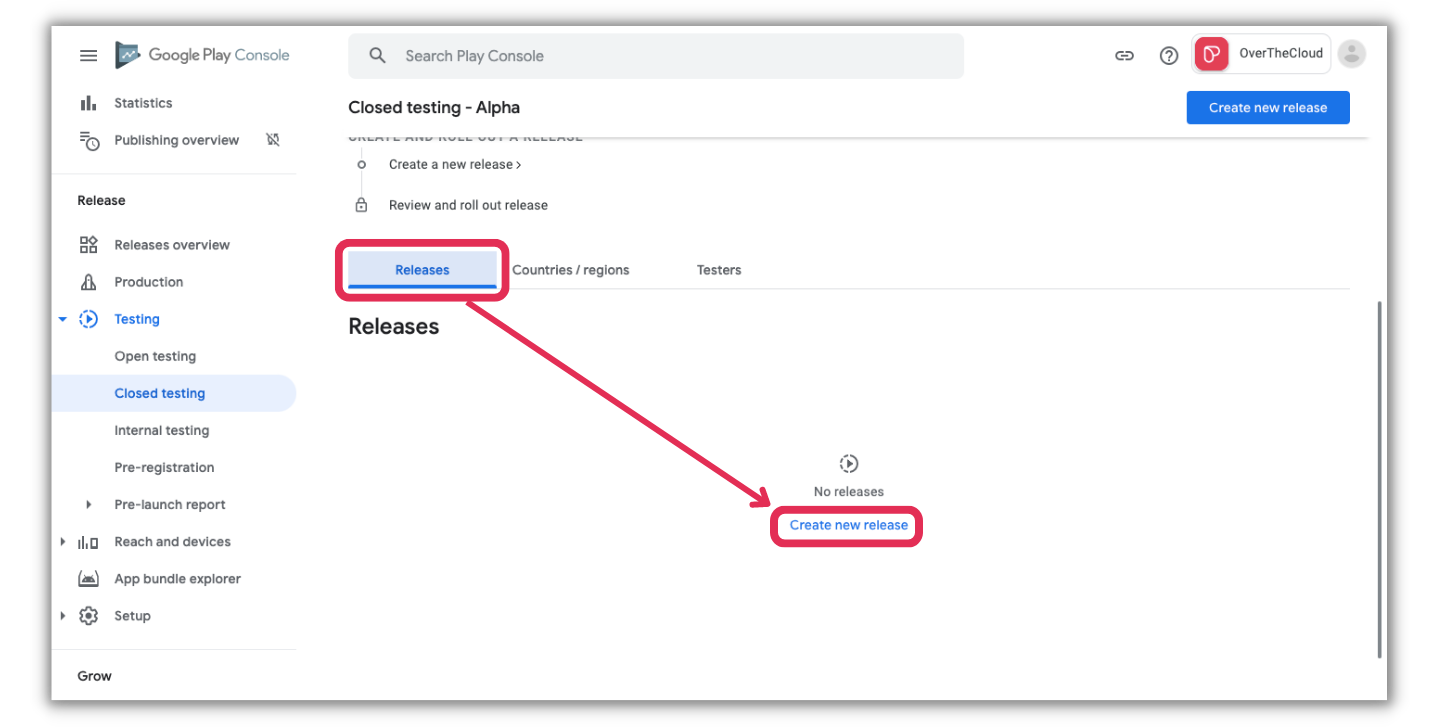
- From Releases, click on Create new release.
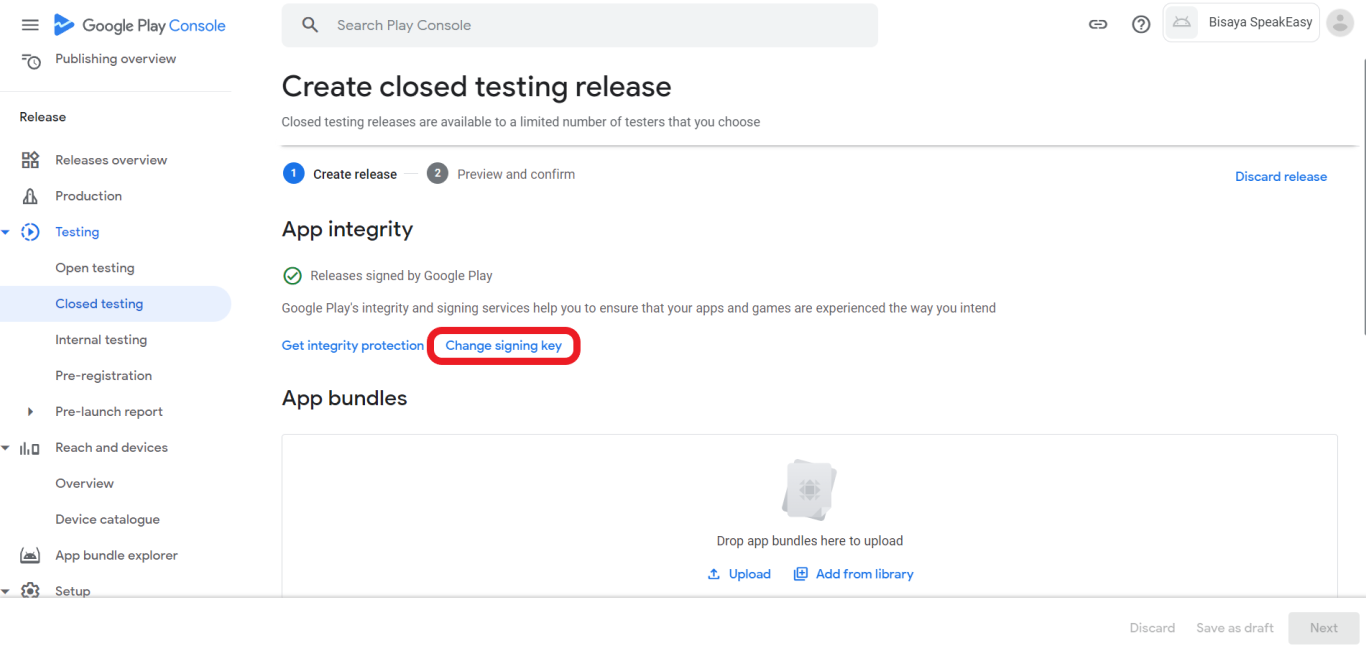
- Click on the Change signing key.
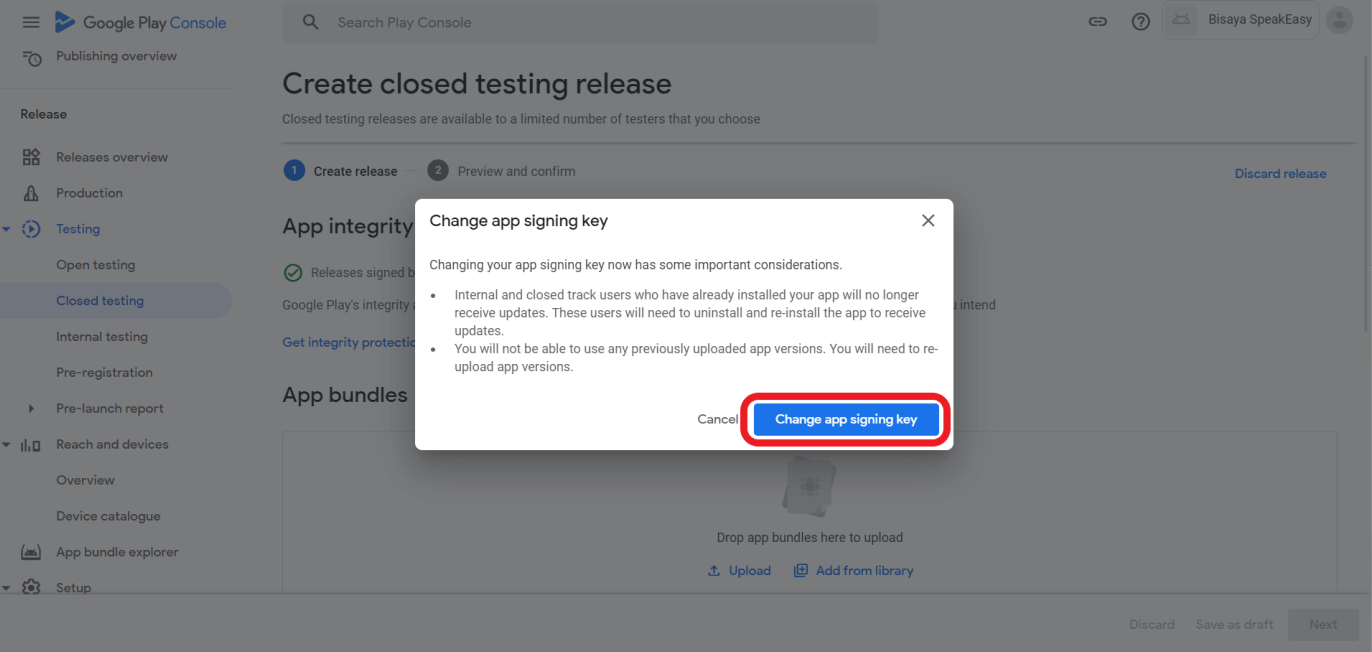
- From the pop-up, choose to Change app signing key.
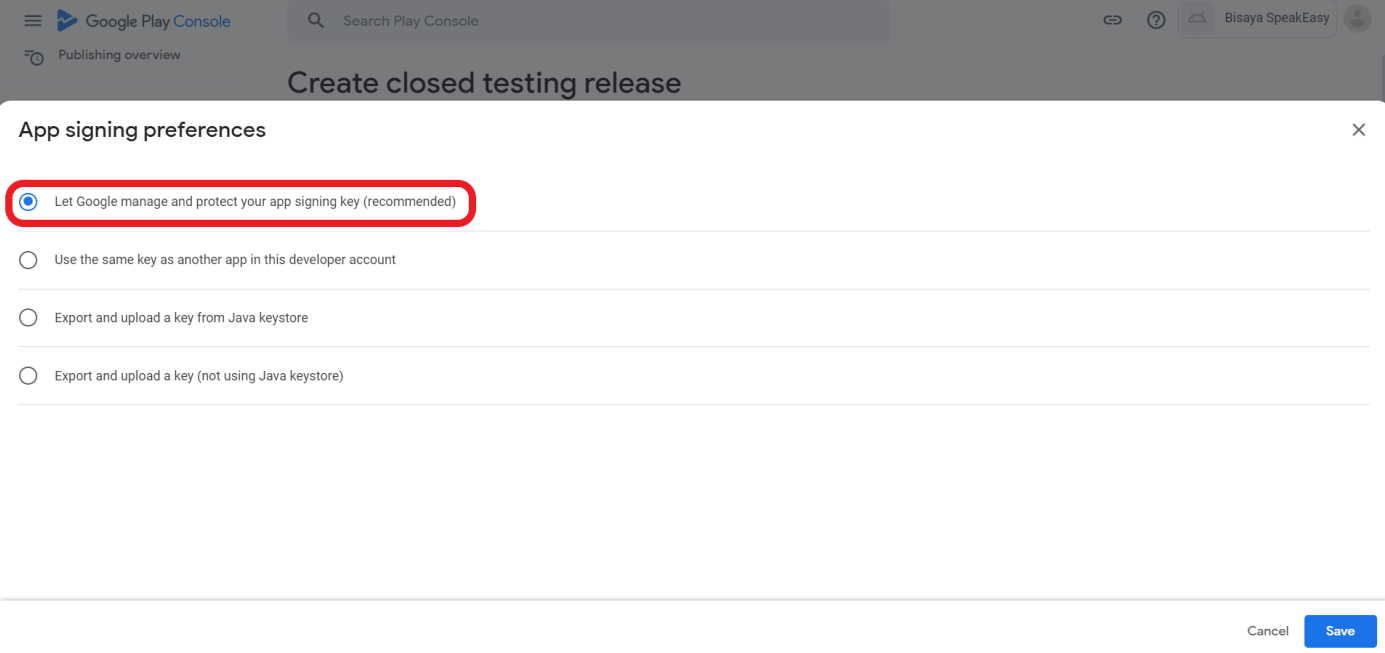
- Select Let Google manage and protect your app signing key (recommended)
- Click Save.
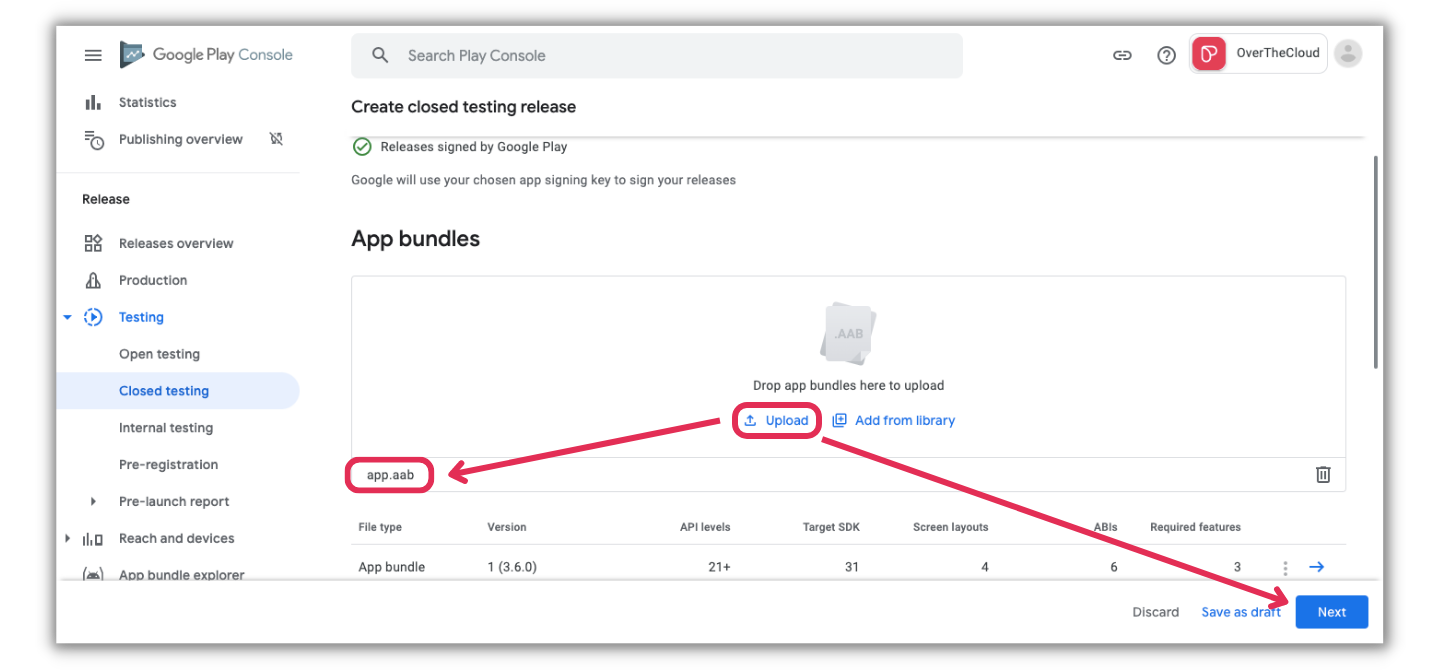
- From App bundles, upload the app.aab file you downloaded by clicking Upload or dragging the file to the box.
Note: please allow 5 minutes for the file to upload.
- Click Next after the file is uploaded successfully.
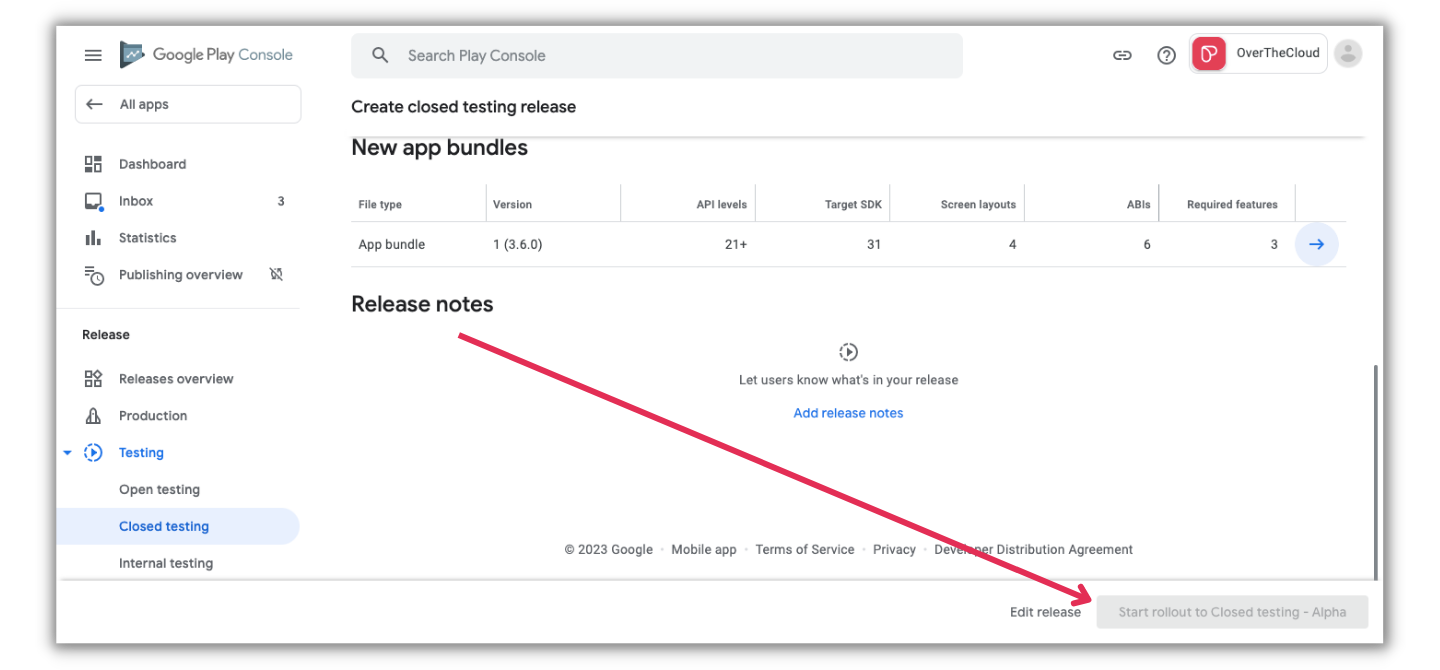
- If there are no errors with your identity/profile, click on Start rolling to closed testing - Alpha to finalize the submission process from Google's side.
- Click on Start rolling to closed testing - Alpha.
- Now go to Passion.io App Builder, go to Sales Channels, and choose Google Play Store ⇒ Continue Setup
- Check the box for I have uploaded my Android App Bundle (AAB) to my Google Play Account. As we have done that!
- Click SUBMIT FOR REVIEW.

- A confirmation is required to ensure your acceptance of the timeline for submitting a new app ==> up to 20 days.

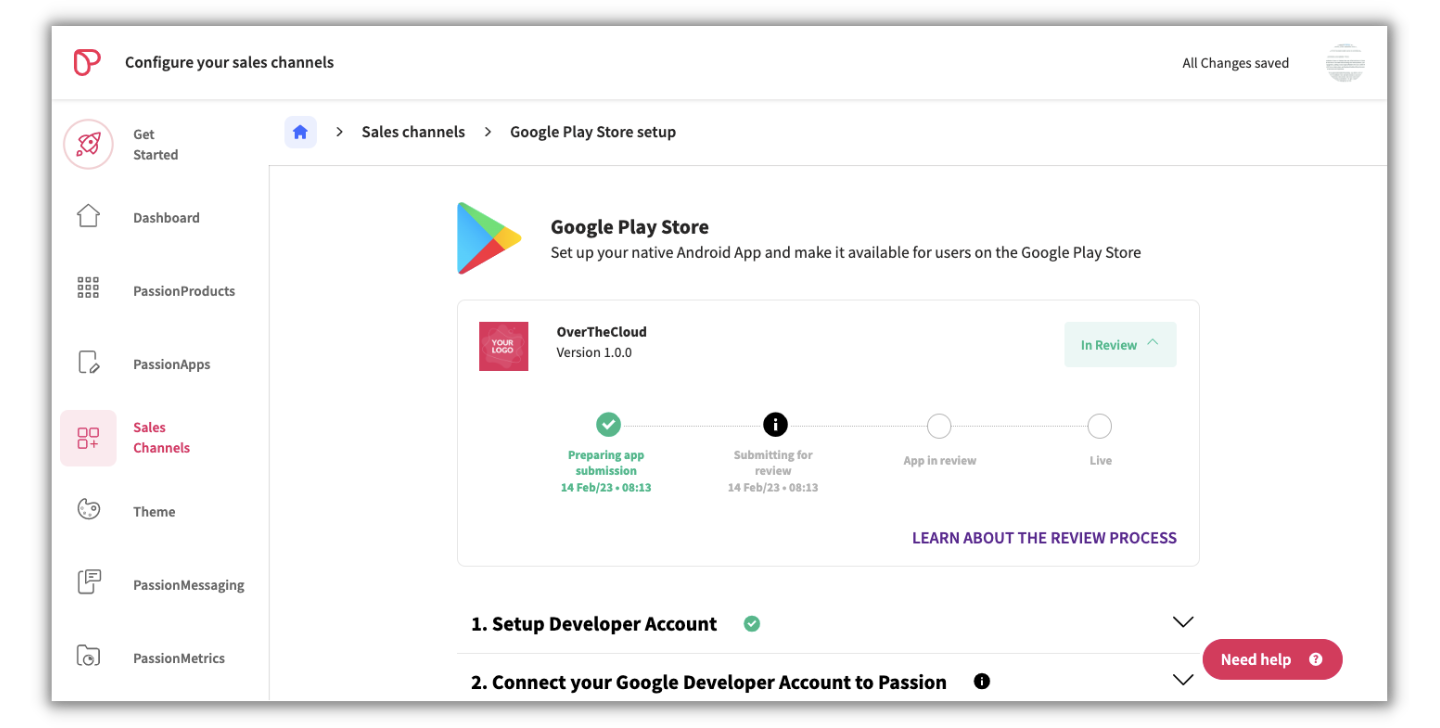
- After your confirmation, you will see your submission's progress.
- Your app will be submitted for review once the connection between your Google Developer and Passion.io Accounts is successful. We will email you with any feedback regarding the connection.
- You can also track the progress of your app by logging in to your Passion.io AppBuilder, going to Sales Channels, and choosing Google Play Store ⇒ Continue Setup.
- Google app reviews usually take seven days or more depending on their review/revision requests.