.png?width=185&height=50&name=Full%20Passion.io%20logo%20(white).png)
IN THIS ARTICLE
1. What are App Details?
2. Updating your App Details
3. App Category and URLs
4. Enabling your Screenshot Builder
5. Frequently Asked Questions (FAQs)
Please ensure you have completed setting up your Developer Accounts and followed the articles below.
1. What are App Details?
App Details are essential information that you need to fill in and complete to publish your app. You can find the App Details under My App > Publish your app.
Please ensure you have completed the information in the "1. Setup Developer Account" and "2. Connect your Developer Account to Passion" tabs before proceeding. You can learn more about these here:
How to set up your iOS App.png?width=688&height=188&name=first%20impressions%20(86).png)
2. Updating your App Details
2.1 For Apple:
- App Name - The name of your app that will be published on Apple and Google
- App Icon - Upload your app's logo or icon to be shown on your app, and it will appear as the icon when downloaded to your home screen. (recommended size: 1024x1024px)
- App Description - This text is used in the app stores to advertise your application. It's critical to convince users to download your app. We recommend that you write a minimum of 50 words. Please include information about all pricing plans you offer on your Sales Page (do not include any prices).
- Promotional Text - A summary of your app description
- App Subtitle - A short description of your app
- App Store Category - The category the app will be placed in on the AppStore
- App Key Words - Define keywords to help with search optimization
- Support URL - Your support link to your site
- Marketing URL - Your marketing link to your site
- Privacy Policy URL - Your privacy policy for the app. You can use your own or use the Passion Privacy Policy.
- Enable Screenshot Builder - enable or disable the use of the screenshot builder.
2.2 For Google:
- App Name - The name of your app that will be published on Apple and Google
- App Icon - Upload your app's logo or icon to be shown on your app, and it will appear as the icon when downloaded to your home screen. (recommended size: 1024x1024px)
- App Description - This text is used in the app stores to advertise your application. It's key to convince users to download your app. We recommend that you write a minimum of 50 words. Do not include prices.
- Short Description - A summary of your app description
- Google Play Feature Image - Your featured image will be shown on Google Play
- App Category - The category the app will be placed in on the AppStore
- App Key Words - Define keywords to help with search optimization
- Support URL - Your support link to your site
- Marketing URL - Your marketing link to your site
- Privacy Policy URL - Your privacy policy for the app. You can use your own or use the Passion Privacy Policy.
- Enable Screenshot Builder - enable or disable the use of the screenshot builder
3. App Category and URLs
You can select a category that best fits your app's content: Lifestyle, Business, or Education.
Additionally, you can include app keywords to improve search results in the App Store.
Support URLs are provided for clients to get assistance and access privacy policies.
4. Enabling your Screenshot Builder
App screenshots are the first images your clients will see when they click on your app store page. They serve as sneak peeks into your app. Your app screenshots must convey the best features of your app and convince clients to download your app.
Here's an example of app screenshots:
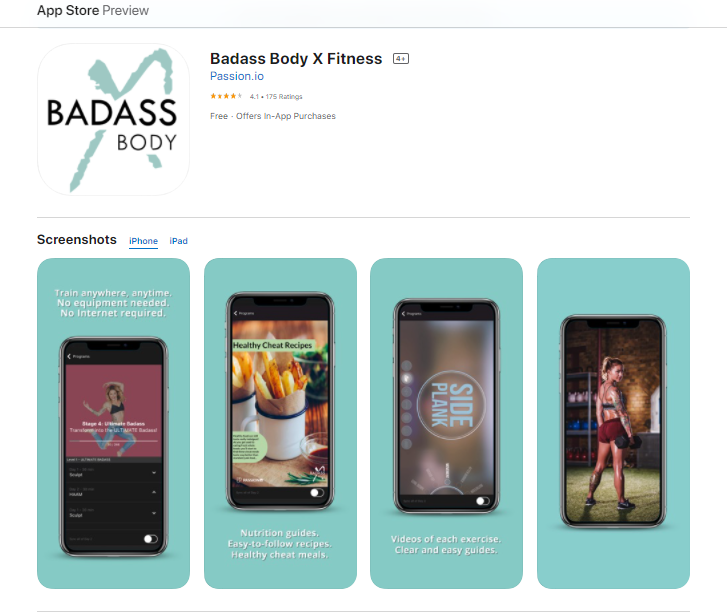
With the Screenshot Builder, you can now choose, customize, and design the app screenshots on your Google and Apple app store pages.
Features:
- Screenshots for Different Mobile Views (Phone and Tablet)
- Different App Scenarios (Learn, Lesson, Discover, and Product Page)
- Adding Captions
- Color Theme/Picker
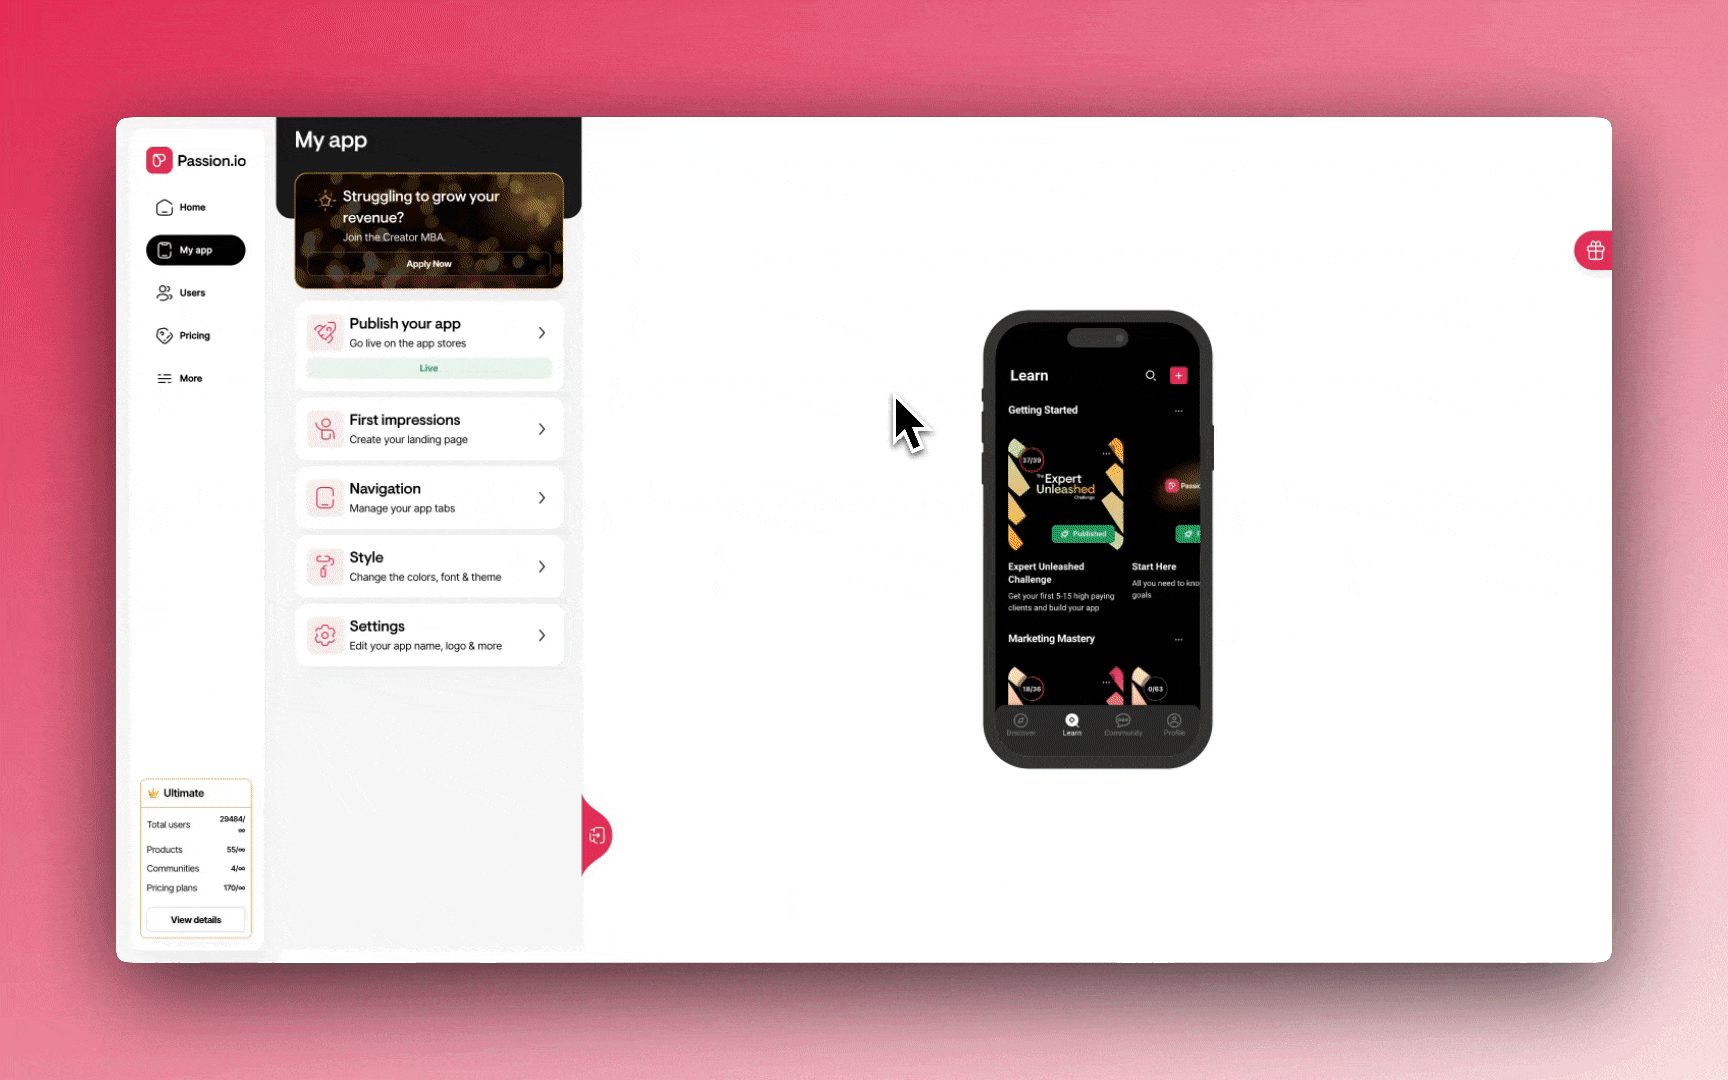
To create your screenshots, follow the steps below:
- Log in to your Passion.io account.
- Go to My App > Publish your app
- Go to App Details and select the Enable Your Screenshot Builder
- Then go into each tab (Learn, Lesson, Discover, Product) and customize them
- Select the PREVIEW type you would like for your screenshots.
- Select the SCENARIO you'd like to use as a screenshot image for your first screenshot.
- Selecy which Mobile Device Template to use for the first screenshot
- Select the Caption placement that will go into your app screenshot.
Lesson Screenshots. The system automatically takes a screenshot of the content from the first lesson. If it's a video, the workaround is to add a still image on the first few seconds of the video so that it will show up instead of a black screen.
4. Once you edit your screenshots, you can publish your apps. Please allow 1 hour for the updated screenshots to appear in the app stores.
-
- Always submit the newest version of your App with the adjustments in the Screenshot Builder so your Screenshots will be up to date.
- You can always submit the newest version of your App with the adjustments in the Screenshot Builder so your Screenshots will be up to date.
- Everything updates automatically, but you must re-submit to the Apple Store/Google PlayStore when you change your pricing plans and App Details.
5. Frequently Asked Questions (FAQs)
Is this required?
Completing all details in the App Details tab will speed up the review process for publishing your app to Apple and Google. Missing information may cause delays and questions from Apple/Google during the review and approval process.
Can I upload my screenshots?
You can use your screenshots if they show what your app does. You'll need to:
- Turn off the Screenshot Builder in your App Details
- Upload your screenshots directly to your Developer Accounts.
Do I have to resubmit my app when I make changes?
Everything updates automatically but you have to re-submit to the Apple Store/Google PlayStore when you change your App Details.