.png?width=185&height=50&name=Full%20Passion.io%20logo%20(white).png)
IN THIS ARTICLE
1. Multipricing vs Pricing plan
2. Setting up the Pricing plan widget
3. Setting up the Multipricing widget
4. Frequently Asked Questions (FAQs)
1. Multipricing vs Pricing plan
You can choose between a single Pricing Plan or a Multipricing plan for your Sales Page.
The Pricing Plan focuses on one plan, while the Multipricing option allows you to sell multiple plans, giving you more selling flexibility.
Adding both widgets to finalize your Sales Page is optional. It is either the Single Pricing Plan Widget or the Multi Pricing Widget.
2. Setting up the Pricing plan widget
- Log in to your Passion.io account and go to your Admin View.
- Go to My App, then First Impressions.
.png?width=635&height=292&name=first%20impressions%20(13).png)
- Select the Sales Page.
- Drag and drop the Pricing Plan Widget to the preview.
.png?width=635&height=292&name=first%20impressions%20(14).png)
- Once you drop the widget, Pricing Plan Settings will appear on the right side.
- You will add:
-
- Small headline: Brief title
- Main headline: Clearly state what the pricing section offers, like "Master Workouts"
- Button Text: Choose an action phrase like "Subscribe" or "Purchase"
- Web App Checkout URL: Leave blank for PassionPayments; paste the external checkout URL for third-party processors.
- Plan - a drop-down menu with all the pricing plans you have created.
.png?width=635&height=292&name=first%20impressions%20(15).png)
- You can always come back and Edit the widget, change its placement on the Sales Page, or remove it.
.png?width=635&height=292&name=first%20impressions%20(16).png)
We implemented a filter on the Sales Page to avoid getting rejections from Apple due to high pricing. The maximum Apple and Google will accept is $100 for a one-time payment or $50/month subscription.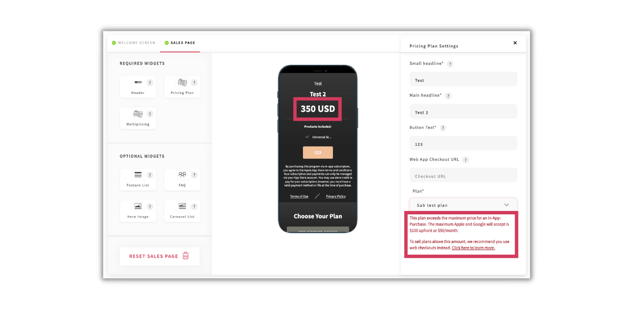
We recommend you use web checkouts to sell plans above this amount. Click here to learn more
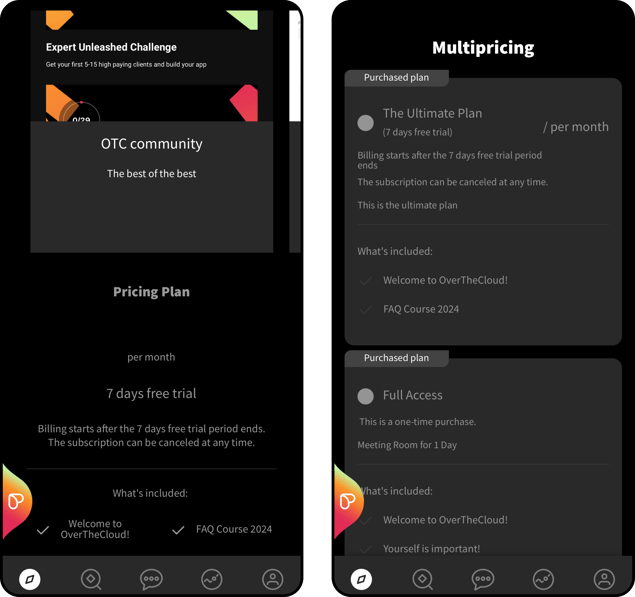
3. Setting up the Multipricing widget
- Log in to your Passion.io account and go to your Admin View.
- Go to My App then First Impressions.
- Select the Sales Page.
- Drag and drop the Pricing Plan Widget to the preview.
.png?width=635&height=292&name=first%20impressions%20(18).png)
- Once you drop the widget, Pricing Plan Settings will appear on the right side.
- You will add:
- Headline - goes on top of the list
- Highlighted text - add short description words for the plan like Popular, Basic, or Level Up. This option will only show up if you Set it as Highlighted.
- Plan - a drop-down menu with all the pricing plans you have created.
- Web App Checkout URL - Leave this blank if you are using PassionPayments. On the other hand, you can copy and paste an external checkout URL here if you are using a third-party payment processor.
- Add Item - Press 'Add Item' to add another pricing plan.
- You can always come back and Edit the widget, change its placement on the Sales Page, or remove it.
.png?width=635&height=292&name=first%20impressions%20(19).png)
4. Frequently Asked Questions (FAQs)
Both Pricing Plan and Multipricing widget are under Required Widget, is it required to use both when I only have one pricing plan?
No, if you only have one pricing plan, you can use only the Pricing Plan widget.
Can I use multiple Pricing Plan widgets on my Sales Page?
Yes, you can add them to different sections of your Sales Page as a call to action.
If I edit my Pricing Plan and change the price, will that change the price automatically on my app?
It changes automatically on your Web app but not on your branded app. You need to send an update to Apple and Google so they can review and update your branded app. Learn how to do it here: