You can build on-the-go using the Passion.io App or directly from your own Passion App.
Directly from your phone, you can:
- Add or edit your courses.
- Add or edit your lessons/sequences.
- Add all the lesson widgets, like Question, Text, Opinion Scale, Videos and more.
- Rearrange your courses and products.
- Rearrange, Clone, and Remove anything from your courses and lessons.
You must log in with the email you used to subscribe to Passion.io.
IN THIS ARTICLE
1. How do I add a new Course from my phone?
2. How do I add a new Lesson from my phone?
3. How do I add a new Sequence from my phone?
4. How to use Passion.io Sequence Widgets from my phone?
5. How to use Passion.io Lesson Widgets from my phone?
6. How to manage my content from my phone?
7. Frequently Asked Questions
- Log in with the email you used to subscribe to Passion.io
- Go to Products or Learn.
- Depends on the name you gave to your products section
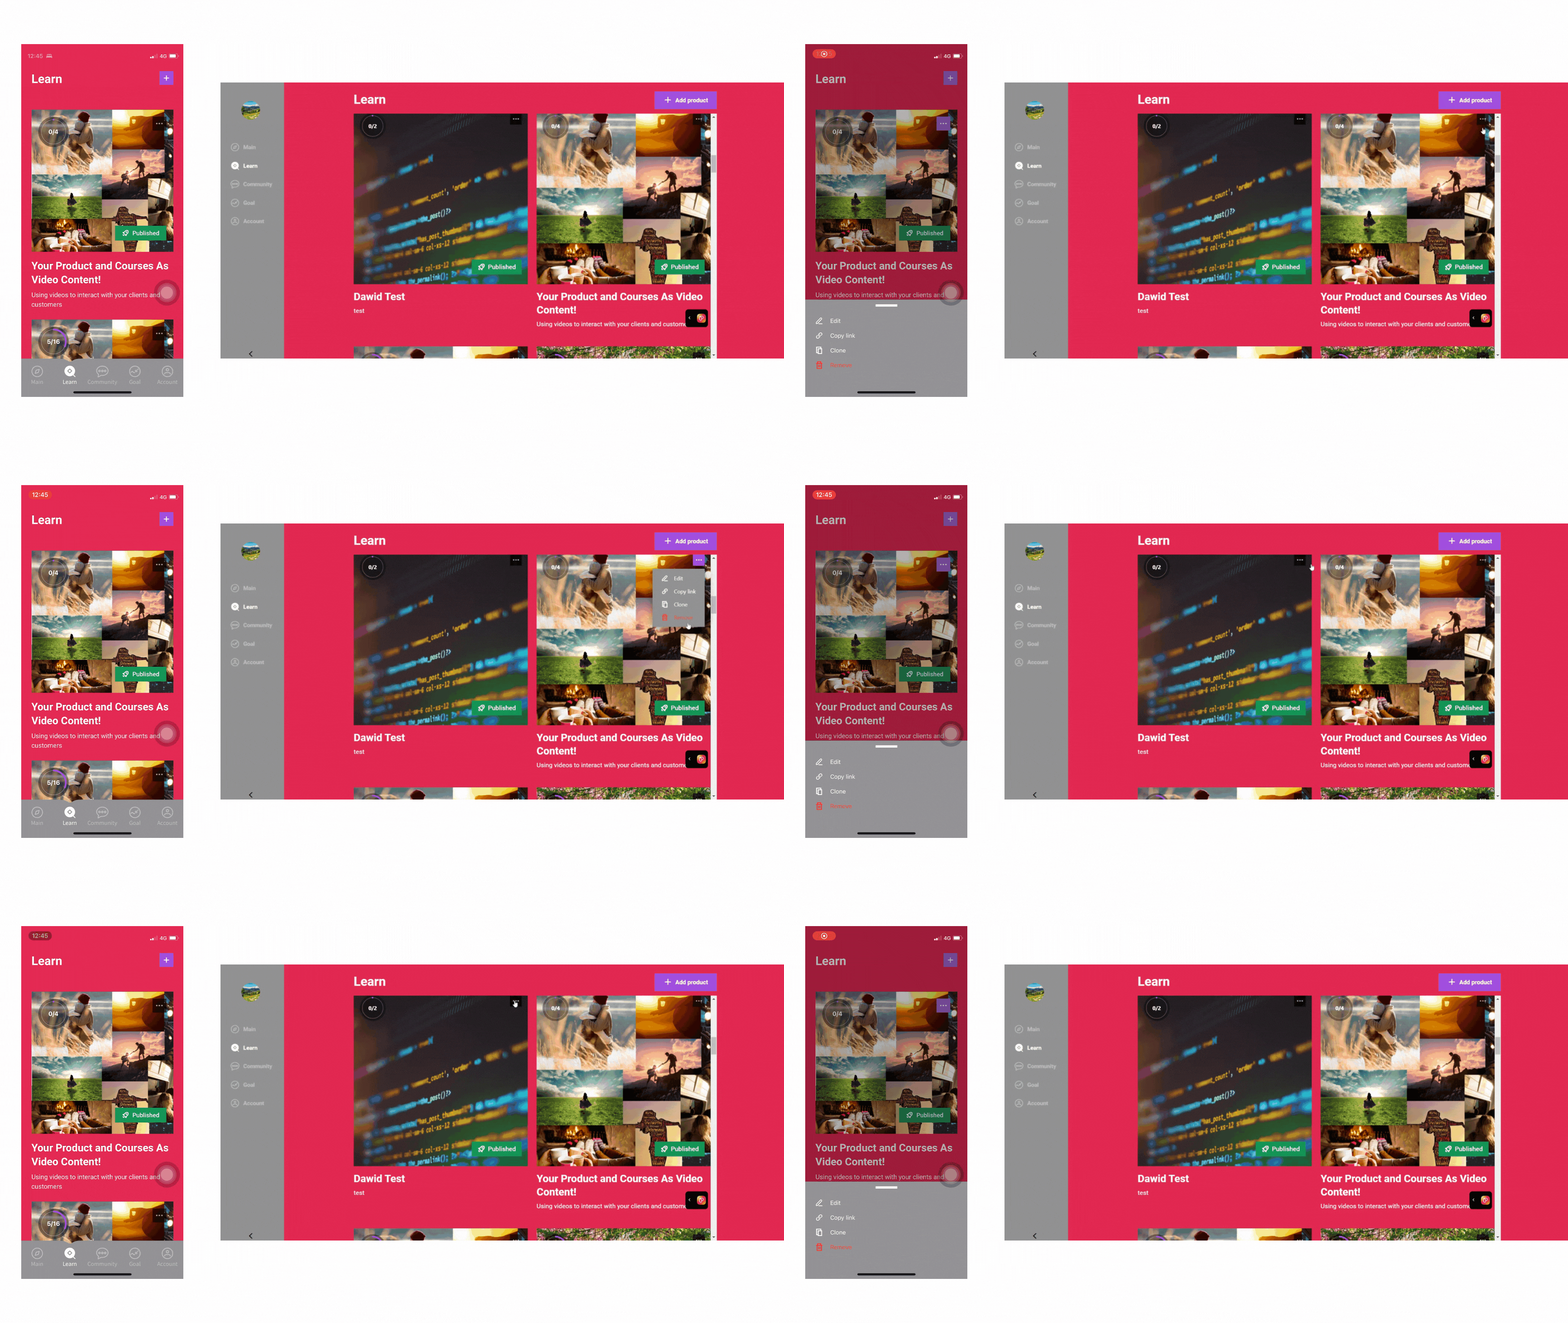
- You will notice a 3-dotted menu on the top right corner of each course.
- Tapping on the 3 dots or long pressing on the course will trigger a pop-up menu; this menu will allow you to:
- Edit your course's cover photo, course name, course description, and which pricing plans would enjoy this course.
- Copy the course's URL to share in your community channels or outside the app.
- Clone your course and make a copy of it.
- Remove a course and delete it from your products permanently.
- Tapping on the 3 dots or long pressing on the course will trigger a pop-up menu; this menu will allow you to:
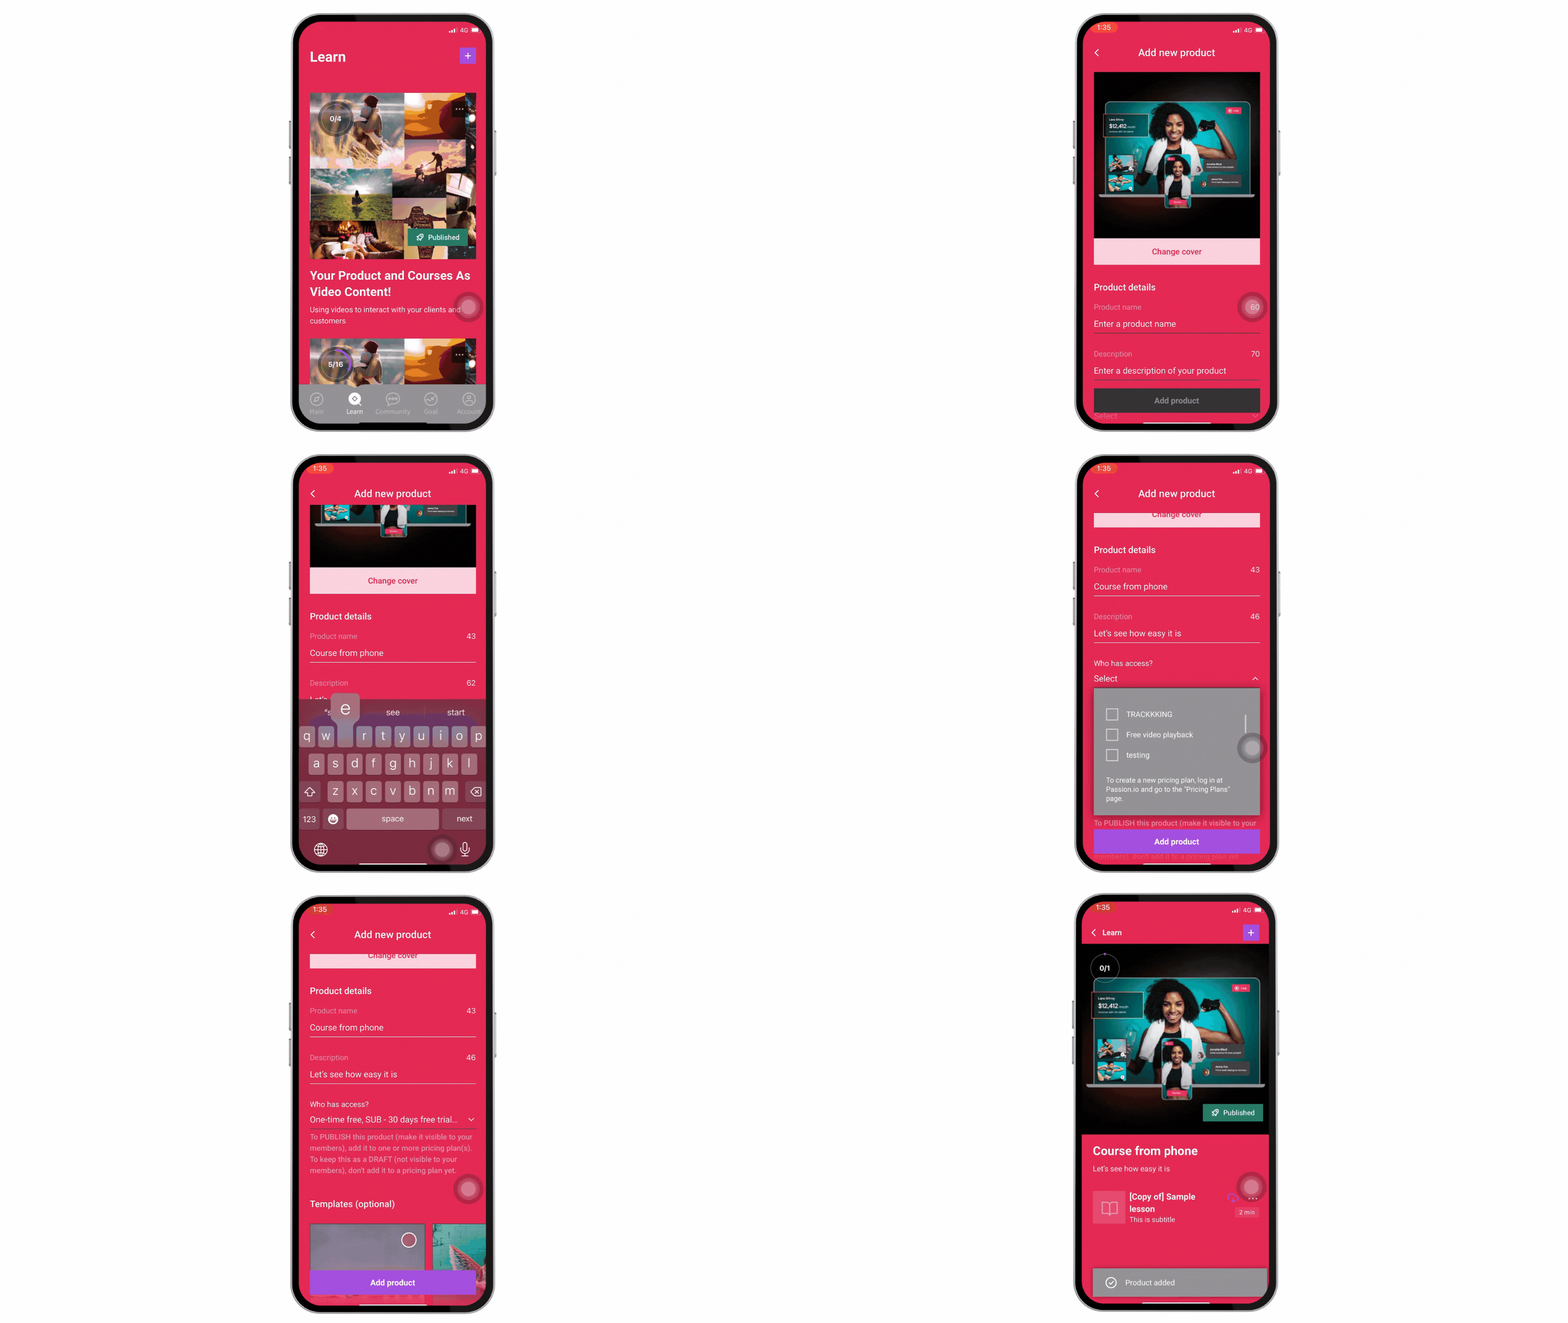
- To add a new course, click on Add product or the + Sign.
- Enter your new course's name with a 60-character limit. "Mandatory".
- Enter a short description of the course with a 70-character limit. "Mandatory".
- Choose a cover photo for your course "Optional".
- The photo dimensions will match the dimensions of the original image, you can zoom in or out to make it fit as you please.
- The photo size should be less than 5 MB.
- Choose which Pricing Plans would include this new course.
- Turn Off or Leave Progress Tracking on.
- Turning this setting off will remove the Complete button from all lessons in this course.You will not be able to track the end users progress through this course.
- Choose a template to help you start building your course's content "Optional".
- Click on Add product at the bottom of the screen.
Adding a course to an active pricing plan would automatically publish this course to your audience, if you wish to save the course as a draft do not link it to a pricing plan now.
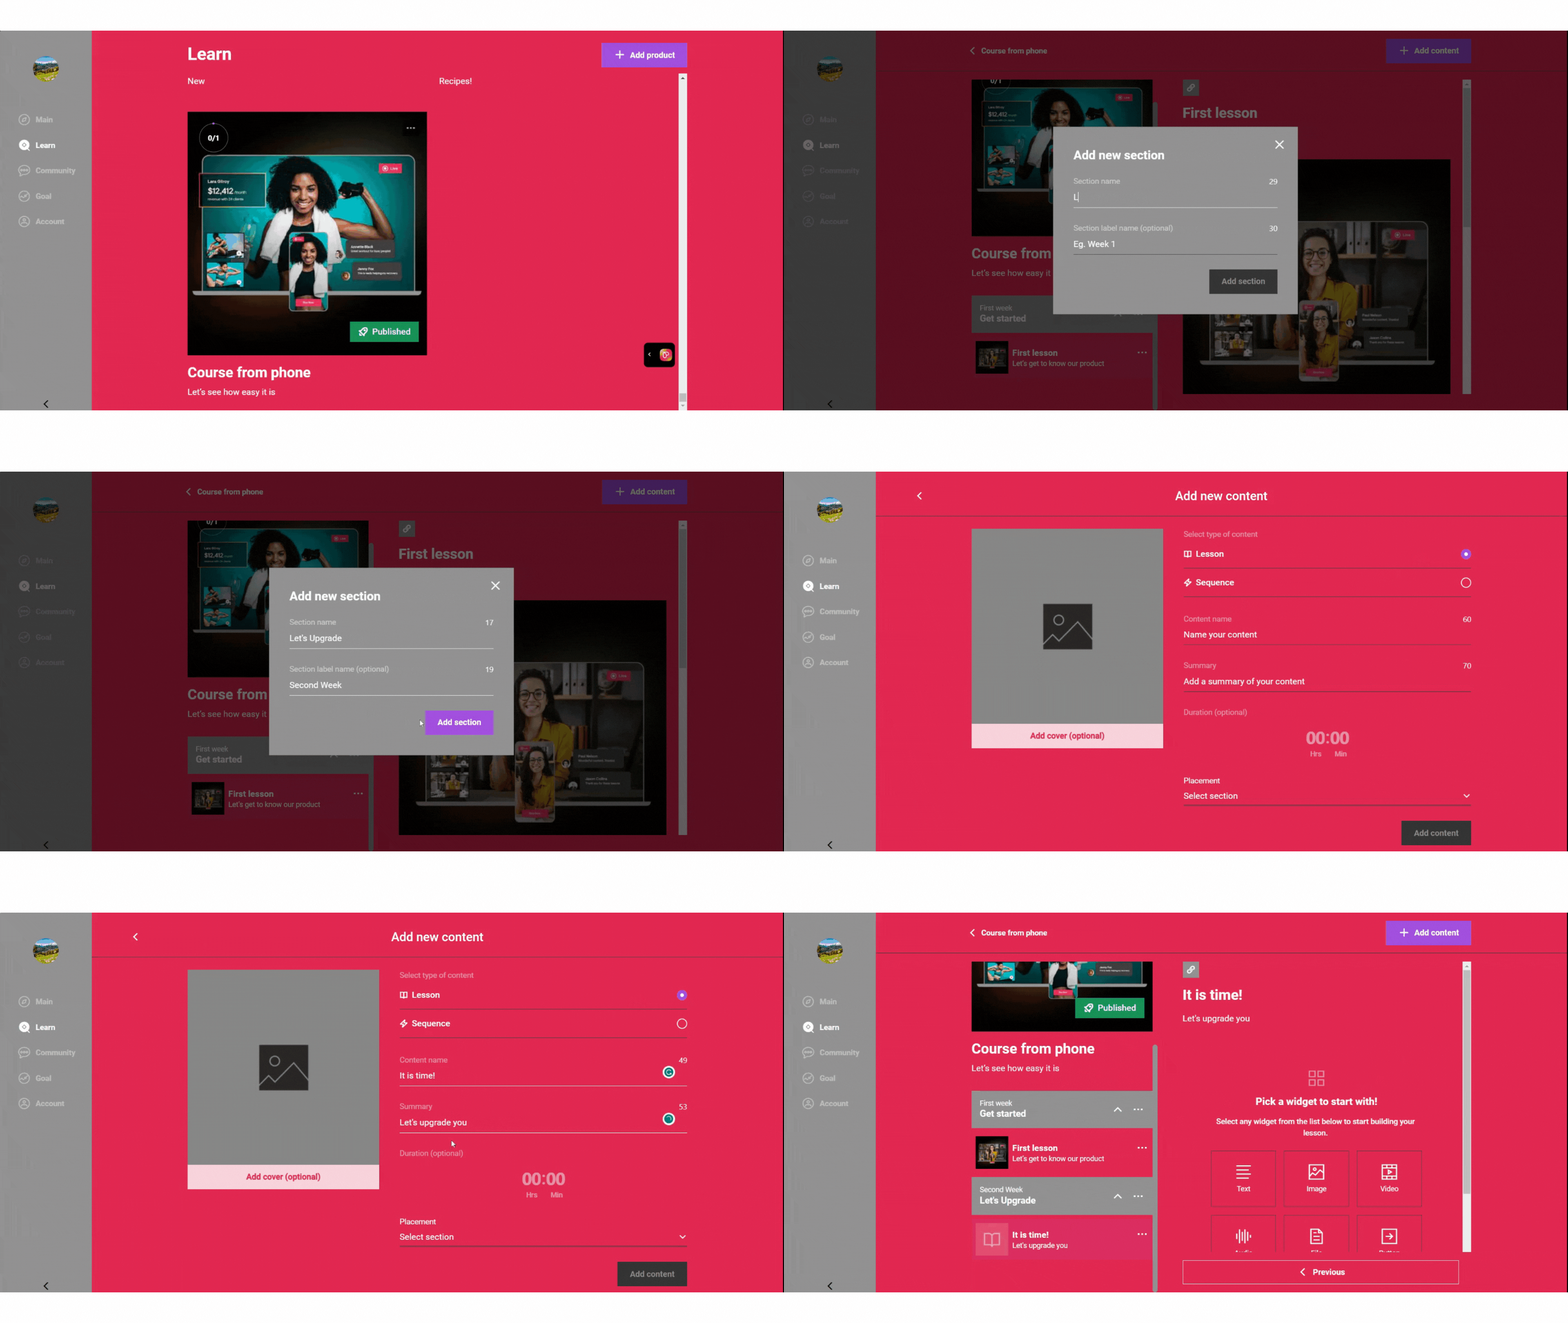
- Open the course you just added.
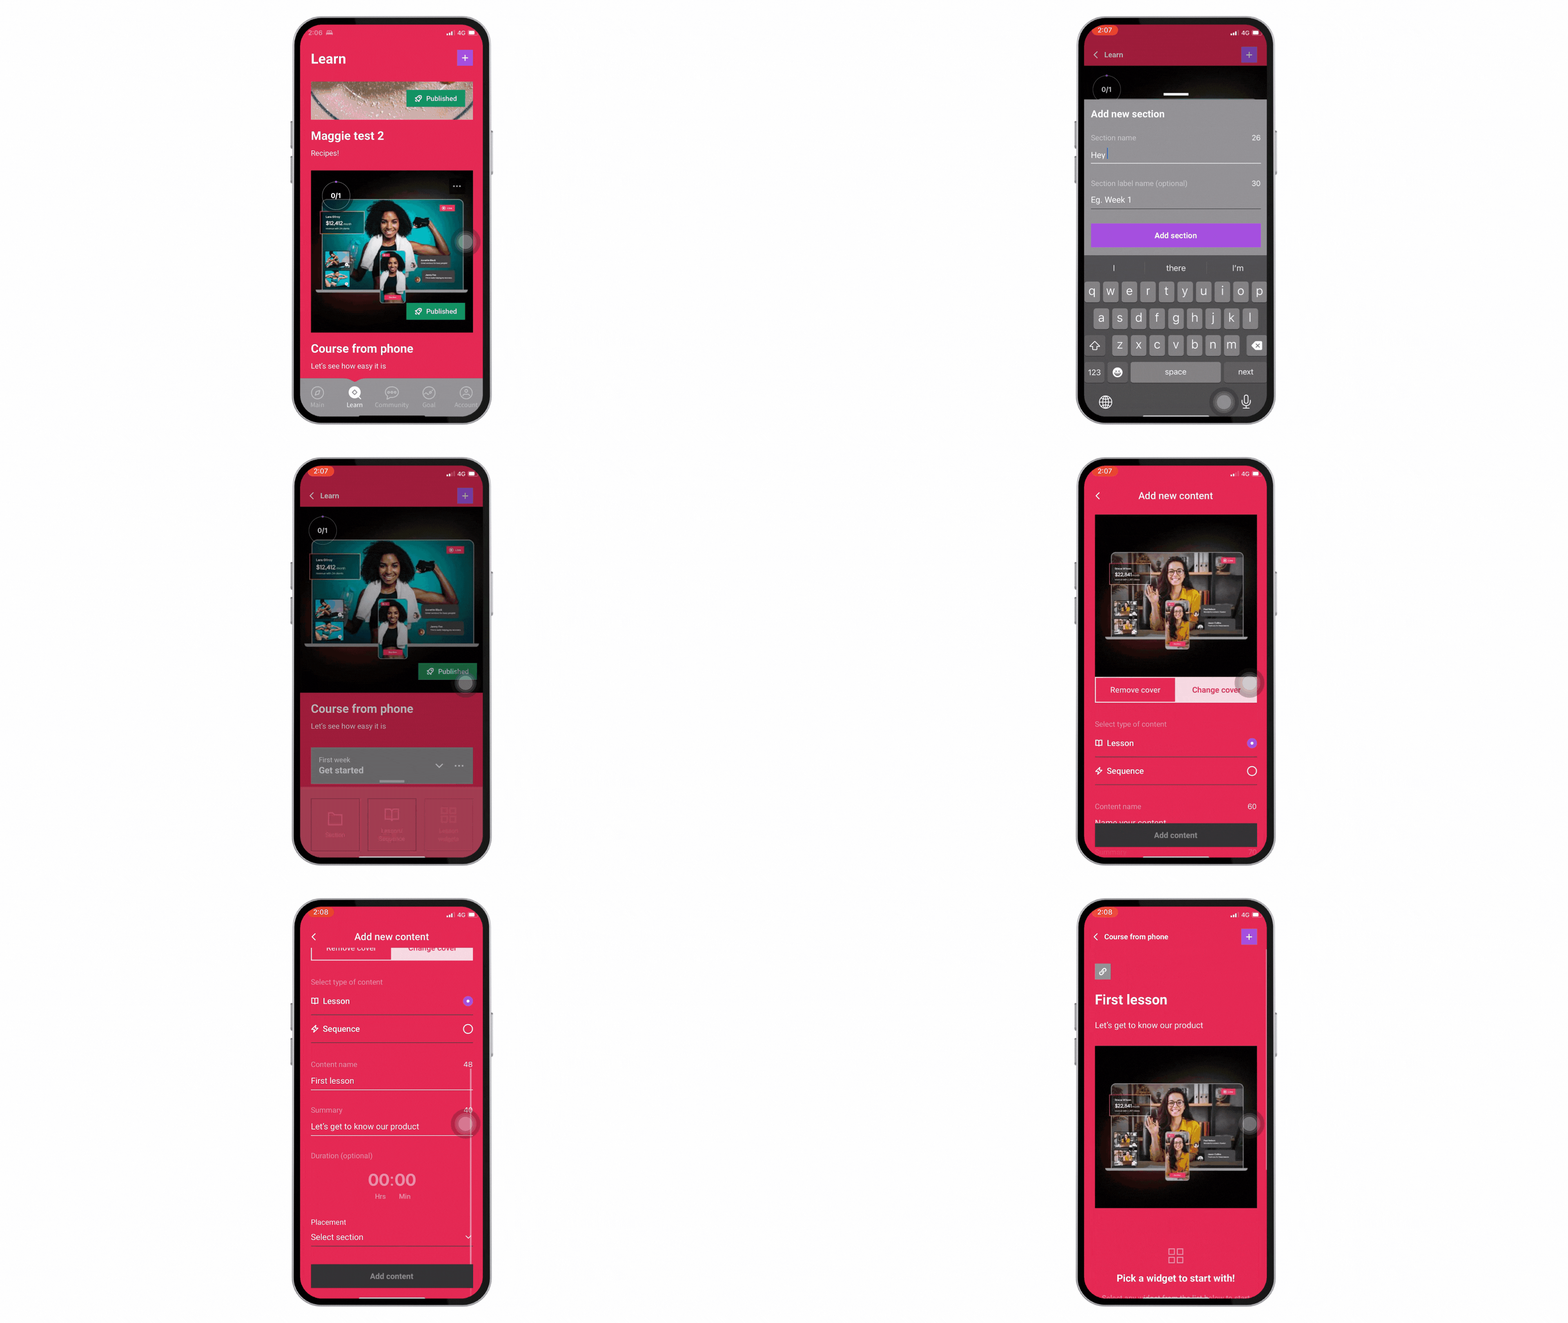
- From the top right corner of PassionApp click on Add content or the + Sign.
- Start adding sections to your course to have multiple levels for your content.
- Adding sections directly from the App will give you the flexibility to customize the labels of each section individually.
- From the same + Sign, add a lesson to your course.
- Add your new lesson's name "Mandatory".
- Add a short description to your lesson "Mandatory".
- Add the duration you would like to set for this lesson "Optional".
- Choose which section you would like this lesson to be under.
- Add a cover photo for your lesson "Optional".
- The photo dimensions will match the dimensions of the original image, you can zoom in or out to make it fit as you please.
- The photo size should be less than 5 MB.
- Click on Add content.
- Open the course you just added.
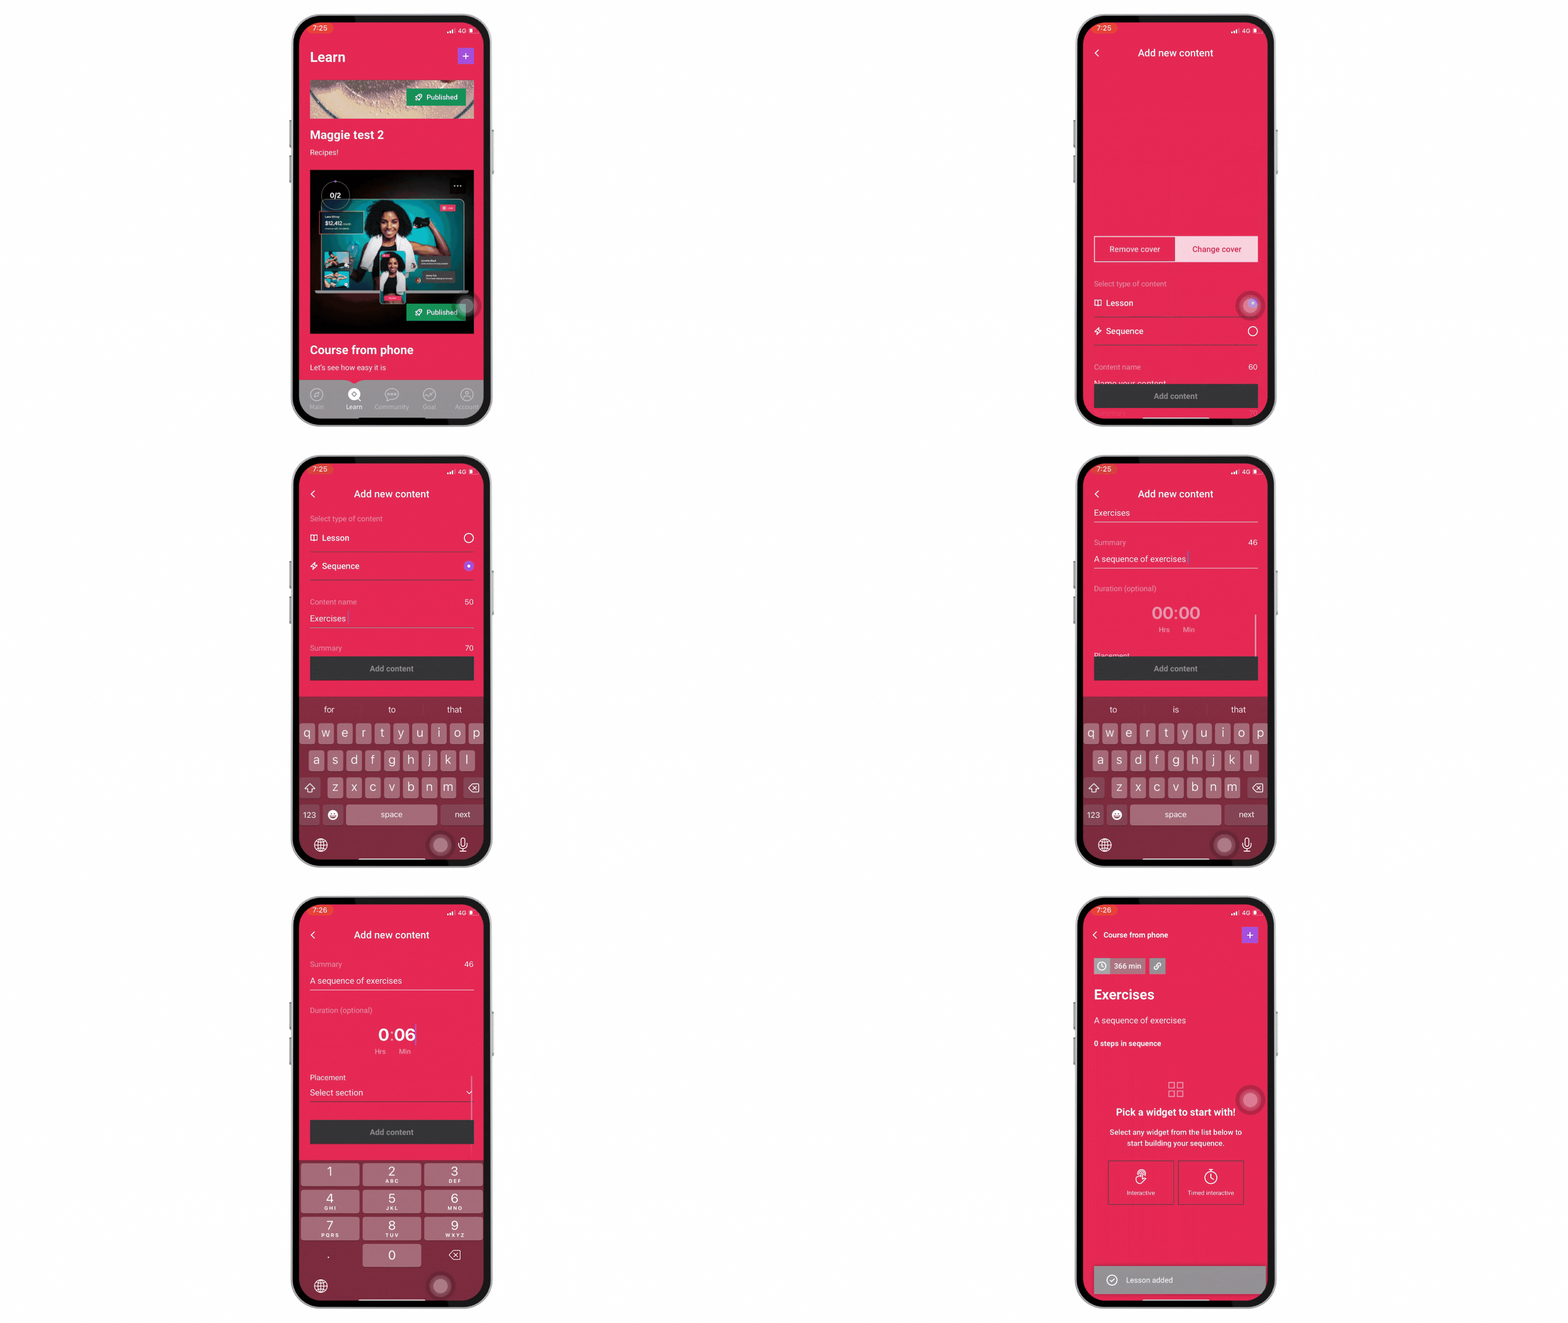
- From the top right corner click on Add content or the + Sign.
- From the same + Sign, add a sequence to your course.
- Add your new sequence's name "Mandatory".
- Add a short description to your sequence "Mandatory".
- Add the duration you would like to set for this sequence "Optional".
- Choose which section you would like this sequence to be under.
- Add a cover photo for your sequence "Optional".
- The photo dimensions will match the dimensions of the original image, you can zoom in or out to make it fit as you please.
- The photo size should be less than 5 MB.
- Click on Add content.
You get to choose between interactive and timed-interactive sequences.
Learn the difference between interactive and timed-interactive sequences from here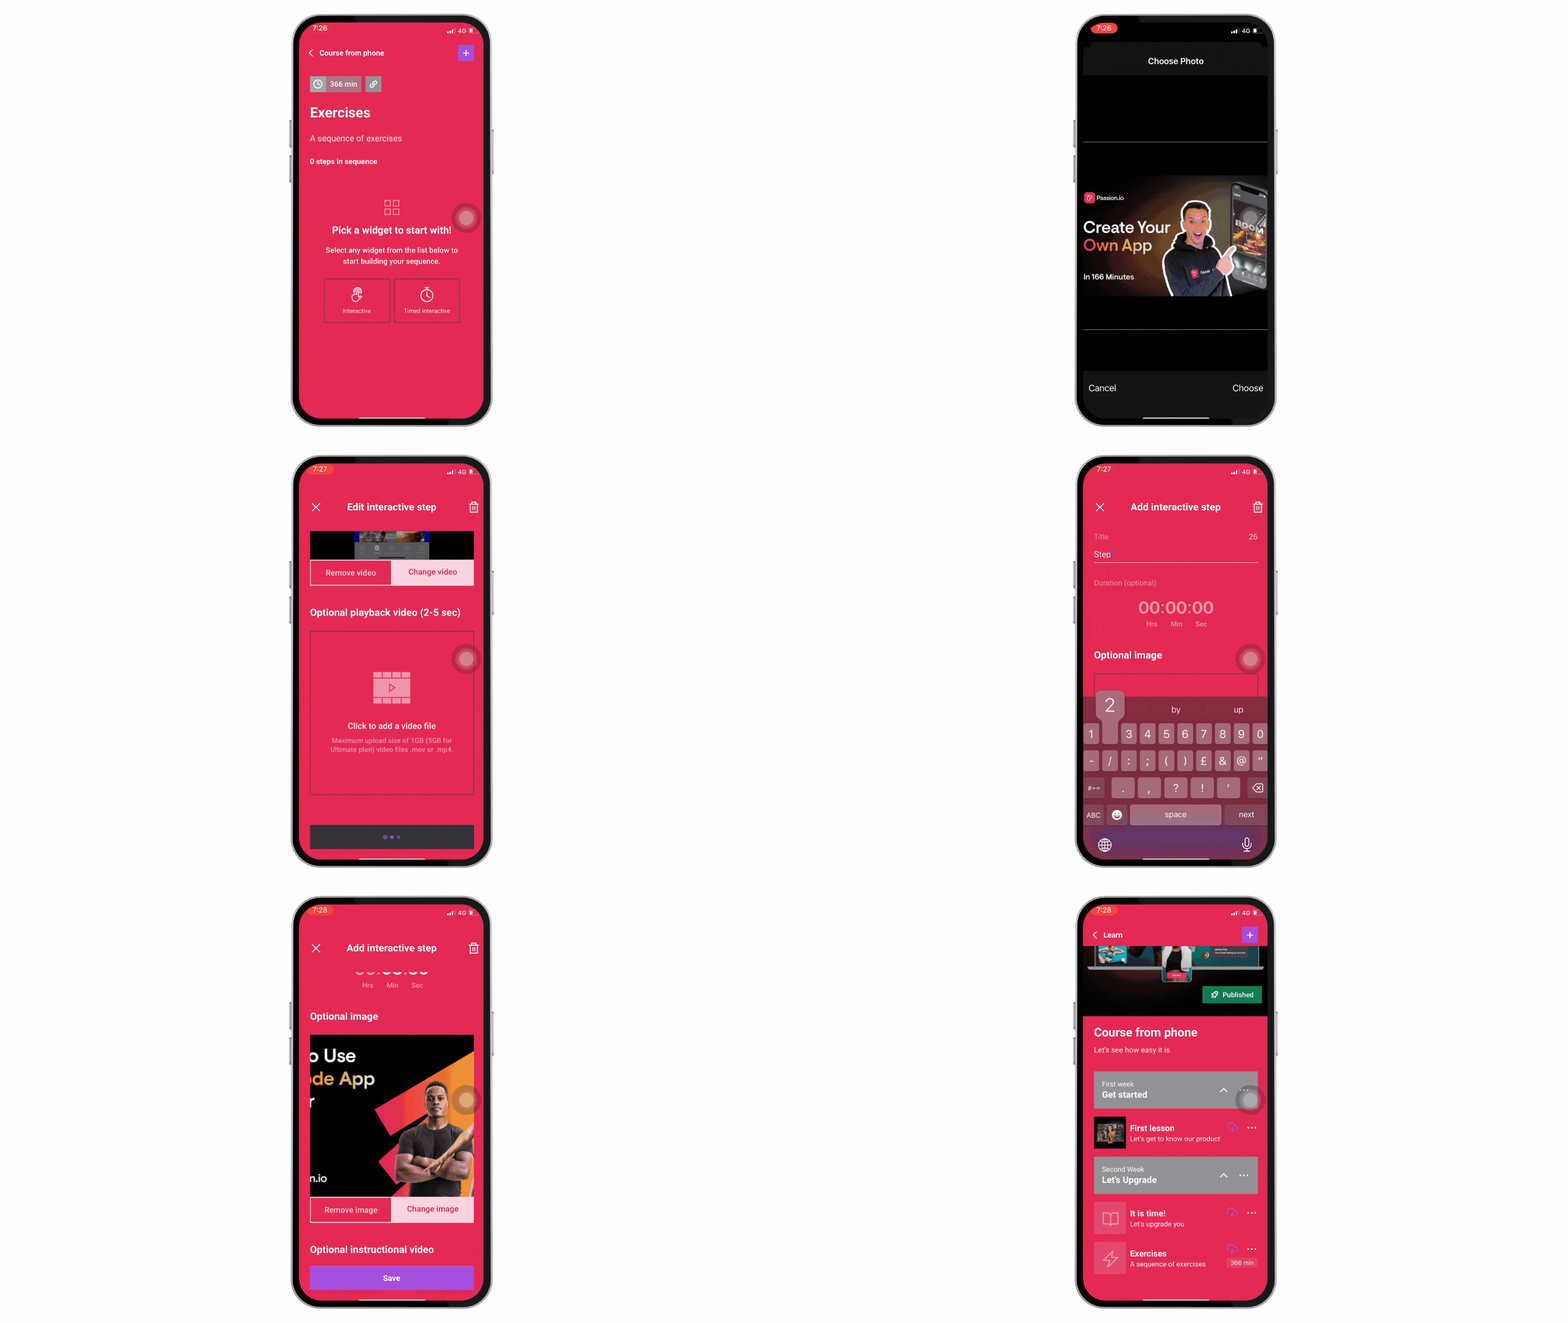
- Select either Interactive or Timed Interactive Sequence from the widgets.
- Tap on the step you just added.
- Add a title to the new sequence.
- Enter a duration for this step in your lesson "Optional".
- Add an image to your sequence "Optional".
- The photo dimensions will match the dimensions of the original image on your device, you can zoom in or out to make it fit as you please.
- The photo size should be less than 5 MB.
- Add an instructional video to your sequence "Optional".
- The video dimensions and aspect ratio will match the original video on your device if the video's dimensions are bigger than your device it will fit within the video upload dialogue.
- Maximum upload size is 1 GB "5 GB for Ultimate Plan and above".
- Add a playback video to loop as your audience is watching the sequence "Optional".
- The video dimensions and aspect ratio will match the original video on your device if the video's dimensions are bigger than your device it will fit within the video upload dialogue.
- Maximum upload size is 1 GB "5 GB for Ultimate Plan and above".
- Click Save.
5. How to use the lesson widgets?
You get to choose from a variety of features to offer to your audience.
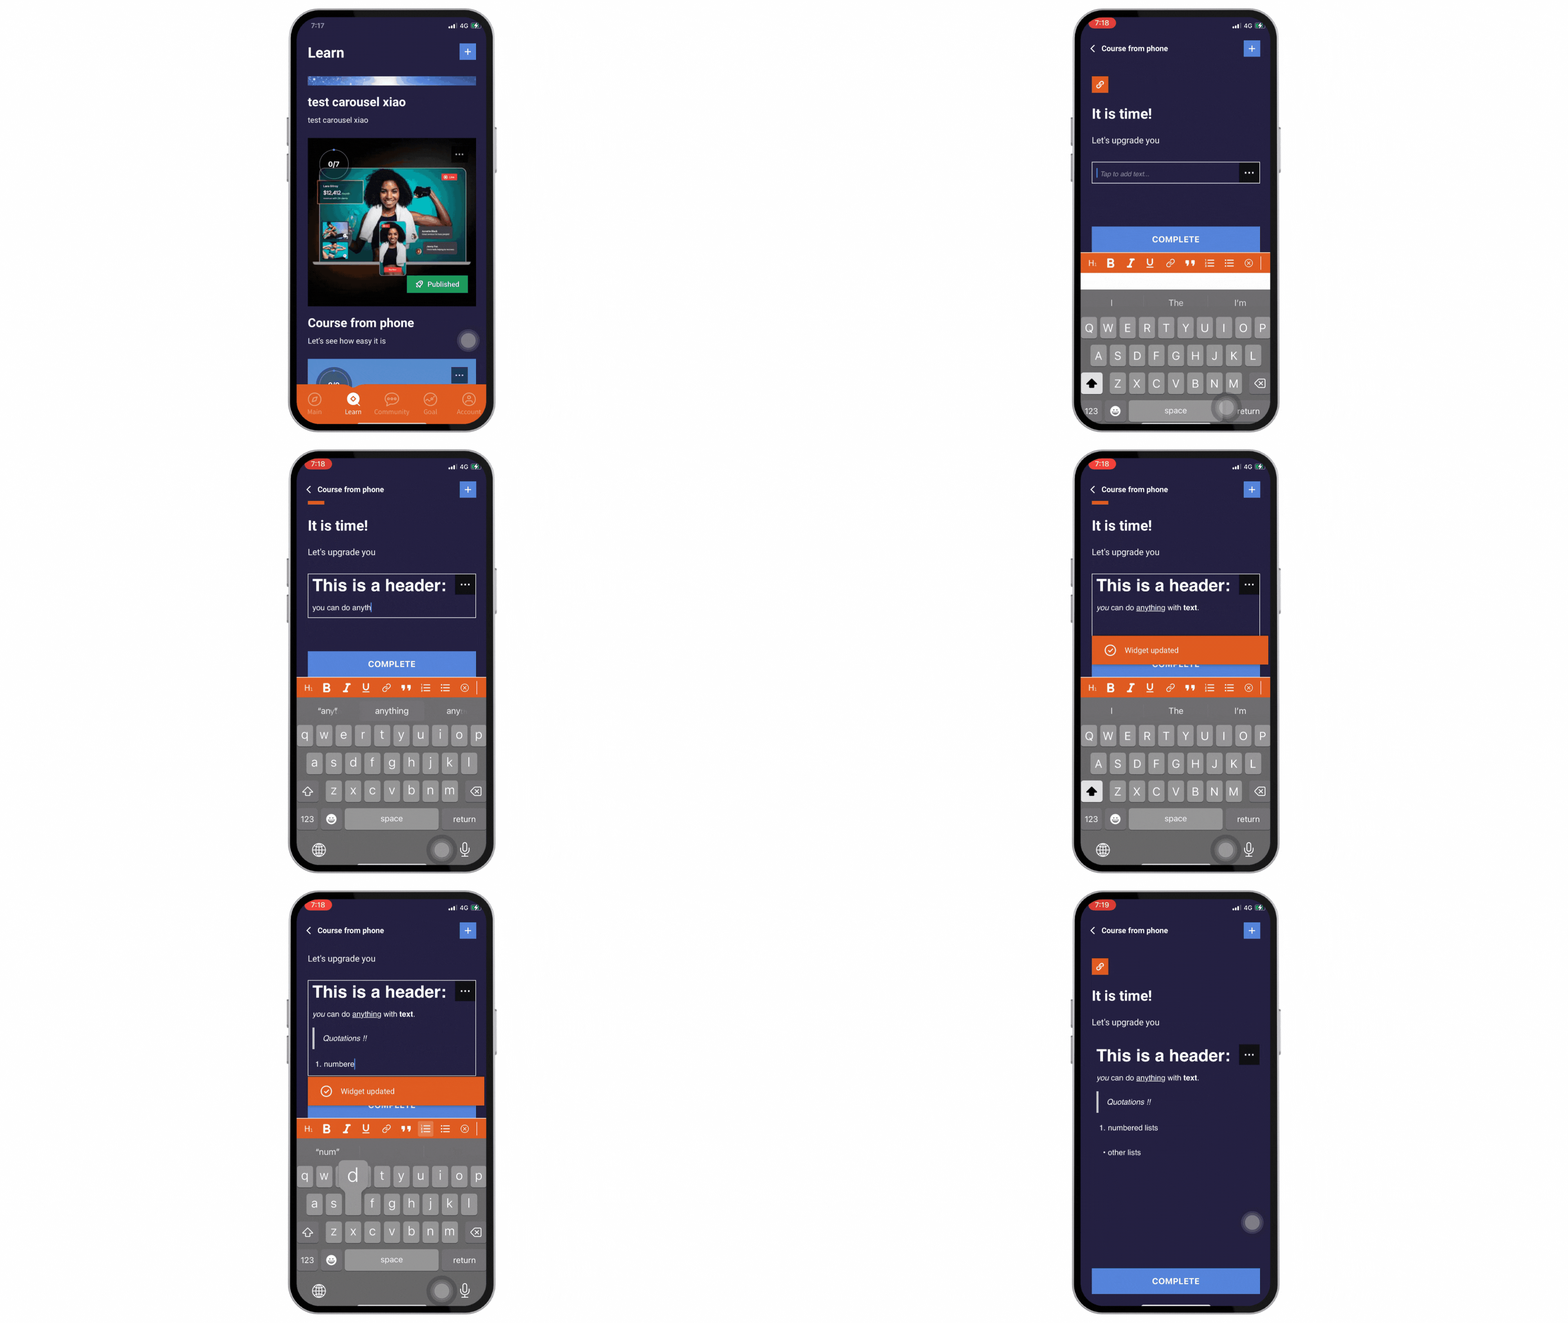
Once you open an empty lesson you get to choose the widget you desire, from the + Sign you get to add more widgets as you build your lesson.
-
Text
-
Image
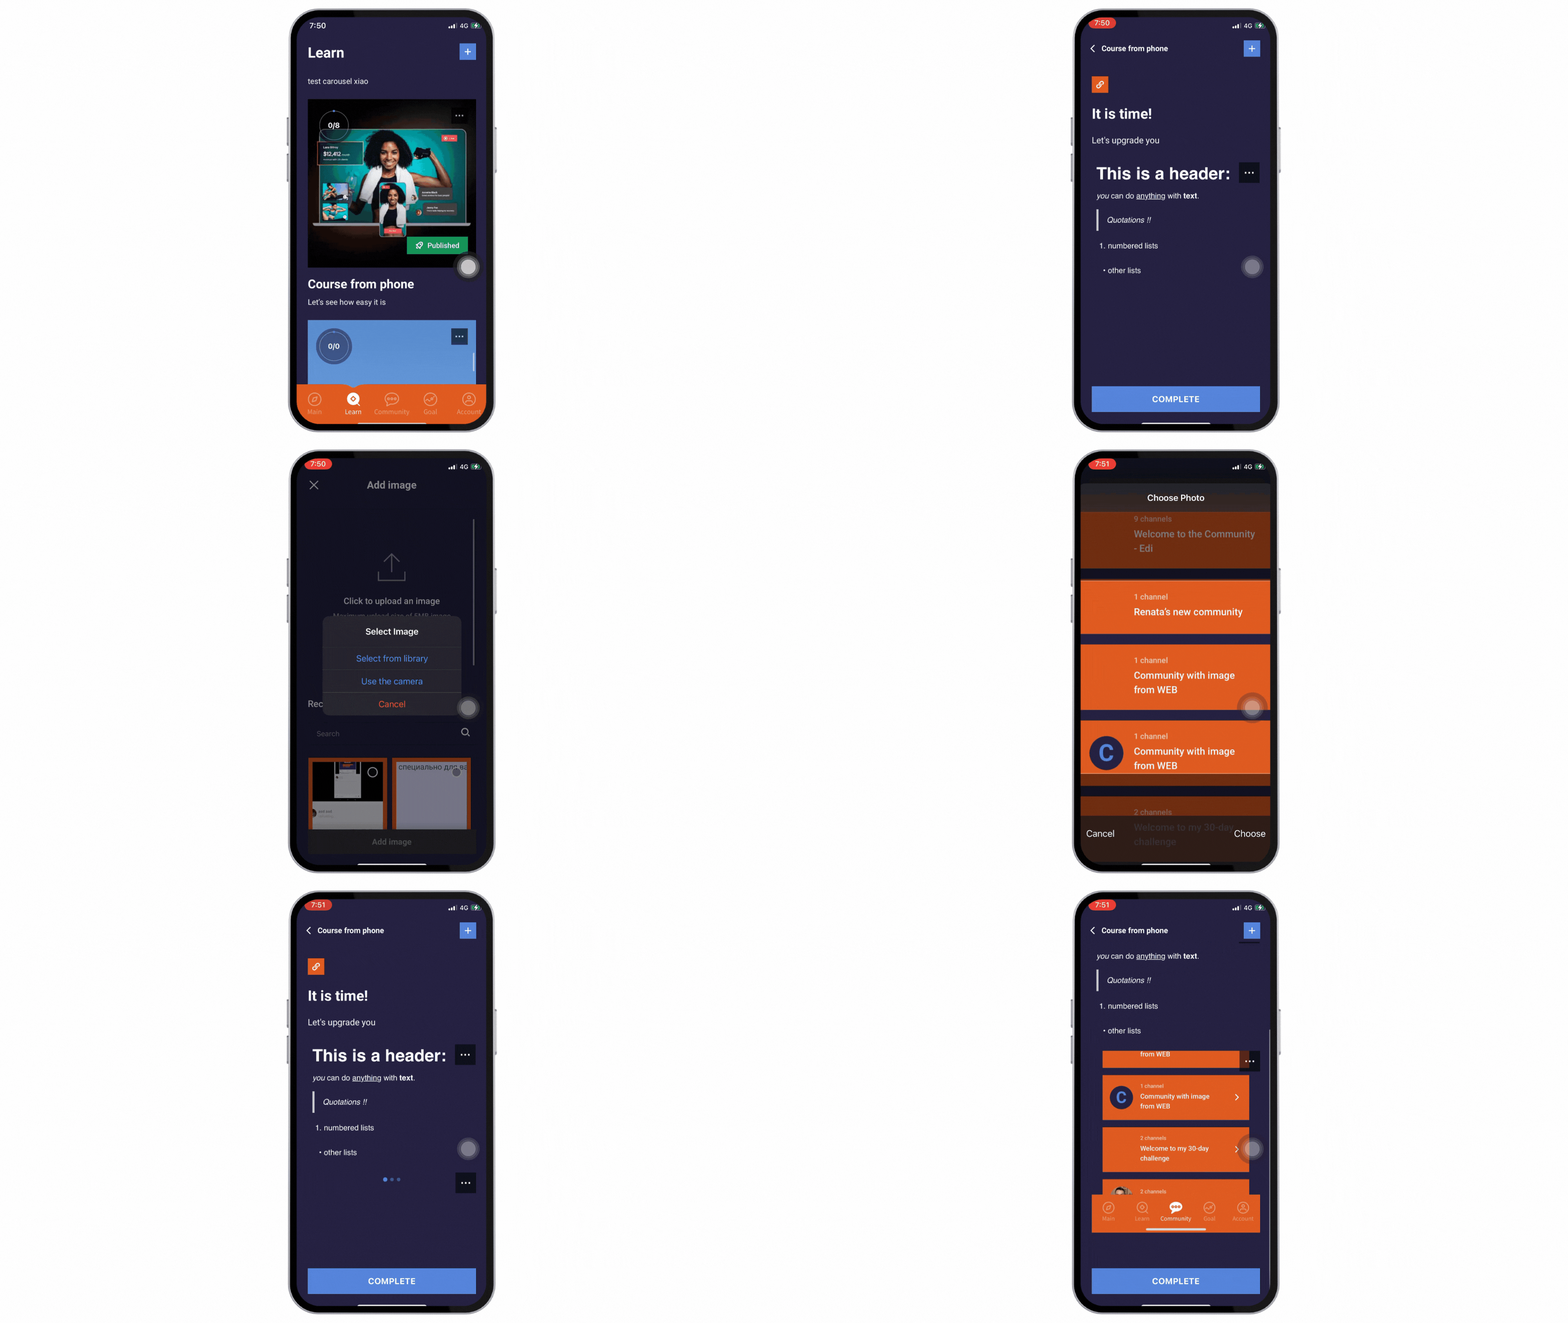
The image dimensions will always match the dimensions of the original image on your device, if it is a screenshot taken from a phone it will have a horizontal orientation. You can zoom in or out to make it fit as you please.
- The image size should be less than 5 MB.
- The image file should be .jpg / .jpeg / .png
-
Video
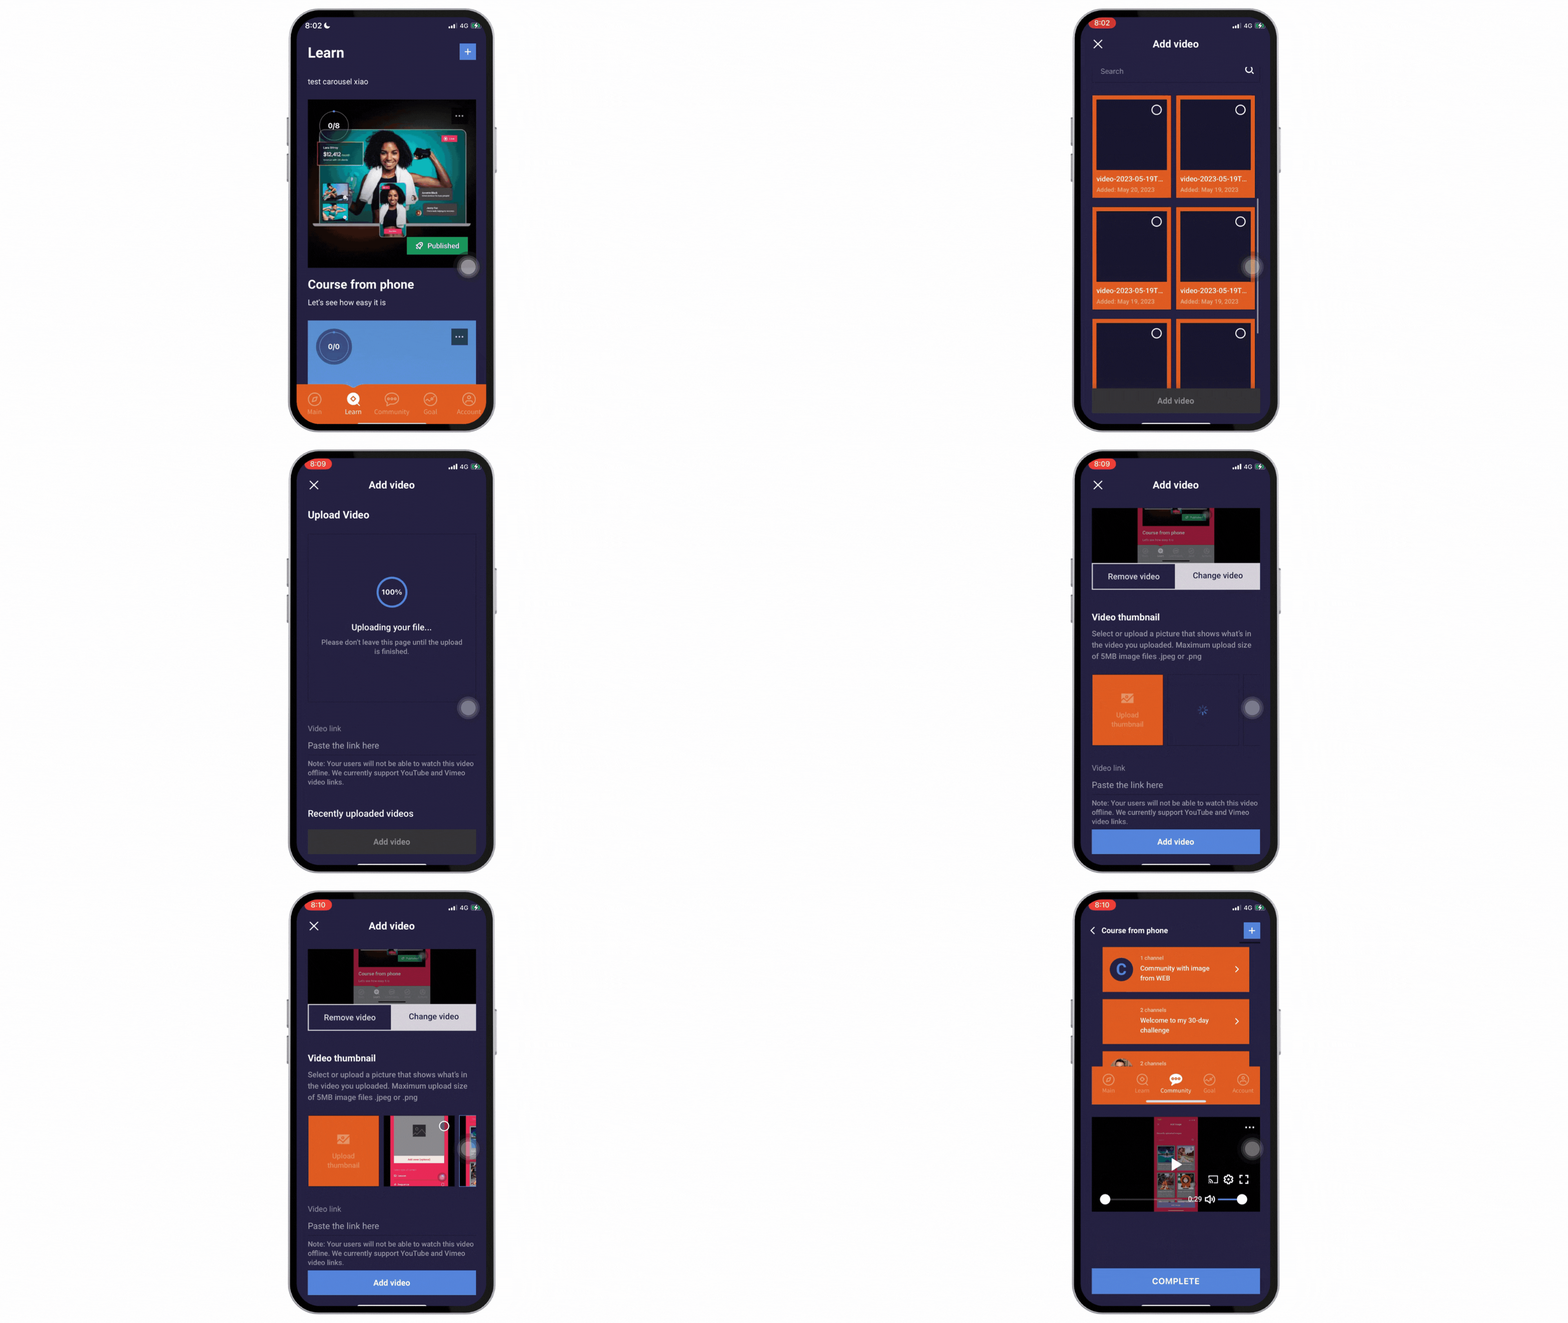
The video dimensions and aspect ratio will match the original video on your device, if the video was originally recorded from a phone it will have a horizontal orientation. If the video's dimensions are bigger than your device it will fit within the video upload dialogue.
- Maximum upload size is 1 GB "5 GB for Ultimate Plan and above".
- Video files should be .mov / .mp4
You can also upload a specific image to be the video's thumbnail rather than the system forcefully choosing the video's first frame as a thumbnail.
-
Audio file
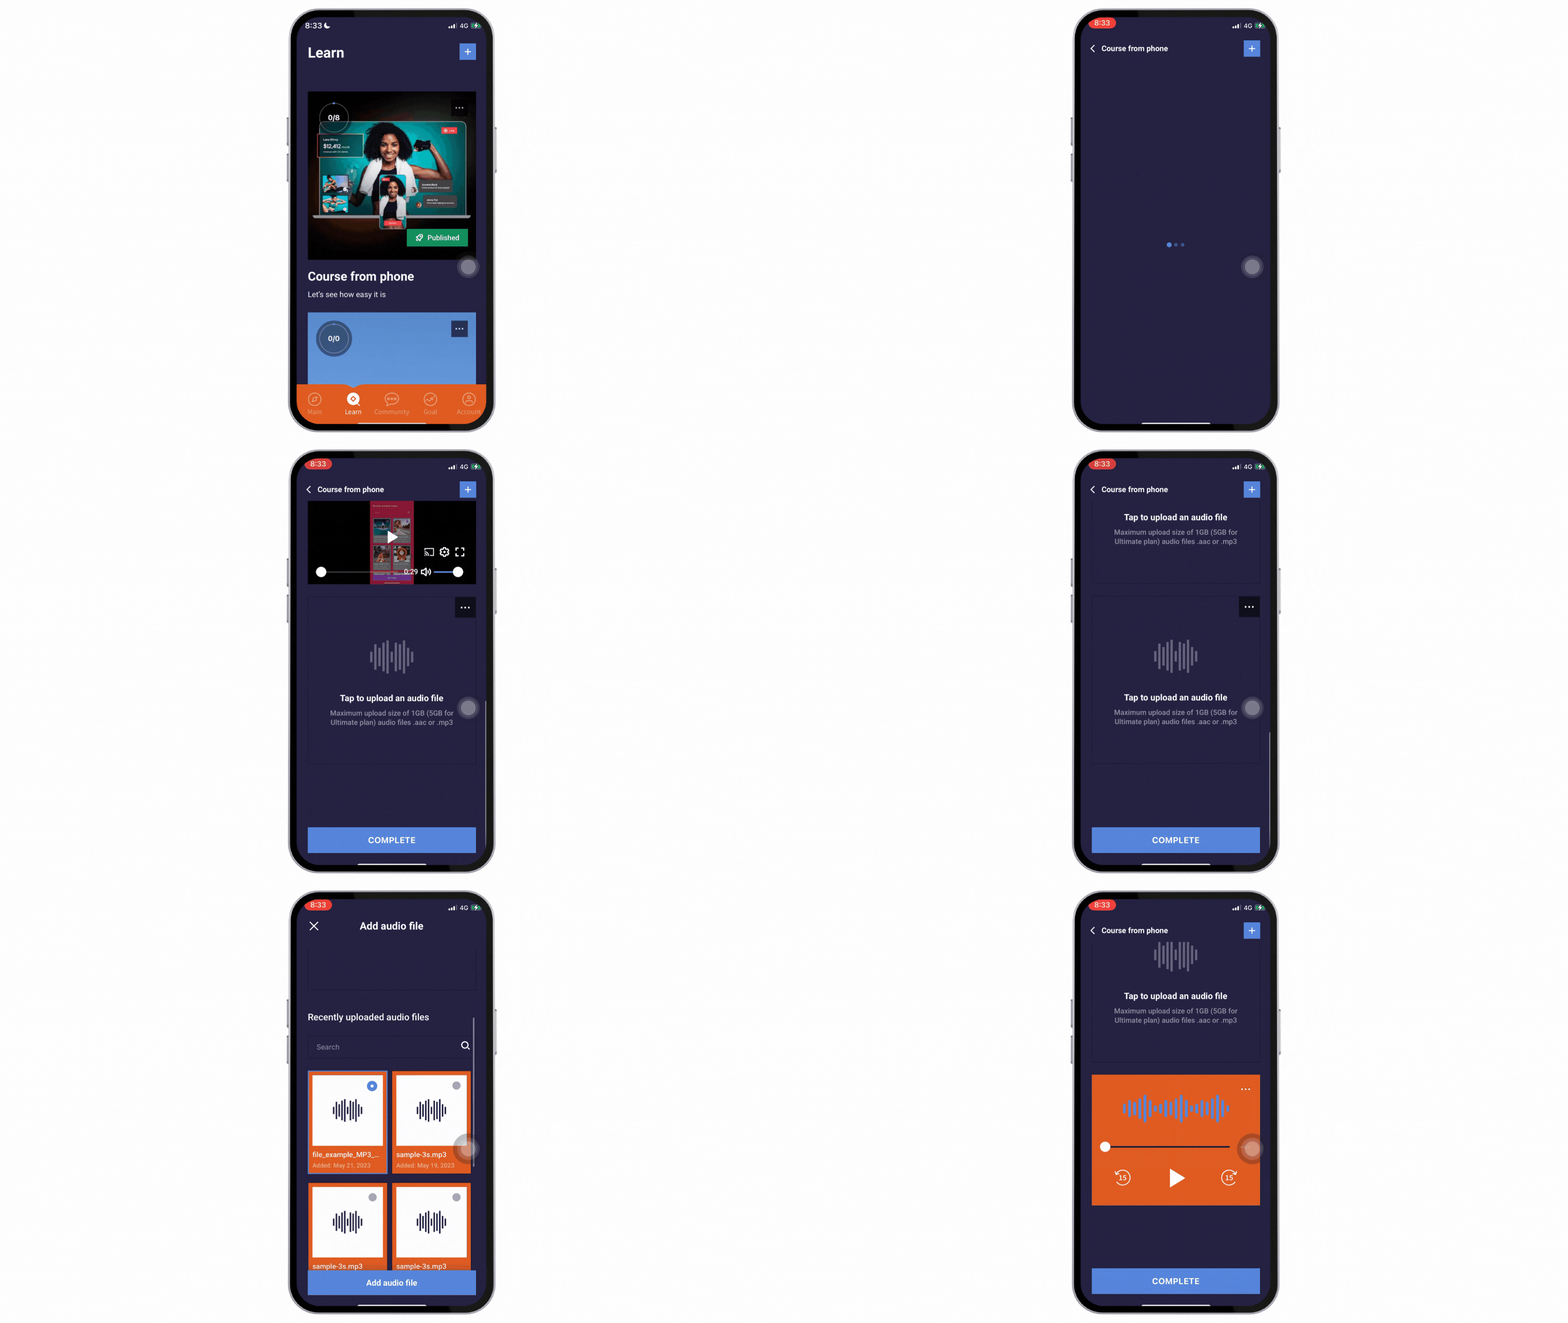
- Maximum upload size is 1 GB (5 GB for the ultimate plan and above).
- Accepted audio files are .aac / .mp3
-
File
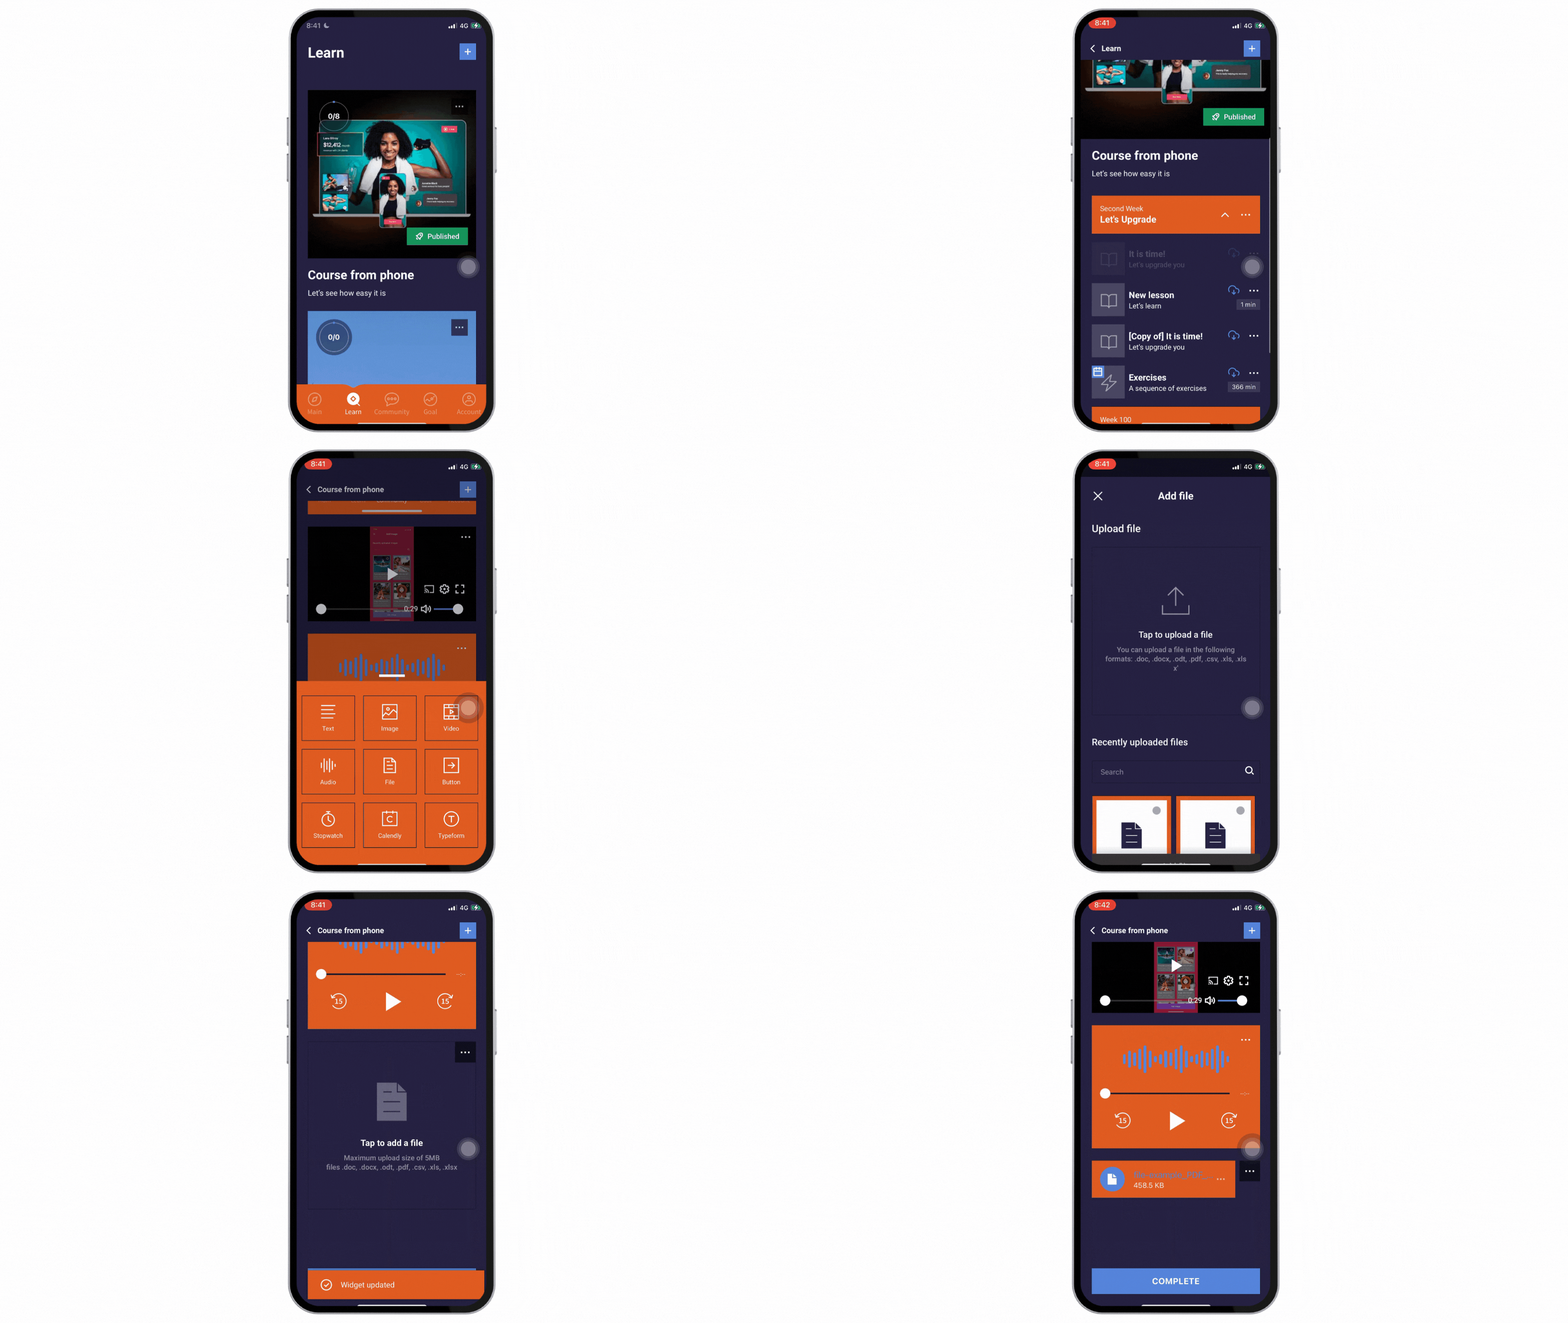
- Maximum upload size is 5 MB.
- Accepted file types are .doc / .docs / .odt / .pdf / .csv / .xls / .xlsx
- Button or Call To Action
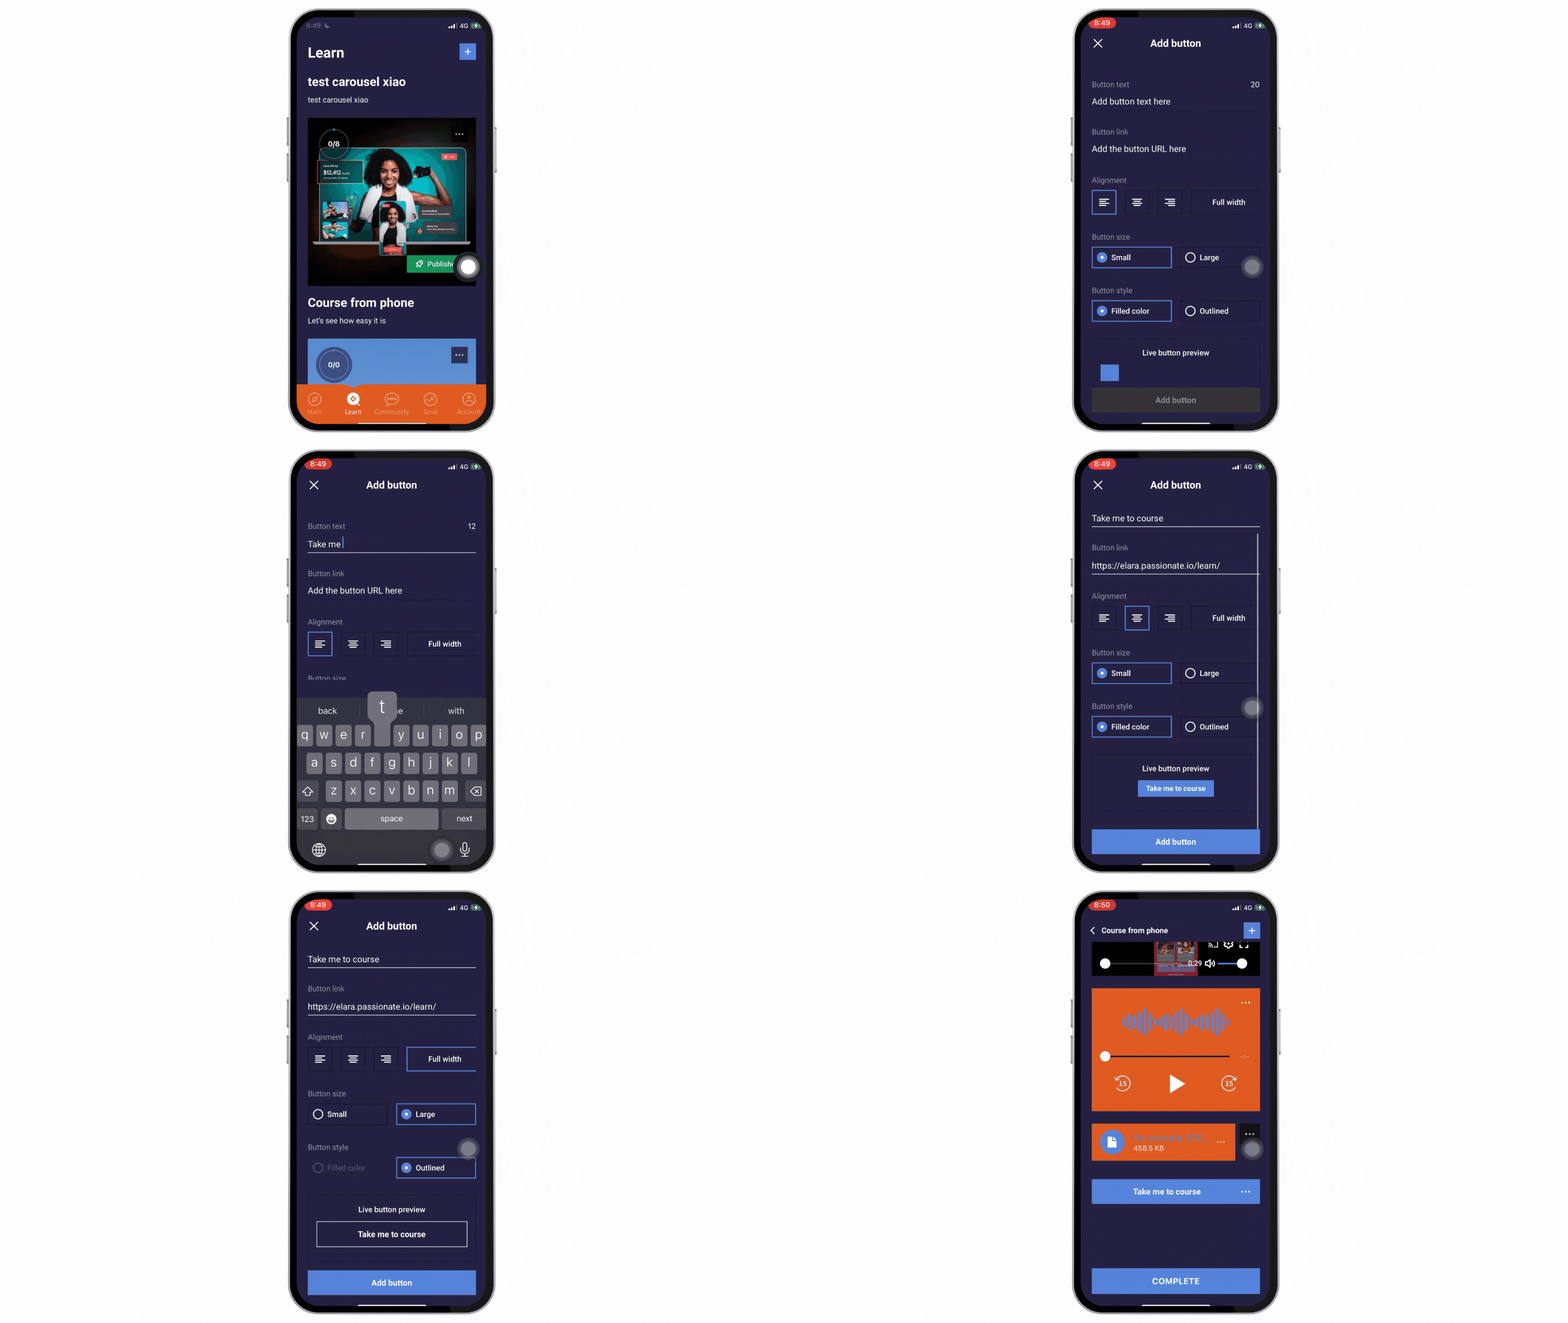
- Add the text you would like to have on the button.
- "Optional" add a URL to redirect your audience when they click on the button.
- Choose the button's alignment, you can choose Full Width so the button would take the whole lesson's width.
- Choose the size of the button.
- Choose the button's style whether to be color-filled or outlined.
- Once you are happy with the button's display click Add button.
Now that you mastered adding content from your phone, managing it is as easy. In this section, you will learn how to perform the below tasks:
- Clone your courses, lessons, and sequences.
- Rearrange your lessons, sequences, and widgets. You can also rearrange your courses.
- Remove any kind of content.
- Set a lesson/sequence to be free.
- Use drip content for lessons/sequences.
You will find 3 dots to tap on.
From the pop-up menu, you can choose the action to apply to your content.
- For courses, you would find them at the top right corner of the course.
- For lessons & sequences, you will find them at the far right of each lesson/sequence.
- For widgets, you will find them at the far right of each widget.
You can also activate the pop-up menu by simply long-pressing on the content you wish to take action on.
- Clone content:
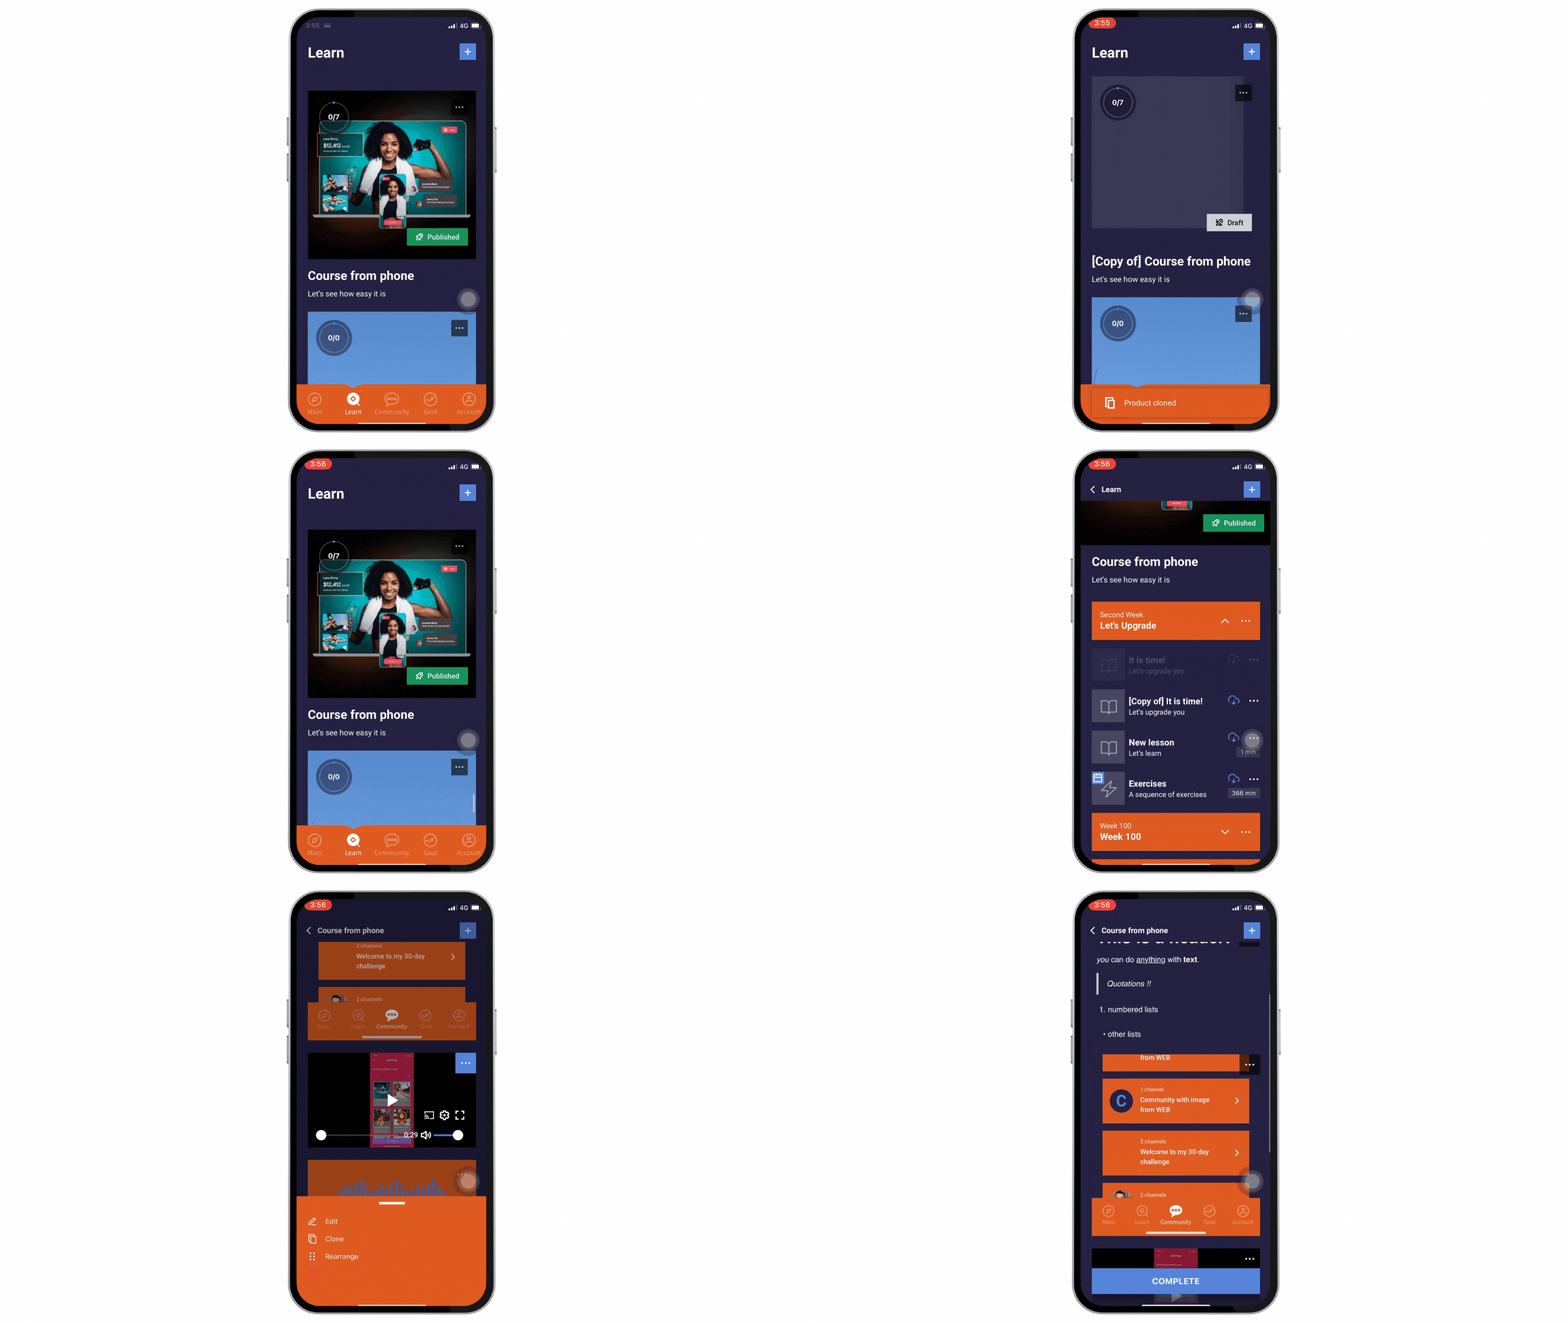
- Rearrange your lessons, sequences, and widgets:
You can also rearrange your course by dragging the lesson/sequence under a different section.
Combining Clone and Rearrange, you now have full control over your content.
- Tap the 3 dots or long press on the content.
- Choose Rearrange.
- Tap and hold the content you would like to move.
- Drag it to the new position you desire.
- Tap Save from the top right corner of the screen.
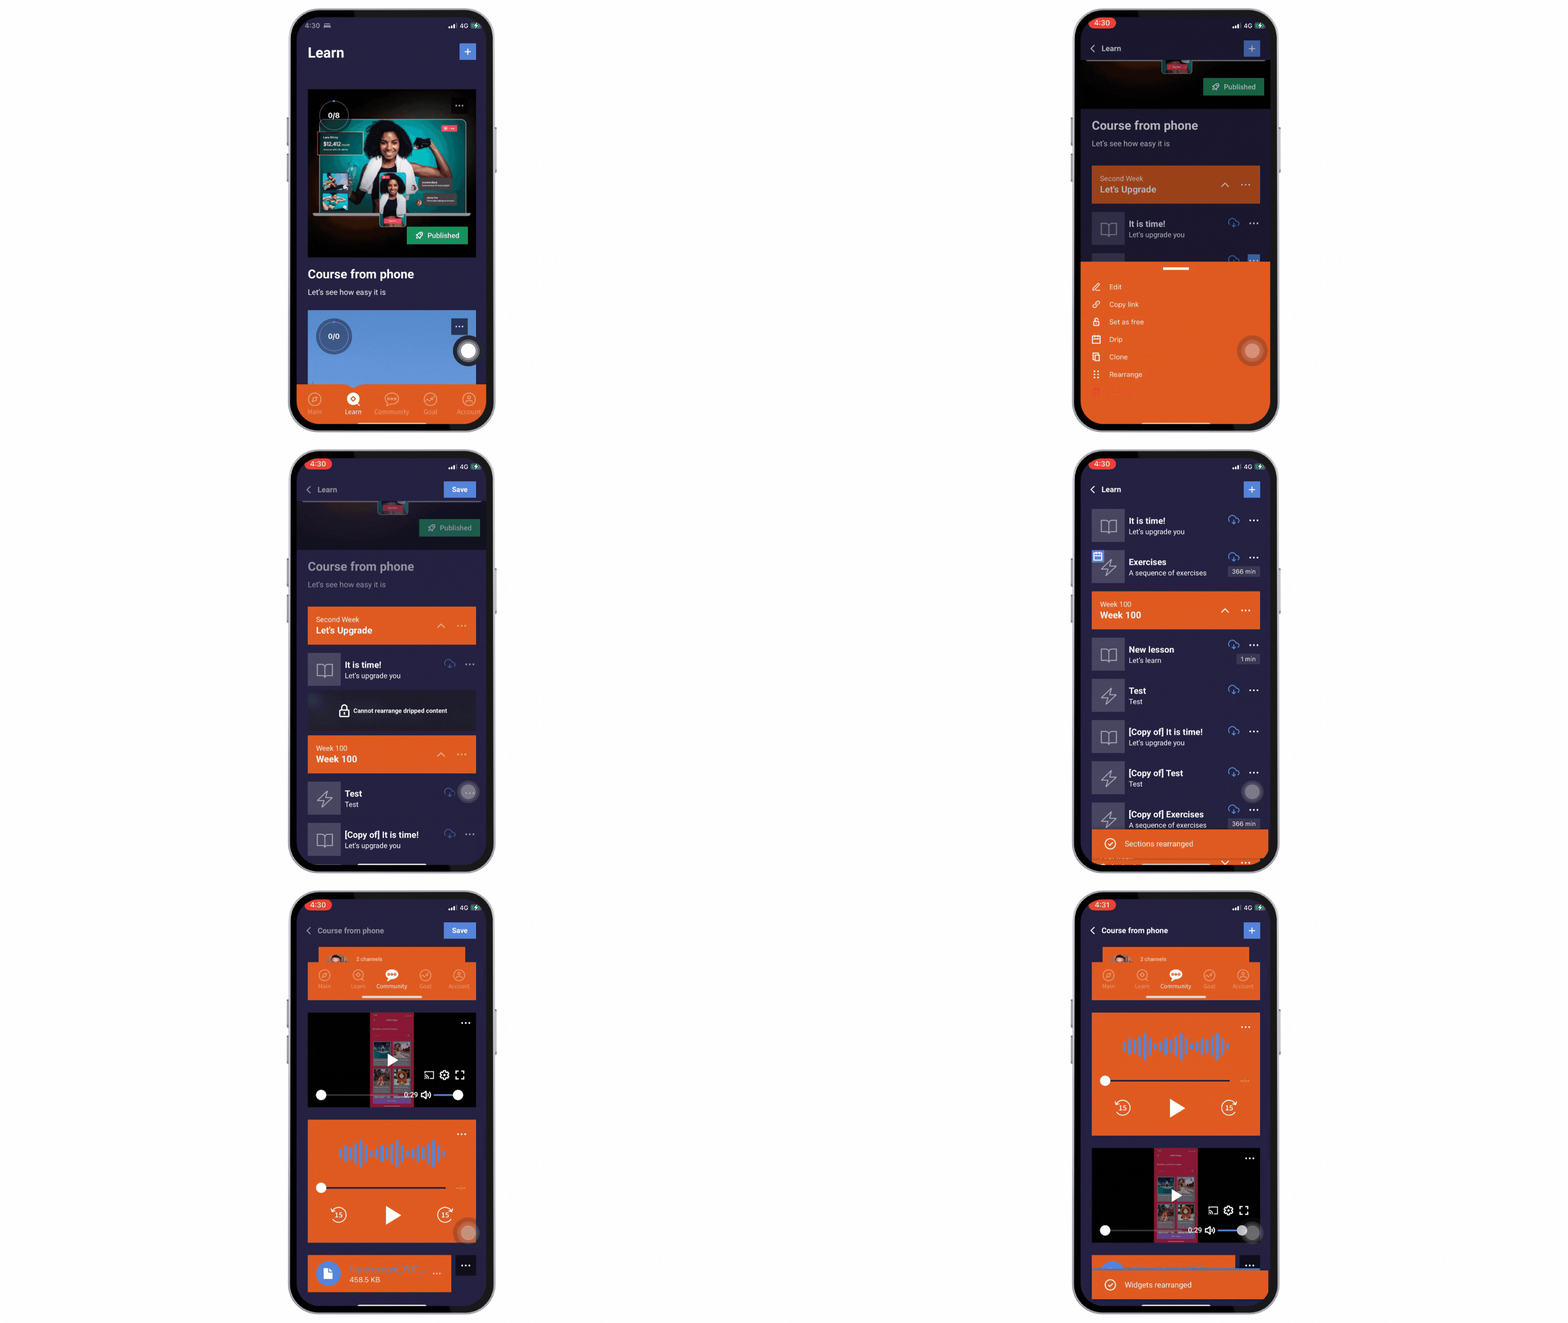
- Free content and drip content:
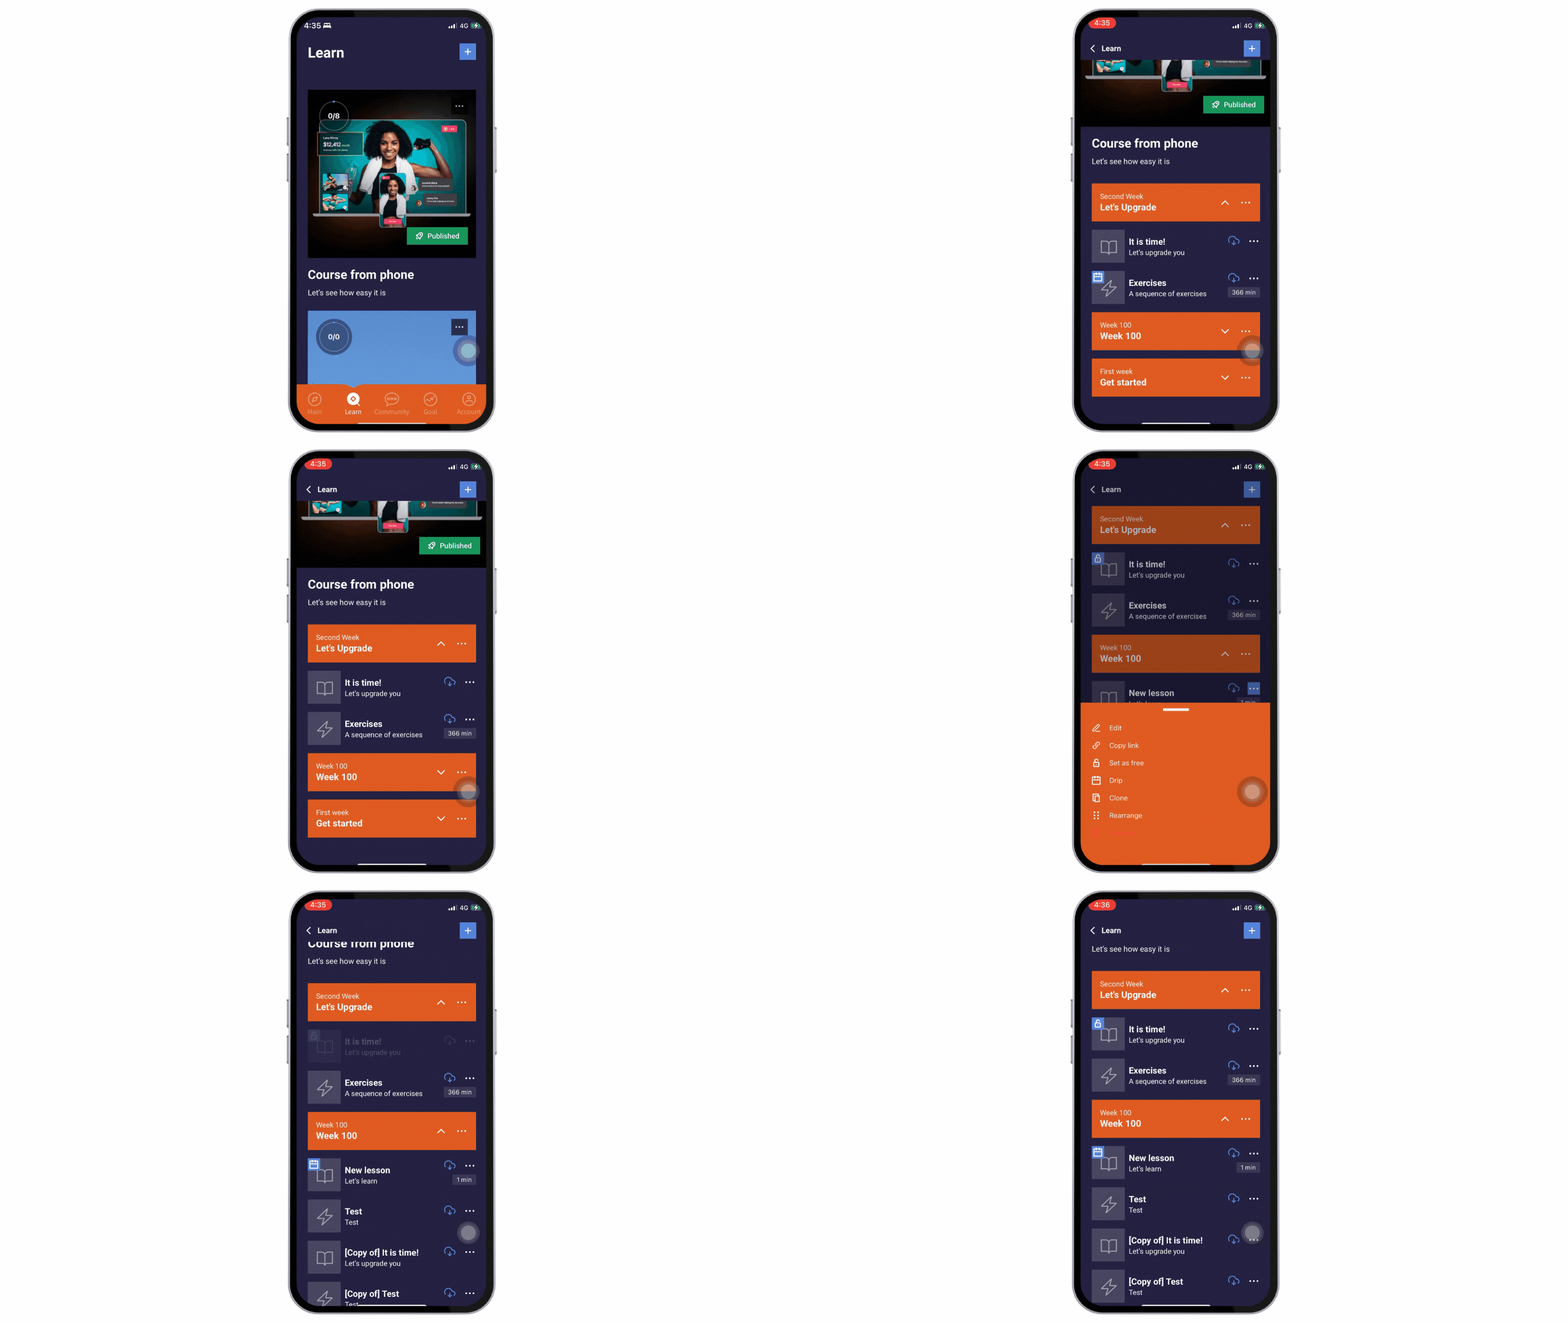
Setting lessons as free is very easy, just long press or tap the 3 dots and you will get the option to Set as free.
To remove the free lesson setting, long press or tap the 3 dots of the free content and tap on Set as locked.
To use the Drip Content feature, long press or tap the 3 dots and you will get the option to Drip. Choose how many days after your audience's access to view the dripped content.
To remove or edit the number of days for the dripped content, long press or tap the 3 dots and tap on Edit drip. Put the number of days as 0 to remove the drip content option.
Why can't I see these features on my phone? I am logged in with the email I used to subscribe to Passion.io
If you are unable to use the features mentioned in this article on your iOS and Android apps, then you probably need update your app.
Please make sure to follow this article to update your iOS App.
Please make sure to follow this article to update your Google App.
How do I unpublish a course?
- Long press or tap the 3 dots on the course.
- Choose Edit from the pop-up menu.
- Remove all the pricing plans from the Who has access field.
A course that is not linked to any active pricing plan is automatically set as a Draft.
Can I rearrange or move a dripped lesson from its place?
You cannot move a dripped lesson/sequence, you should disable the drip content feature to move it to a new position or section.

